As AWOL asked about lipo bms I used, I thought I would do a how to though it has been said and done before on here.
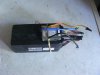
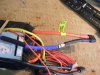
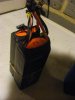
20a continuous output bms I used with switch wiring and balance function.
Barring the switch bms is much the same as the 15a version so should handle a 50 - 60a peak/spike output.
https://www.aliexpress.com/store/product/36V-li-ion-battery-BMS-36V-20A-lithium-ion-batteries-BMS-With-balanced-function-and-ON/623665_32830759079.html?spm=2114.12010612.8148356.20.21857abeDNtiCE
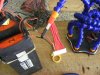
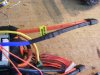
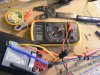
Before 6+4s lipo.
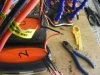
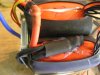
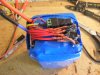
After.
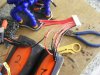
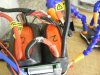
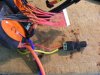
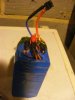
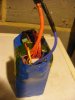 Sense wire jst and wires purposely left exposed in case of need to check cells with dvm.
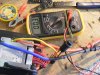
1. Hot melt two cell packs together and measure both voltages.
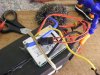
2. Place bms and hot glue in position.
3. Cut and solder/insulate sense wires one at a time (leave bms sense jst unconnected ), determine cell #1 b- (0v) with dvm should be first black thin wire on pack where thick black comes from , next is #2 (3.7v), #3 (7.4v) until you reach the first thin red. Final thin red on pack should be b10+.
6. Make discharge connection. Cut P- discharge wire from bms to length and solder/insulate to wire connector with short thick black and long red still connected.
7. Cut other thick long black (B-) still in connector and solder/ insulate wire end to BMS B- wire.
8. For charge lead you will carefully need to cut all way a long top of cell pack with thick long red wire and solder your red lead to top or side of the thick red soldered one. Once done cover with Kapton tape and reseal. Solder other end to charge connector + and solder in C- bms wire. I used the green /black simple connector off ebay which is marked + & -. If using a solder type connector central inner end is +, you will need to do a continuation check to find correct + solder pin.
9. For 2 pin switch just connect one on each doesn't matter which way as both are v+.
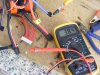
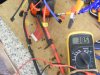
10. Fit sense jst to bms turn on switch and measure voltage should be same value as you measured in #1 & #4.
11. Connect charger switch battery on and check voltage input.
12. If all is good heat shrink wrap together and then hot glue charge connector and switch to top.
13, Fuse not used as I use inline fuse on bike discharge v- wiring.
20a continuous output bms I used with switch wiring and balance function.
Barring the switch bms is much the same as the 15a version so should handle a 50 - 60a peak/spike output.
https://www.aliexpress.com/store/product/36V-li-ion-battery-BMS-36V-20A-lithium-ion-batteries-BMS-With-balanced-function-and-ON/623665_32830759079.html?spm=2114.12010612.8148356.20.21857abeDNtiCE
Before 6+4s lipo.
After.
Sense wire jst and wires purposely left exposed in case of need to check cells with dvm.1. Hot melt two cell packs together and measure both voltages.
2. Place bms and hot glue in position.
3. Cut and solder/insulate sense wires one at a time (leave bms sense jst unconnected ), determine cell #1 b- (0v) with dvm should be first black thin wire on pack where thick black comes from , next is #2 (3.7v), #3 (7.4v) until you reach the first thin red. Final thin red on pack should be b10+.
4. When you get to first thin red it has to be connected to the first thin black wire of the next jst (which will be 0v) these two soldered together is the next sense wire connection, once done you should have equal amount of thin sense wires left to connect.
5. Make series connection. Cut inner /middle thick black wire and inner/middle thick red, bare,solder and insulate joint. dvm probes on two remaining thick wires should add up to measurement in #16. Make discharge connection. Cut P- discharge wire from bms to length and solder/insulate to wire connector with short thick black and long red still connected.
7. Cut other thick long black (B-) still in connector and solder/ insulate wire end to BMS B- wire.
8. For charge lead you will carefully need to cut all way a long top of cell pack with thick long red wire and solder your red lead to top or side of the thick red soldered one. Once done cover with Kapton tape and reseal. Solder other end to charge connector + and solder in C- bms wire. I used the green /black simple connector off ebay which is marked + & -. If using a solder type connector central inner end is +, you will need to do a continuation check to find correct + solder pin.
9. For 2 pin switch just connect one on each doesn't matter which way as both are v+.
10. Fit sense jst to bms turn on switch and measure voltage should be same value as you measured in #1 & #4.
11. Connect charger switch battery on and check voltage input.
12. If all is good heat shrink wrap together and then hot glue charge connector and switch to top.
13, Fuse not used as I use inline fuse on bike discharge v- wiring.
Last edited: