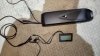
When things go wrong, you have to measure with instruments to find out what's wrong. That isn't easy when you have the moulded connectors, which Is why I prefer the normal connectors and aluminium box connectors, like I said earlier in the thread. I have matching connectors from scrap systems, so its easy for me to measure what's on the wires. before I had those, I used to use sewing needles in the holes.
My guess is that you don't have battery voltage in the LCDs connector for whatever reason. You can easily test the battery when it's off its receiver, so that's the first thing to check, then you need to get a medium sized sewing needle and stick it in one of the holes in the LCD connector. Set your meter to continuity and put one probe on the controller's negative battery connector, then try each hole to see which one is the ground. Repeat to find the battery voltage hole with your other probe on the positive battery terminal. Now you know those two pins, so connect the battery and switch it on, then use two needles to check what's on those two pins. The needles need to be fat enough to make contact in the holes.

")