Advice needed - Controller kit, Panda ECO from Pandaebikes

Andrew Wingrove

Pedelecer
Jul 8, 2017
87
3
York
www.simplicityin.training
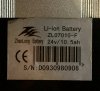
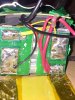
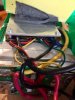
I have just replaced the complete electrics on my ebike with only the 24V 250 watt Currie motor and the battery being from the original bike. The new components 24V 250W Electric Bike eBike Controller kit, Panda ECO from Pandaebikes. https://www.pandaebikes.com/shop/control-systems/24v-250w-electric-bike-ebike-controller-kit-panda-eco/

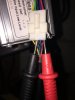
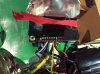
After connecting it all up I have an issue with the LED 880 control panel. When I press the On/off button all 7 red lights along the bottom of the display and they then fade away quickly and then nothing at all. Pressing again results in nothing lighting up. Disconnecting the brakes, throttle and pass makes no difference. I have tried with another identical LED 880 control panel that is brand new and I get the same problem,

I have contacted Pandaebikes, but wont hear anything till Monday, so though I would try here.
 
D

Deleted member 4366

Guest
That's what happens when you try and switch on when your battery's switched off.
 
D

Deleted member 4366

Guest
Can you check your battery voltage where it's connected to the controller before and after pressing the "on" button on the panel? I expect that one or both readings will be anomalous.
 

Andrew Wingrove

Pedelecer
Jul 8, 2017
87
3
York
www.simplicityin.training
So checking battery voltage on the cable leading from the controller box to the LED unit. When I first plugged my leads into the cable connector I had a reading of 4.7 volts that slowly crept up to 24.7 volts over 6 or 7 minutes.

I have uploaded a video showing the results of what you asked me to do onto YouTube.

IMG_0231.JPG
 
D

Deleted member 4366

Guest
Your problem is in the battery. The BMS has switched off the power for whatever reason. The voltage you're measuring is just leakage. It climbs slowly because it's charging up a capacitor, and it's the discharge from the capacitor that provides the power to blink the LEds.
 
D

Deleted member 4366

Guest
Take the the bottom and top off. Turn the bottom sideways-on and use it to push the cell-pack up a couple of inches, peel off any tape and heatshrink until you get to the BMS's multi-pin connector. pull it out and measure the voltage on each pin. Put your red probe on the positive terminal on the bottom of the battery and use your black probe to check each pin. Write down the results. There should be 10 results in steps of about 4v. if you only get 9 results, use the point where the black power wire from the cell-pack joins to the BMS to get the last one.
 

Andrew Wingrove

Pedelecer
Jul 8, 2017
87
3
York
www.simplicityin.training
Okay! So I made my way into the battery casing and it seems to be very well made inside. The shrink wrap around the battery casing was very hard to get into. I initially took some readings on what I could first see.


Top left green wire was 10.34 volts with a little fluctuation between 10.2 and 10.5V Top right with small yellow wire was 6.6 Volts and the black wire bottom left was 3.15. Bottom right with the three red wires gave me no reading at all.ba2.jpg


I then realised that the BMS must be hidden further back inside and I cut back the green shrink wrap and then bent the yellow plastic sheet back until I could see the thin unit with wires. This must be the BMS, but the wires going inside its case seem to be surrounded by a resin making it impossible to take a reading. it is also glued down, and the screws holding the two plates together seem to have no heads on them.

Should I keep prising away the yellow plastic sheet to get this BMS free from the battery?
ba3.jpg
 
D

Deleted member 4366

Guest
Basically, you need to measure B1 to B7. put your red probe on B7+, then probe with your black from B6+ to B1+, and finally B1- to get seven readings. I said 10 before, but that was wrong for a 24v battery. Note that B1+ is the same as B2-, B2+ the same as B3-, etc.

If you need to re-insulate everything when you've finished, you can use gaffa tape.
 
D

Deleted member 4366

Guest
That makes more sense. All cells are at 4.1v except one, which is at 1.2v. if any cell goes below something like 2.8v, the BMS will switch off.

Something is still confusing me though. It should go like this:
B1-, B- Black power wire connected
B1+ joined to B2- (4v approx)
B2+ joined to B3- (8v approx)
B3+ joined to B4- (12v approx)
B5+ joined to B5- (16v approx)
B5+ joined to B6- (20v approx)
B6+ joined to B7- (24v approx)
B7+, B+ Red power wire connected. (28v approx)

It looks like your red power wire is joined to B1+, which doesn't make sense.

Can you check your measurements again bearing in mind the above logic, just to make sure.

I think I've figured it. They have all the numbers reversed, so B1+ = B7+, B1- = B7-, B2+ = B6+, etc.
 
Last edited by a moderator: