Wheel Building - Tongxin in Brompton wheel

jerrysimon

Esteemed Pedelecer
Aug 27, 2009
3,292
112
Cambridge, UK
Thanks James,

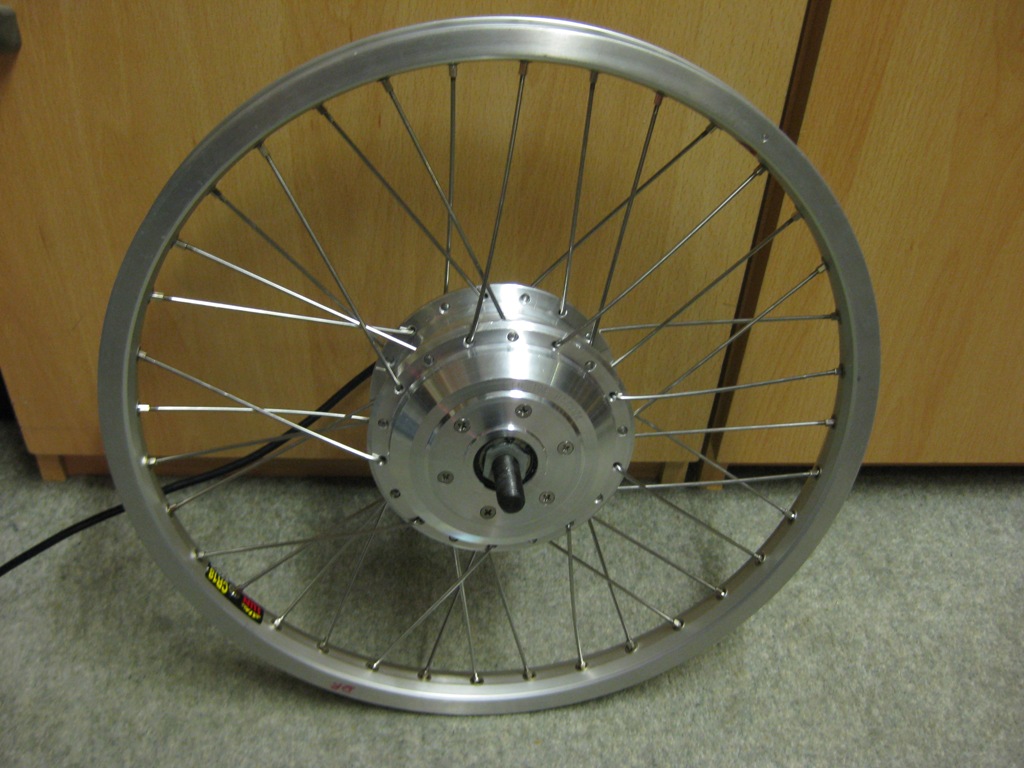
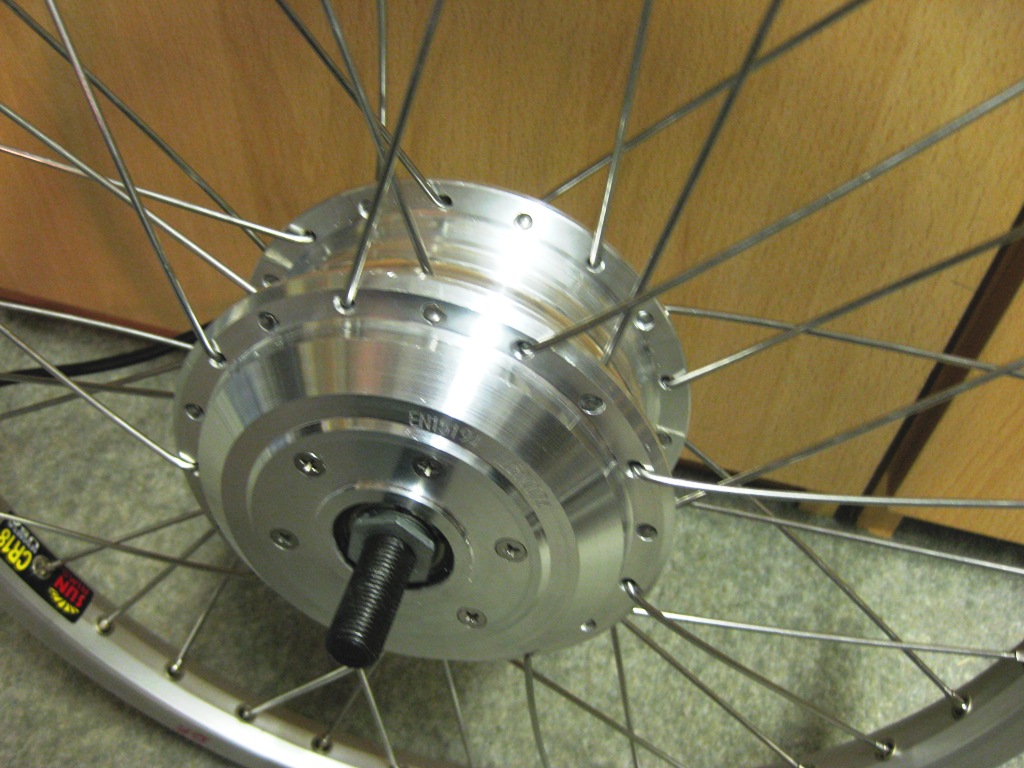
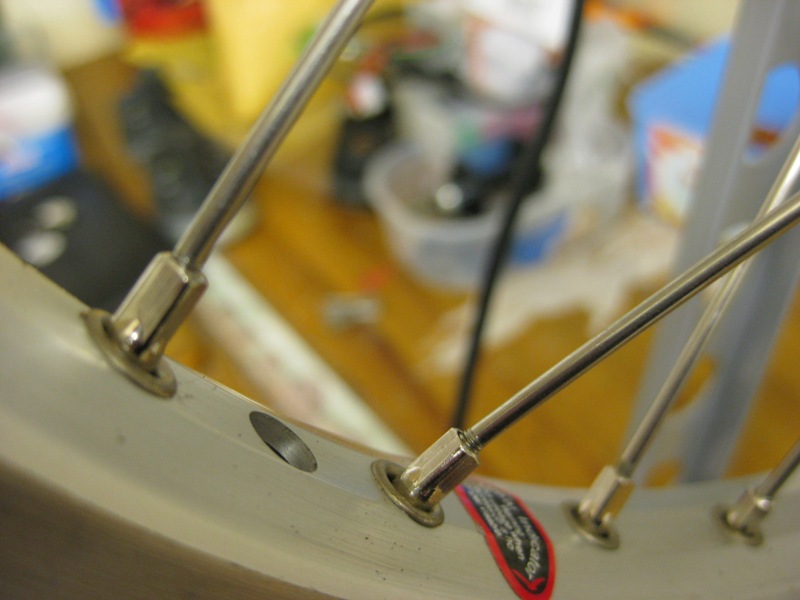
I haven't got to the "squeeze" stress relieving bit yet. I paid for and downloaded Roger Musson's techniques book and followed it to the letter. The mistake I think was that I assumed that his use of the term "freewheel" meant the gear side of the wheel (right side)which is probably why now my trailing spokes are on the outside of the hub flange. Also his example build is based on a rear wheel not a front wheel.

If I had followed the Sheldon Brown's web site page on wheel building I would have got it the right way round. Sadly I see Sheldon died recently but what a great web site and wealth of knowledge he has left for us all.

For my own peace of mind I think I will re-lace it the other way round with the trailing spokes on the inside of the hub flange as you say.

Regards

Jerry
 
Last edited:

daniel.weck

Esteemed Pedelecer
Aug 8, 2009
1,224
1
Hi Jerry !
I agree about trying to make the spokes as straight and non-twisty as possible before putting tension into them. This stress-relieving procedure was not very intuitive when I did it, I didn't manage to get a "feel" of the wheel so I just followed instructions hoping I was doing the right thing. So far my wheel tension is holding well and the rim is still true vertically and laterally. Obviously, failures may happen any time as my mileage increases...we shall see :)

Regarding the leading versus trailing spokes: you might as well start all over again just like you said. This way you will feel more confident about your bike when you ride it, and you will have no regrets :) The second time is bound to be easier, right ? :D
 

jerrysimon

Esteemed Pedelecer
Aug 27, 2009
3,292
112
Cambridge, UK
Ok thanks for all the replies. Thirty minutes later and I have it relaced. Second time round it was much easier the trick is to only do a few turns on the nipples when you first insert the spokes.

Here we go. Viewed from the side (clockwise = forward motion of the wheel) the trailing spokes now go out from the inside of the hub flange


And viewed from the top


The leading spokes definately have a little more tension in them at this stage than the trailing spokes which rattle. Is this where even at this stage I should squeeze the pairs to try and get them equally tensioned before I start tightening things up ?

Any more other comments, I am pretty sure this is now right.

Hopefully tomorrow I can start tensioning it all up and truing it and maybe actually get it built and go out for my first test ride :D

Regards

Jerry
 
Last edited:

jerrysimon

Esteemed Pedelecer
Aug 27, 2009
3,292
112
Cambridge, UK
With the wide spacing of the hub flanges, personally, I would prefer that the "trailing" (or "pulling") spokes arrive at the inside face of the flanges, giving a straighter pull.

This is not a hard and fast rule, and you will find wheel builders are divided on the subject.
James I just read your reply again and saw the link you posted to one of your earlier posts. The link was perfect and illustrated my delema here perfectly. Its also finally helped clarify things for me so many thanks. What a great forum this is!

Interestingly you mention Roger's book which I also purchased a while back.

Having re-read the book I realise now that there are actually 4 different ways you can set the spokes in the hub flange.

1. Trailing (pulling) spokes on the inside of the hub flange
2. Training spokes on the outside of the hub flange
3. On the drive side trailing spokes on the inside of the hub flange and then on the outside for the non drive side
4. On the drive side trailing spokes on outside and inside on non drive side.

1 and 2 are mirror images and 3 and 4 are opposites. Some use 3 or 4 where disk brakes are fitted etc.

He states that he in fact uses technique 1. on all his wheel builds. I now undertsand what is going on and as they say there is no substitute for practically building a wheel to see and undertsand this stuff. I think in summary there is in fact no "right" way as you say and its all down to builders preference. Looking on line I have seen all 4 ways used. Your post however puts forward a good case for 1. above in this application and I tend to agree with you.

I am going to be looking at every wheel I see now checking out which technique wheel builders have used :rolleyes:

Regards

Jerry
 
Last edited:

JamesC

Esteemed Pedelecer
Sep 1, 2007
435
5
Peterborough, UK
I am going to be looking at every wheel I see now checking out which technique wheel builders have used :rolleyes:

Regards

Jerry
Yes - I also found that I looked at a lot of wheels after getting interested in the subject.

James
 

jerrysimon

Esteemed Pedelecer
Aug 27, 2009
3,292
112
Cambridge, UK
Ok 2hrs+in the workshop and I think I am done.

Firstly as per advice I put some pressure on the spokes from the outer flange to make sure they came in at 90% rather than bowing out.


This made quite a difference and in fact these outer hub flange spokes loosened off a little, whereas before as I said they had a little tension in them and bowed out.

Next I used my electric screw driver to draw up each nipples to about two threads showing certainly saved some wrist ache!


A couple of threads showing


I then went round the wheel squeezing the spokes in pairs to de-stress everything.

Next in the stand it goes. The stand makes easier work of things and as I got it cheap it was well worth it.


This is kinda where I began to go wrong. I started tightening everthing up so no threads showed. I forgot to check the tension of the spokes by pinging them and only realised that I had over tightened everything when the nipples started to groan as they rotated in the rim holes. When a nipple eventually split I knew I had gone too far!

I also noticed at this point truing was all over the place with the hub dished to one side.

I loosened everything back off to a few threads showing and then tightened each until the ping sounds was equal in each spoke. I used my exisitng Brompton front and back wheels as a reference sound. I noticed that these smaller wheels have a higher ping sound compared to my larger 700c Cytronex wheel.
 
Last edited:

jerrysimon

Esteemed Pedelecer
Aug 27, 2009
3,292
112
Cambridge, UK
Once I had all spokes with tension in them I again squeezed them all in pairs and then started truing up using 1/4 turns where necessary. To be honest before this everything was pretty close and it needed little ajustment.

Now most the nipples have their thread hidden but one or two still showed the odd thread or two


I checked a spare loose spoke with a nipple and I could do 18 full turns before the nipple would lock up tight. To the end of the thread is about 12 full turns so the least number of turns on any of my nipples will be about 10 full turns.

To be honest I think I got too intense about the whole process and probably the easiest thing would have been to get the spoke tension right first using the "pinging spokes technique". As I said after I did this, the wheel was pretty true anyway and I only needed some minor adjustment to get all three truing directions right. I think I followed the book/instructions to the letter and that maybe building these smaller wheels is less precise and not about following exact instructions, but more using your ear and eye once the spokes are up to tension.

Anyway by this time it was getting late so it will be tomorrow before I can fit the tyre onto the wheel and try everything out.

Regards

Jerry
 
Last edited:

flecc

Member
Oct 25, 2006
52,799
30,374
I noticed that the smaller wheels have a higher ping sound compared to my larger 700c Cytronex wheel.
Just like a piano or a harp, the shortest strings will produce the highest frequency sounds at any given tension.
.
 

jerrysimon

Esteemed Pedelecer
Aug 27, 2009
3,292
112
Cambridge, UK
Thanks flecc.

Do things look about right from what I have explained/showed above ?

PS I realise that it is probably hard to say without actually seeing the wheel in the flesh so to speak. This has certainly been an adventure lol

Jerry.
 
Last edited:

JamesC

Esteemed Pedelecer
Sep 1, 2007
435
5
Peterborough, UK
Looks good from here, Jerry.

Out of interest, how far did the spokes reach into the nipples. If the tip of the spoke reaches somewhere between the bottom of the slot in the nipple and flush with the top, then the spoke length is ideal.

Always worth noting at this stage whether you would once again use exactly the same length of spoke, or a bit longer or shorter. Very useful information for others building that motor into that rim !

James
 

jerrysimon

Esteemed Pedelecer
Aug 27, 2009
3,292
112
Cambridge, UK
Thanks James,

Some just below, some level with the bottom of the slot so as you say in retrospect, I think maybe a mm or two longer would be worth while. The spokes were 18mm so maybe 20mm. *** Edit 118mm so maybe 119/120mm.

That said the holes in the hub flange are not drilled perfectly central either.

Regards

Jerry
 
Last edited:

flecc

Member
Oct 25, 2006
52,799
30,374
Looks good to me as well Jerry. Much of the secret is taking care and checking at each stage, and you've done
that in plenty. I can't see the finished wheel giving you any trouble.
.
 

JamesC

Esteemed Pedelecer
Sep 1, 2007
435
5
Peterborough, UK
Thanks James,

Some just below, some level with the bottom of the slot so as you say in retrospect, I think maybe a mm or two longer would be worth while. The spokes were 18mm so maybe 20mm.

That said the holes in the hub flange are not drilled perfectly central either.

Regards

Jerry
Would that be 118 / 120 mm ?

James
 
Last edited:

jerrysimon

Esteemed Pedelecer
Aug 27, 2009
3,292
112
Cambridge, UK
Oops corrected lol

Jerry
 

daniel.weck

Esteemed Pedelecer
Aug 8, 2009
1,224
1
It's a good idea JamesC. I obtained the spoke length from a mathematical formula, but there can always be minor discrepancies with the real world. Mind you, that length was not only fine for my Tongxin build, but was also used successfully by another DIY'er on his 80mm-wide Tongxin hub motor.
A possible difference in the spokes fit could come from a slightly different hub construction: after all Jerry received a rather different model than the ones we have used so far.
Cheers, Dan
 
Last edited:

jerrysimon

Esteemed Pedelecer
Aug 27, 2009
3,292
112
Cambridge, UK
A valid point Dan and probably what accounts for the difference.

Regards

Jerry
 

jerrysimon

Esteemed Pedelecer
Aug 27, 2009
3,292
112
Cambridge, UK
Well the last stage of fitting the tyre certainly proved problematic. The Sun CR18 rims make it hard to get the 16" Brompton tyre on. I had been warned by others who have used this rim and broke one of my plastic tyre levers trying myself.

After a couple of hours yesterday trying to fit the standard yellow flash Brompton tyre, I decided to call it a day. So frustrating!

Today I ditched the original Brompton tyre and picked up a Schwalbe Marathon 16 * 1 3/8" and another inner tube. Its also worth noting that these rims need to have the valve hole drilled out a mm or two to fit the schrader valve in them.

The guy at the shop was helpfull and gave me a few tips.

I fitted this one in about 20 mins. The trick was to make sure after fitting the first side of the tyre into the rim and as much as you can of the second side, that the tyre steel beads are positioned in the center of the rim to allow maximum stretch of the final bit of bead into the rim. The inner tube is inserted after the first side of the tyre and inflated slightly. Great care must me taken not to pinch the tube. I then put a little bit of washing up liquid on the remaining 4-6 inches of rim edge, where the final bit of tyre bead was to be streted onto the rim and using a metal trye level carefully inserted under it and on the rim edge popped it over with a little bit of firm force. I then pumped it up to 80 PSI. Finally done and looking great!


I will probably fit a Marathon Plus to the rear wheel later.

Another slight hitch then followed fitting the wheel into the forks. It was still a little tight with the spacing washers so I had to go back to the earlier operation and widen them a little more.

Finally it was all done and I had my first test ride.

Regards

Jerry
 
Last edited:

daniel.weck

Esteemed Pedelecer
Aug 8, 2009
1,224
1
Well done :D

PS: I know your pain with regards to fitting these tyres...been there, done that (and don't want to do it again, thus why I hope my investment in a puncture-proof Marathon Plus tyre will pay dividends !)
 
Last edited:

daniel.weck

Esteemed Pedelecer
Aug 8, 2009
1,224
1

jerrysimon

Esteemed Pedelecer
Aug 27, 2009
3,292
112
Cambridge, UK
Dan :eek:

LMAO, that made my day. Seems like me, someone who ordered their Tongxin never expected it to come with that rollerbrake flange either :p

I was really carefull when I filed mine down a little and protected the inside with some masking tape. If those filings get into the workings it would not be good. In the end I needn't have bothered as a single washer enables you to clear the forks anyway.

Do you have a link to the german thread ?

Regards

Jerry
 
Last edited: