Display unit or controller fault?

Nealh

Esteemed Pedelecer
Aug 7, 2014
21,767
8,843
62
West Sx RH
The more complicated the comm's the harder it is to fault find.
In over tens years I have used generic uart comm's systems and yet have not had a comm's issue.
We know CANbus is simply a dealer issue unless one has the necessary to deal with it.
Bt and phone Apps simply adds another layer of issues to over come.

The most common results over the years with comm's has simply led to in quite a few cases either wire break in the display that needs resoldering to a pad.
Water ingress in the display causing shorting out.
Occasionally the main trunk cable becomes damaged, smaller thin wires inside the outer sheathing can be compromised by either over tightening of said cable with cable ties or a severe bend in the cable somewhere (usually with internally routed cables exiting from the BB area.
 

RobG_UK

Finding my (electric) wheels
Sep 16, 2025
18
0
Wires sometimes break in an obvious way and sometimes not so clear. One way to avoid it is to make sure they don't get pinched too tightly where they are secured with zip ties and that the routing of cables allows enough slack so they don't get pulled hard when the handlebars are turned to full lock.

I'd kind of hoped there was a loose plug or an obvious water ingress problem, but in some ways you are looking for a needle in a haystack - though not that big a haystack really.
Just been having a look and not found any obvious needles in this particular haystack. (Will post separate update below.)

I say again - there are people here with vast experience of mending broken e-bikes, and that is not who I am. I only came in because your question seemed not to have had an answer. By the time I had finished typing, two others with much more experience had posted. I'd take notice of what they say.
Everyone here knows far more than I do, so I'm doing my best to take all advice on board
 

RobG_UK

Finding my (electric) wheels
Sep 16, 2025
18
0
Following everyone's advice, I've unplugged and inspected all the connectors I can find on the bike (controller to LCD, brakes and hub motor). Everything looks to be in order: no sign of obvious damage to pins or water ingress, and all connectors are pushed together as snugly as they will go. I also can't see any sign of external damage to cables.

I took the LCD off to see if I could find any identifying information. Here's what I found on the rear:

64373

Googling the company and model name draws a blank. There are no screws anywhere on the body of the LCD so I'm assuming it's glued together. Not sure I like the idea of trying to prize it apart – I'd be worried about doing irreparable damage to it in the process.

Another thing I noticed when powering on the bike this morning: when I first power it on at the LCD, the battery charge indicator shows full for a split second, then immediately shows empty.

Also, the PAS level, which normally indicates zero on startup, reads "F". I have no idea what this means: I haven't found any reference to it in the manual (error codes are E followed by a two -digit number) or online.

Not sure how to proceed from here. The company has now told me they hope to have the LCD back in stock next week.
 

Sparksandbangs

Esteemed Pedelecer
Jan 16, 2025
330
139
I would be tempted to check the continuity of the cable from the display to the controller. I suspect there will be a plug at both ends.

Unplug both ends. One end will have male connector and the other end will be female. Put one probe of the multimeter on one of the pins on the male end and stick a needle/safety pin or similar in the corresponding pin of the female end. Check for continuity of each core. If all is fine then you have discounted the cable as being faulty.
 

saneagle

Esteemed Pedelecer
Oct 10, 2010
9,483
4,226
Telford
Following everyone's advice, I've unplugged and inspected all the connectors I can find on the bike (controller to LCD, brakes and hub motor). Everything looks to be in order: no sign of obvious damage to pins or water ingress, and all connectors are pushed together as snugly as they will go. I also can't see any sign of external damage to cables.

I took the LCD off to see if I could find any identifying information. Here's what I found on the rear:

View attachment 64373

Googling the company and model name draws a blank. There are no screws anywhere on the body of the LCD so I'm assuming it's glued together. Not sure I like the idea of trying to prize it apart – I'd be worried about doing irreparable damage to it in the process.

Another thing I noticed when powering on the bike this morning: when I first power it on at the LCD, the battery charge indicator shows full for a split second, then immediately shows empty.

Also, the PAS level, which normally indicates zero on startup, reads "F". I have no idea what this means: I haven't found any reference to it in the manual (error codes are E followed by a two -digit number) or online.

Not sure how to proceed from here. The company has now told me they hope to have the LCD back in stock next week.
I've had a good look around and can't find anything on that. Even the website and other links to their products don't work. If you can solder two wires together, you can make an opportunity out of a crisis by getting a better standard controller. A good one that'll give you a much better riding experience would be about £70 with a throttle and LCD, or one that works the same as what you have would be as low as £30 with LCD.

Whenever you swap controllers, there are always connectors that don't match or have the wires in the wrong sequence, so you have to do a bit of cutting and soldering to sort it out. alternatively, you can buy the whole kit with controller, LCD, throttle, PAS and brakes as a set and swap all those items, but then you have to take off the bottom bracket and grips to fit the new parts.
 

RobG_UK

Finding my (electric) wheels
Sep 16, 2025
18
0
I would be tempted to check the continuity of the cable from the display to the controller. I suspect there will be a plug at both ends.

Unplug both ends. One end will have male connector and the other end will be female. Put one probe of the multimeter on one of the pins on the male end and stick a needle/safety pin or similar in the corresponding pin of the female end. Check for continuity of each core. If all is fine then you have discounted the cable as being faulty.
I can only find one connector between the display and the controller. If there is another one, I think it must be hidden inside the downtube.
 

RobG_UK

Finding my (electric) wheels
Sep 16, 2025
18
0
If you can solder two wires together, you can make an opportunity out of a crisis by getting a better standard controller. A good one that'll give you a much better riding experience would be about £70 with a throttle and LCD, or one that works the same as what you have would be as low as £30 with LCD.

Whenever you swap controllers, there are always connectors that don't match or have the wires in the wrong sequence, so you have to do a bit of cutting and soldering to sort it out. alternatively, you can buy the whole kit with controller, LCD, throttle, PAS and brakes as a set and swap all those items, but then you have to take off the bottom bracket and grips to fit the new parts.
In all honesty that sounds a bit scary. I briefly dabbled in electronics in my youth but it's several decades since I last wielded a soldering iron.

What other options do I have? I could buy a new display when they come back into stock: in the worst case scenario it wouldn't resolve the problem and I'd have wasted £27 – but I would at least have proved that the display wasn't at fault. I guess the logical next step then would be to replace the controller – Eleglide sell a replacement for £53. I've no idea how easy it is to replace; probably easy enough if you know what you're doing but maybe tricky if you've little or no experience working on bikes.

Or maybe I should be trying to find an ebike repair specialist in my local area?
 

saneagle

Esteemed Pedelecer
Oct 10, 2010
9,483
4,226
Telford
In all honesty that sounds a bit scary. I briefly dabbled in electronics in my youth but it's several decades since I last wielded a soldering iron.

What other options do I have? I could buy a new display when they come back into stock: in the worst case scenario it wouldn't resolve the problem and I'd have wasted £27 – but I would at least have proved that the display wasn't at fault. I guess the logical next step then would be to replace the controller – Eleglide sell a replacement for £53. I've no idea how easy it is to replace; probably easy enough if you know what you're doing but maybe tricky if you've little or no experience working on bikes.

Or maybe I should be trying to find an ebike repair specialist in my local area?
I doubt that you'll find an ebike specialist that can fix it, and if you could, the cost would be prohibitive. Best would be to wait until the LCD comes back into stock.
 
  • Like
Reactions: RobG_UK

RobG_UK

Finding my (electric) wheels
Sep 16, 2025
18
0
Best would be to wait until the LCD comes back into stock.
Yeah, I think that's probably the best option, assuming it isn't delayed indefinitely. If a replacement LCD doesn't resolve the problem, I might have to think about getting my hands dirty and replacing the controller and LCD myself rather than spending more money on a replacement controller as well.

A couple of questions on replacing the controller and LCD (I don't have a throttle and don't want one):

• Would I be able to get a controller that works with my current battery?
• I'm guessing that replacing the controller would involve removing and replacing some of the cabling that runs inside the downtube, right? How straightforward is that?
 

Nealh

Esteemed Pedelecer
Aug 7, 2014
21,767
8,843
62
West Sx RH
If one replaces the current system with a new controller kit the only connection one has to make are the two battery wires, if you are lucky it may be possible to find a controller with the same battery connection.
Bar the battery connection a controller kit is plug and play.
Show us a pic of the battery connection .
 

RobG_UK

Finding my (electric) wheels
Sep 16, 2025
18
0
If one replaces the current system with a new controller kit the only connection one has to make are the two battery wires, if you are lucky it may be possible to find a controller with the same battery connection.
Bar the battery connection a controller kit is plug and play.
Show us a pic of the battery connection .
Thanks for being patient with a newbie :)

A dumb question perhaps, but what exactly do you mean by the battery connection?
 

saneagle

Esteemed Pedelecer
Oct 10, 2010
9,483
4,226
Telford
Thanks for being patient with a newbie :)

A dumb question perhaps, but what exactly do you mean by the battery connection?
First, you have to look at the controller. It's in the battery receiver thing. You have to remove that to dismantle it. I reckon it's the same as the Argos bike I just did. Learning from that, it would be a good idea to check your motor connector first to see if it's 6 pin or 9-pin. If it's 9-pin, it's a lot easier.

When you look at the controller, you will see how many wires are connected to the battery connector. If it's two wires (red and black thickish wires), you're good to go.

Start at post #11 to see what it looks like. In the last photo, you can see that the new controller is located in a plastic box behind the seat-tube.
 

RobG_UK

Finding my (electric) wheels
Sep 16, 2025
18
0
First, you have to look at the controller. It's in the battery receiver thing. You have to remove that to dismantle it. I reckon it's the same as the Argos bike I just did. Learning from that, it would be a good idea to check your motor connector first to see if it's 6 pin or 9-pin. If it's 9-pin, it's a lot easier.

When you look at the controller, you will see how many wires are connected to the battery connector. If it's two wires (red and black thickish wires), you're good to go.

Start at post #11 to see what it looks like. In the last photo, you can see that the new controller is located in a plastic box behind the seat-tube.
Thanks. All of that will help if I do get as far as considering changing the controller.

To clarify, when you asked me to show you a pic of the battery connection, you meant dismantling the battery receiver/cradle and opening it up as in your linked photo, right?
 

Waspy

Esteemed Pedelecer
Sep 8, 2012
684
283
Thanks. All of that will help if I do get as far as considering changing the controller.

To clarify, when you asked me to show you a pic of the battery connection, you meant dismantling the battery receiver/cradle and opening it up as in your linked photo, right?
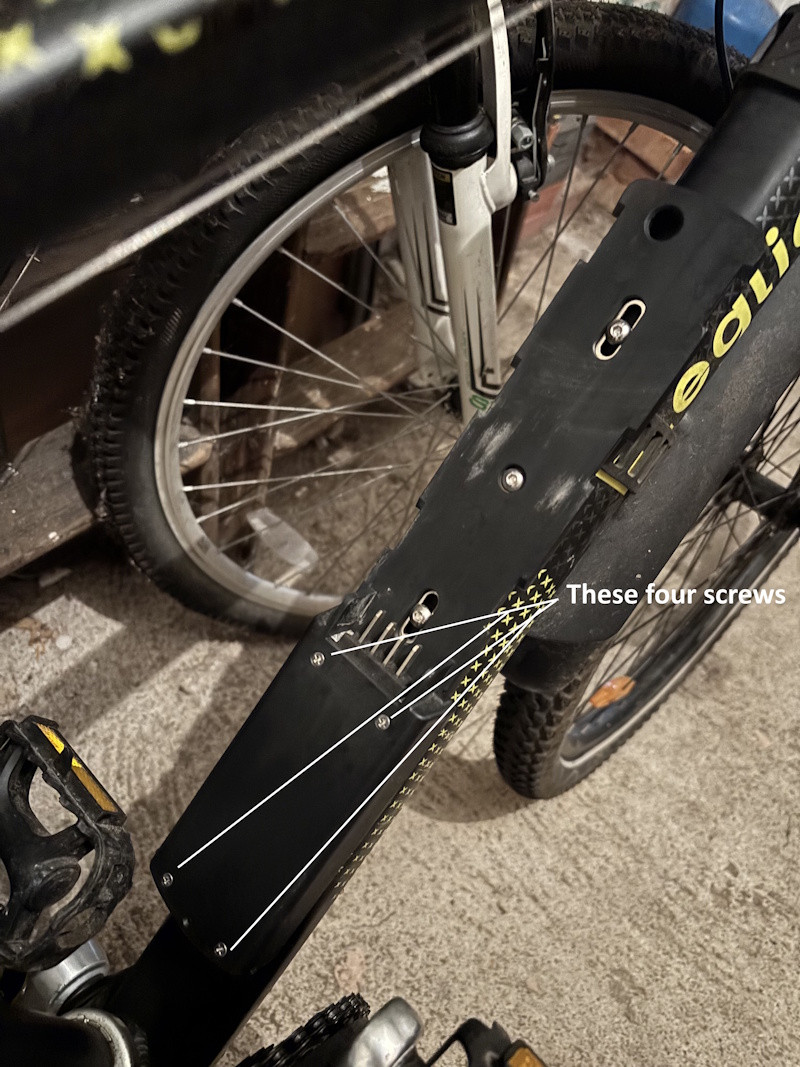
Yeah, just undo these 4 screws and take a pic.


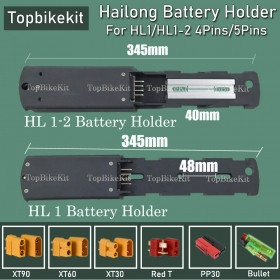
You can buy these for $12 from Topbikekit, there is no controller under the cover, just two wires coming out for connecting to a controller:


You can specify whatever connections you like, if you buy the controller from them, you can tell them you want them both XT60 (for example).

No soldering required.

But first, always listen to saneagle, best check the connection to the motor is 9 pin.
 
Last edited:

saneagle

Esteemed Pedelecer
Oct 10, 2010
9,483
4,226
Telford
Let's make it simple. Before anything check the motor connector. Next, do what Waspy said: Take off the battery, remove those 4 screws, lift up the end of the black plastic and wiggle the aluminium base out along with the connector. You might have to remove the bottom scre that holds the base to the frame to get a bit more wiggle room - possibly loosen the middle screw too, but your one might have a slightly different fixing arrangement.

Unfortunately, you need an empty aluminium piece to use an alternative base. That means that you have to either buy a replacement base of exactly the same type or scrape out the old controller from the aluminium piece. Sorry, I forgot about that. The one I just did had a defective controller, so I scraped it out.
 

RobG_UK

Finding my (electric) wheels
Sep 16, 2025
18
0
Yeah, just undo these 4 screws and take a pic.


You can buy these for $12 from Topbikekit, there is no controller under the cover, just two wires coming out for connecting to a controller:


You can specify whatever connections you like, if you buy the controller from them, you can tell them you want them both XT60 (for example).

No soldering required.

But first, always listen to saneagle, best check the connection to the motor is 9 pin.
Great, thanks: I'll have a look at this in the morning.
 

RobG_UK

Finding my (electric) wheels
Sep 16, 2025
18
0
Let's make it simple. Before anything check the motor connector. Next, do what Waspy said: Take off the battery, remove those 4 screws, lift up the end of the black plastic and wiggle the aluminium base out along with the connector. You might have to remove the bottom scre that holds the base to the frame to get a bit more wiggle room - possibly loosen the middle screw too, but your one might have a slightly different fixing arrangement.
Thanks. I'll have a go at this in the morning.
 

Advertisers