
After considerable ‘umming and ahhing’, I finally got round to adding some electrical assistance to our Orbit tandem. This my first attempt at an e-bike.
The main reason for installing electric assist was to provide some help on the steeper hills. I had wanted to fit a mid-drive motor as from what I could gather, a mid-drive motor is potentially a better option in this case. Fitting a mid-drive motor to a solo appears to be quite easy, fitting it to a tandem does not seem to be a straightforward task, so the next best option seemed to be a rear hub motor. I had discounted a front drive hub as I had some concerns over the weight of a hub motor and the possibility of putting too much load on the forks.
I’m reasonably competent mechanically, so the DIY option appealed to me. I bought my rear hub kit from Woosh (as many here seem to) and followed their advice to go with the DGW22C kit as the preferred option for tandems. I made ready for a day fettling in the garage. I had already removed the rear mudguard and luggage rack for better access. The first bit of good news was that the battery unit will fit along the boom tube – more on that later.
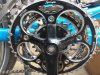
As per the Woosh manual, I started off with the Pedal Assist Sensor (PAS). My favoured position was the RHS front bottom bracket. I had a brief look at the proposed layout and found that the cable supplied was just fractionally too short to reach the battery. Fitting the battery ‘back to front’ in the frame meant the PAS cable would reach but the motor wire was then too short. Woosh sent me an extension cable for the PAS – great! As part of an annual ‘major service’ on my bikes, I remove the BB’s and re-apply anti-seize compound to the threads in the frame and cups, so extracting them was not a problem. It looked like the PAS would be a perfect fit on the front, but unfortunately it interfered with the eccentric shell on the front BB – this was really frustrating as it would only have to move about 1mm further out from the BB shell to clear – bugger! Ok, time for plan B. There was enough room on my rear RHS BB to fit the PAS, so that is where it is now mounted and is pretty much invisible when the crankset is fitted. I also chose to fit a throttle as hill starts on a tandem can be difficult and being able to call on instant power might prove useful. That meant installing the brake cut-out sensors.
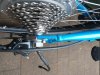
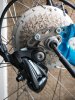
I moved on to the wheel next. I didn’t bother changing over the cassette from the existing wheel, I just fitted a new one. We have three bikes in the household which all have Shimano 9 speed 11 – 32 cassettes, so I had one in the spares ‘stock’ anyway. The existing cassette is a 12 – 36, but I hope I won’t miss the slightly lower bottom gear now I have the motor. I fitted a new chain too – the existing chainrings are all in good condition so they’re being kept. When fitting the wheel, a couple of issues emerged:
The hub motor has a 12mm axle and a normal Shimano cassette tool won’t fit over that size. As the tool is made from hardened steel, I didn’t think it was worth the hassle of de-hardening it then drilling it out to fit over the axle. My Unior emergency tool for roadside removal of cassettes was pressed into service and it did the job.
https://uniortools.com/eng/product/1669-4-2-in-1-pocket-spoke-and-cassette-lockring-tool#44729
Another other option would have been to use ‘farmboy’ engineering and stick a pair of needle nose pliers into the lockring, then turn the pliers with an adjustable wrench (there’s always a way!). A deeper socket style lockring tool with a ½ inch square drive would have been fine as it could fit over the axle. I’ll add one to the toolkit for future use. I believe lockrings are meant to be torqued up to 40Nm, but I’ve never had an issue with one coming loose although I only tighten them until I feel a bit of resistance and hear a couple of clicks from the lockring – that makes taking them off a lot easier too!
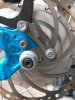
A quick test fit of the hub in the frame brought more good news – the axle was a good snug fit in the dropouts and only a few spacers / washers either side would be needed for a perfect fit. Most tandems have a larger OLN dimension than solos at 145mm. Similarly, the rim looked pretty much dead centre in the frame – great. I started off checking the disk side of the hub and found that the spacing for the disk was dead on – I’d removed the brake caliper, to make fitting the wheel simpler but it bolted back into place exactly where it had been. As the axle is a larger diameter, the disk has been moved down about about 1mm away from the caliper, but this unlikely to have a significant effect on the swept area of the brake. I may yet remove some material from the IS mount to compensate and realign the disk in the caliper.
Next was the drive side and an issue emerged here. The OD of the supplied washers was just a fraction too large to clear the cassette lockring and butt up against the cone nut. When I tightened up the wheel nuts, this washer was compressed in to the small gap between the cassette lockring and the axle and was binding slightly. I had to make up a couple of spacer washers to fit. I could also have removed a small amount from the supplied washer on the bench grinder which would have worked just as well and in retrospect, would probably have been easier. As an aside, there is very little drag when freewheeling – perhaps fractionally more than a normal hub. I know geared motor hubs have clutches to allow for this – I assume they are the ‘sprag’ type.

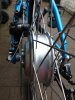
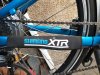
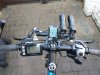
At this point I deviated from the normal installation routine as I wanted to fit torque arms to the bike. I sourced a set on ebay although I probably should have asked if Woosh supply them. I had intended to use these as a stop gap and make up my own set, but they look sturdy enough so, I’ll just keep them. The Orbit frame is alloy so I thought it would be prudent to try and distribute the loads of the wheel more evenly on the frame. I used some 5mm and 3mm steel arms. They’re attached to a brake caliper mounting on the non-drive side and a mudguard mount on the drive side.
Whilst coping with the torque reaction of the wheel was one concern, I was also conscious that the dropouts were never designed to cope with the 5Kg weight of a powered hub and might not take kindly to the shock forces transmitted if (when) I hit a pothole. I’m probably over reacting to the possible effects of fitting a low power hub motor without torque arms, but I’d rather do that than wreck the frame, hub motor and possibly me too!
At the moment, I’ve used a few washers to get the correct spacing for the torque arms, but I’ll make up some spacers in due course. The motor connector plug is small enough to fit through the torque arm on the drive side. I’m happy knowing that it is now very unlikely that the hub axle will spin in the frame. I’ve added some hassle / additional steps to a road-side puncture repair, but that’s OK as far as I’m concerned.
I have a neoprene chainstay protector which fastens with velcro and is large enough to allow it to be wrapped around the motor cable. This keeps the cable secure and avoids the need to zip tie it to the frame.
With the wheel now firmly bolted in place, I rechecked the alignment. I fiddled about very slightly with washers / spacers, but things were largely OK. Surprisingly, the distance between the hub flanges on the powered hub is quite a bit less than the original (tandem specific) Shimano FH-HF08 hub. The Shimano is 51mm, the new hub is only 38mm. The wheel is significantly dished on the drive side, although this is probably not an issue with 12 gauge spokes! Woosh seem to have the wheel build dead right – either through luck or judgement. Since they’ve been selling these kits for a while, I suspect the latter is the case. The wheel is laced in a twin cross pattern and was completely true as supplied. I’ll see in due course how this fares after a few miles – I’d expect a bit of twiddling with a spoke key after some use.
The rim is a ‘no name’ with a 25mm internal width (so quite wide). We tend to use wider tyres on the tandem anyway for a bit more cushioning / comfort, so that isn’t an issue. We’ve got 40mm Schwalbe Marathon Supreme fitted at the moment. They’re not as puncture proof as the Marathon Plus, but they are half the weight, comfy and roll very easily. More on tyres in due course.
I located the battery unit on the ‘boom-tube’ rather than the down tube as it keeps the weight as low as possible and helps centralize the mass. There are no bottle mounts on the boom-tube and I was not keen on drilling holes to fit rivnuts. Grin Technologies in Vancouver offer a useful alternative: https://ebikes.ca/shop/electric-bicycle-parts/battery-accessories/triple-bob.html
I bought one of these and it provides a very secure fit for battery unit.
Finally, I fitted the handlebar control unit and connected everything up. It all went together perfectly and everything worked without a hitch. It may be possible to source these kits via the internet, but I’m happy to have access to a UK supplier to call on for product support / guidance. The fact that the new wheel fitted straight off and all the electrical items worked instantly counts for a lot with me, so credit to Woosh for supplying decent stuff.
* Ignore the apparent missing brake cut-out sensor on the LHS - it is now in place.
We’ve only done a total of about 40 miles so far comprising of two 20 mile trips, but the experience is overwhelmingly positive. One steepish climb of about 1 mile, which normally requires the use of the granny gear (18.5”) and can see my pulse rate hovering between 160 and 170, was accomplished with ease. The assistance level was set at level 2 (of 5) and we just sailed up the hill at our normal 90rpm cadence. At one point during this maiden trip we got an error message 25 (brake sensor) and lost power but switching the unit off and on again cleared the fault and it has not recurred.
The riding experience:
Our first trip of 20 miles used up two (of five) of the battery charge indicators, but that included some quite steep ‘test’ climbs and a long uphill drag of about 7 miles. Most of the time we used level 1 or 2 assist. I didn’t charge the battery when we received it from Woosh and although it showed ‘Full’, it probably wasn’t completely topped up.
When we returned from our first trip, as I was putting the bike in the garage, there was a bang (like a gunshot) and the rear tyre deflated. The inner tube was shredded and had obviously pushed the tyre off the rim. The tyres are 40mm Schwalbe Marathon Supreme. These are folding type tyres and were a very loose fit on the rim when I mounted them. On the tandem, we tend to inflate the tyres towards the upper end of the limits. I then tried a 38mm Schwalbe Marathon Plus on the rim and even the Marathon Plus (a notoriously difficult tyre to fit) slipped on the rim with only light finger pressure. When I started to inflate the tyre, I got the same ‘bang’ at about 75psi and bits of tube scattered round the garage! I fitted another tube and dropped the pressure to 60psi, which was fine. For the avoidance of doubt, as far as I know I fit tyres correctly. I put in about 10psi and work my way round the rim squeezing the tyre to ensure the tube is not trapped and that the beads are fully seating in the rim, I do the same check at 20psi before inflating to full pressure. In decades of cycling, I’ve never experienced this before. In fairness to Woosh, I would not expect them to supply a top quality rim for the amount they charge for the kit, just a pity my rim is clearly at the small end of 700C size tolerances. I’ll probably change it out for something like an Andra 30 in due course.
Before our second test run, I had fully charged the battery and we set off to climb some steep hills and some long uphill drags. The extra assistance from the motor is excellent and we just romped up hills that we would have either avoided altogether or dropped right down to the granny ring. Again, we only needed level 1 or 2 assistance. One thing which is very useful is having the motor power when pulling away from rest (sometimes an awkward task on a tandem) or when constantly slowing down / stopping for inconsiderate pedestrians / dog-walkers on shared cycle paths. We covered just over 20 miles and the battery display was still showing ‘Full'. For our pattern of use, the anticipated range will clearly be much greater than we expected. We bought the kit to help, not to replace, our own efforts on hills and headwinds. Most of the time we were above the speed limit for level 1 and 2 assist, so the battery was not being used much. Still, both the power and the range are better than I expected.
Our tandem weighed 21Kg as delivered, 23Kg by the time a suspension seatpost and other bits and pieces were added. In current trim, with the motor, battery and so on it weighs 32.5 Kg. Riding without the motor assist feels like you would use 1 gear lower than a ‘normal’ machine – perfectly acceptable to me and still easily capable of being pedalled home under human power alone if the motor should pack up.
If you are still awake having ploughed through my ramblings, I hope it was useful for anyone contemplating an electric conversion. It's a very worthwhile exercise in my opinion.
The main reason for installing electric assist was to provide some help on the steeper hills. I had wanted to fit a mid-drive motor as from what I could gather, a mid-drive motor is potentially a better option in this case. Fitting a mid-drive motor to a solo appears to be quite easy, fitting it to a tandem does not seem to be a straightforward task, so the next best option seemed to be a rear hub motor. I had discounted a front drive hub as I had some concerns over the weight of a hub motor and the possibility of putting too much load on the forks.
I’m reasonably competent mechanically, so the DIY option appealed to me. I bought my rear hub kit from Woosh (as many here seem to) and followed their advice to go with the DGW22C kit as the preferred option for tandems. I made ready for a day fettling in the garage. I had already removed the rear mudguard and luggage rack for better access. The first bit of good news was that the battery unit will fit along the boom tube – more on that later.
As per the Woosh manual, I started off with the Pedal Assist Sensor (PAS). My favoured position was the RHS front bottom bracket. I had a brief look at the proposed layout and found that the cable supplied was just fractionally too short to reach the battery. Fitting the battery ‘back to front’ in the frame meant the PAS cable would reach but the motor wire was then too short. Woosh sent me an extension cable for the PAS – great! As part of an annual ‘major service’ on my bikes, I remove the BB’s and re-apply anti-seize compound to the threads in the frame and cups, so extracting them was not a problem. It looked like the PAS would be a perfect fit on the front, but unfortunately it interfered with the eccentric shell on the front BB – this was really frustrating as it would only have to move about 1mm further out from the BB shell to clear – bugger! Ok, time for plan B. There was enough room on my rear RHS BB to fit the PAS, so that is where it is now mounted and is pretty much invisible when the crankset is fitted. I also chose to fit a throttle as hill starts on a tandem can be difficult and being able to call on instant power might prove useful. That meant installing the brake cut-out sensors.
I moved on to the wheel next. I didn’t bother changing over the cassette from the existing wheel, I just fitted a new one. We have three bikes in the household which all have Shimano 9 speed 11 – 32 cassettes, so I had one in the spares ‘stock’ anyway. The existing cassette is a 12 – 36, but I hope I won’t miss the slightly lower bottom gear now I have the motor. I fitted a new chain too – the existing chainrings are all in good condition so they’re being kept. When fitting the wheel, a couple of issues emerged:
The hub motor has a 12mm axle and a normal Shimano cassette tool won’t fit over that size. As the tool is made from hardened steel, I didn’t think it was worth the hassle of de-hardening it then drilling it out to fit over the axle. My Unior emergency tool for roadside removal of cassettes was pressed into service and it did the job.
https://uniortools.com/eng/product/1669-4-2-in-1-pocket-spoke-and-cassette-lockring-tool#44729
Another other option would have been to use ‘farmboy’ engineering and stick a pair of needle nose pliers into the lockring, then turn the pliers with an adjustable wrench (there’s always a way!). A deeper socket style lockring tool with a ½ inch square drive would have been fine as it could fit over the axle. I’ll add one to the toolkit for future use. I believe lockrings are meant to be torqued up to 40Nm, but I’ve never had an issue with one coming loose although I only tighten them until I feel a bit of resistance and hear a couple of clicks from the lockring – that makes taking them off a lot easier too!
A quick test fit of the hub in the frame brought more good news – the axle was a good snug fit in the dropouts and only a few spacers / washers either side would be needed for a perfect fit. Most tandems have a larger OLN dimension than solos at 145mm. Similarly, the rim looked pretty much dead centre in the frame – great. I started off checking the disk side of the hub and found that the spacing for the disk was dead on – I’d removed the brake caliper, to make fitting the wheel simpler but it bolted back into place exactly where it had been. As the axle is a larger diameter, the disk has been moved down about about 1mm away from the caliper, but this unlikely to have a significant effect on the swept area of the brake. I may yet remove some material from the IS mount to compensate and realign the disk in the caliper.
Next was the drive side and an issue emerged here. The OD of the supplied washers was just a fraction too large to clear the cassette lockring and butt up against the cone nut. When I tightened up the wheel nuts, this washer was compressed in to the small gap between the cassette lockring and the axle and was binding slightly. I had to make up a couple of spacer washers to fit. I could also have removed a small amount from the supplied washer on the bench grinder which would have worked just as well and in retrospect, would probably have been easier. As an aside, there is very little drag when freewheeling – perhaps fractionally more than a normal hub. I know geared motor hubs have clutches to allow for this – I assume they are the ‘sprag’ type.
At this point I deviated from the normal installation routine as I wanted to fit torque arms to the bike. I sourced a set on ebay although I probably should have asked if Woosh supply them. I had intended to use these as a stop gap and make up my own set, but they look sturdy enough so, I’ll just keep them. The Orbit frame is alloy so I thought it would be prudent to try and distribute the loads of the wheel more evenly on the frame. I used some 5mm and 3mm steel arms. They’re attached to a brake caliper mounting on the non-drive side and a mudguard mount on the drive side.
Whilst coping with the torque reaction of the wheel was one concern, I was also conscious that the dropouts were never designed to cope with the 5Kg weight of a powered hub and might not take kindly to the shock forces transmitted if (when) I hit a pothole. I’m probably over reacting to the possible effects of fitting a low power hub motor without torque arms, but I’d rather do that than wreck the frame, hub motor and possibly me too!
At the moment, I’ve used a few washers to get the correct spacing for the torque arms, but I’ll make up some spacers in due course. The motor connector plug is small enough to fit through the torque arm on the drive side. I’m happy knowing that it is now very unlikely that the hub axle will spin in the frame. I’ve added some hassle / additional steps to a road-side puncture repair, but that’s OK as far as I’m concerned.
I have a neoprene chainstay protector which fastens with velcro and is large enough to allow it to be wrapped around the motor cable. This keeps the cable secure and avoids the need to zip tie it to the frame.
With the wheel now firmly bolted in place, I rechecked the alignment. I fiddled about very slightly with washers / spacers, but things were largely OK. Surprisingly, the distance between the hub flanges on the powered hub is quite a bit less than the original (tandem specific) Shimano FH-HF08 hub. The Shimano is 51mm, the new hub is only 38mm. The wheel is significantly dished on the drive side, although this is probably not an issue with 12 gauge spokes! Woosh seem to have the wheel build dead right – either through luck or judgement. Since they’ve been selling these kits for a while, I suspect the latter is the case. The wheel is laced in a twin cross pattern and was completely true as supplied. I’ll see in due course how this fares after a few miles – I’d expect a bit of twiddling with a spoke key after some use.
The rim is a ‘no name’ with a 25mm internal width (so quite wide). We tend to use wider tyres on the tandem anyway for a bit more cushioning / comfort, so that isn’t an issue. We’ve got 40mm Schwalbe Marathon Supreme fitted at the moment. They’re not as puncture proof as the Marathon Plus, but they are half the weight, comfy and roll very easily. More on tyres in due course.
I located the battery unit on the ‘boom-tube’ rather than the down tube as it keeps the weight as low as possible and helps centralize the mass. There are no bottle mounts on the boom-tube and I was not keen on drilling holes to fit rivnuts. Grin Technologies in Vancouver offer a useful alternative: https://ebikes.ca/shop/electric-bicycle-parts/battery-accessories/triple-bob.html
I bought one of these and it provides a very secure fit for battery unit.
Finally, I fitted the handlebar control unit and connected everything up. It all went together perfectly and everything worked without a hitch. It may be possible to source these kits via the internet, but I’m happy to have access to a UK supplier to call on for product support / guidance. The fact that the new wheel fitted straight off and all the electrical items worked instantly counts for a lot with me, so credit to Woosh for supplying decent stuff.
* Ignore the apparent missing brake cut-out sensor on the LHS - it is now in place.
We’ve only done a total of about 40 miles so far comprising of two 20 mile trips, but the experience is overwhelmingly positive. One steepish climb of about 1 mile, which normally requires the use of the granny gear (18.5”) and can see my pulse rate hovering between 160 and 170, was accomplished with ease. The assistance level was set at level 2 (of 5) and we just sailed up the hill at our normal 90rpm cadence. At one point during this maiden trip we got an error message 25 (brake sensor) and lost power but switching the unit off and on again cleared the fault and it has not recurred.
The riding experience:
Our first trip of 20 miles used up two (of five) of the battery charge indicators, but that included some quite steep ‘test’ climbs and a long uphill drag of about 7 miles. Most of the time we used level 1 or 2 assist. I didn’t charge the battery when we received it from Woosh and although it showed ‘Full’, it probably wasn’t completely topped up.
When we returned from our first trip, as I was putting the bike in the garage, there was a bang (like a gunshot) and the rear tyre deflated. The inner tube was shredded and had obviously pushed the tyre off the rim. The tyres are 40mm Schwalbe Marathon Supreme. These are folding type tyres and were a very loose fit on the rim when I mounted them. On the tandem, we tend to inflate the tyres towards the upper end of the limits. I then tried a 38mm Schwalbe Marathon Plus on the rim and even the Marathon Plus (a notoriously difficult tyre to fit) slipped on the rim with only light finger pressure. When I started to inflate the tyre, I got the same ‘bang’ at about 75psi and bits of tube scattered round the garage! I fitted another tube and dropped the pressure to 60psi, which was fine. For the avoidance of doubt, as far as I know I fit tyres correctly. I put in about 10psi and work my way round the rim squeezing the tyre to ensure the tube is not trapped and that the beads are fully seating in the rim, I do the same check at 20psi before inflating to full pressure. In decades of cycling, I’ve never experienced this before. In fairness to Woosh, I would not expect them to supply a top quality rim for the amount they charge for the kit, just a pity my rim is clearly at the small end of 700C size tolerances. I’ll probably change it out for something like an Andra 30 in due course.
Before our second test run, I had fully charged the battery and we set off to climb some steep hills and some long uphill drags. The extra assistance from the motor is excellent and we just romped up hills that we would have either avoided altogether or dropped right down to the granny ring. Again, we only needed level 1 or 2 assistance. One thing which is very useful is having the motor power when pulling away from rest (sometimes an awkward task on a tandem) or when constantly slowing down / stopping for inconsiderate pedestrians / dog-walkers on shared cycle paths. We covered just over 20 miles and the battery display was still showing ‘Full'. For our pattern of use, the anticipated range will clearly be much greater than we expected. We bought the kit to help, not to replace, our own efforts on hills and headwinds. Most of the time we were above the speed limit for level 1 and 2 assist, so the battery was not being used much. Still, both the power and the range are better than I expected.
Our tandem weighed 21Kg as delivered, 23Kg by the time a suspension seatpost and other bits and pieces were added. In current trim, with the motor, battery and so on it weighs 32.5 Kg. Riding without the motor assist feels like you would use 1 gear lower than a ‘normal’ machine – perfectly acceptable to me and still easily capable of being pedalled home under human power alone if the motor should pack up.
If you are still awake having ploughed through my ramblings, I hope it was useful for anyone contemplating an electric conversion. It's a very worthwhile exercise in my opinion.
Last edited:


