Shengyi Motor Repair

saneagle

Esteemed Pedelecer
Oct 10, 2010
9,512
4,242
Telford
I mentioned a couple of weeks ago that a friend had a Woosh bike that his wife took to a local bike shop to tighten the centre stand that had come loose. They managed to fully tighten it with the motor cable trapped so that the cable was half severed, and when she tried to operate the bike, it zapped the hall sensors. I therefore had to srip it down to replace them. It's not the easiest motor to do that because the hall sensor pcb is on the side between the stator and rotors, so the motor had to be completely stripped. Here's a challenge for you technical guys. You have to shout "stop" when you reach the position in the following description when I made a disastrous error.

0. Test hall sensors to confirm faulty
1. Remove axle nuts washers and spacers.
2. Remove the two cylinder nuts that hold the motor relative to the axle.
3. Pull off the cassette spline
4. Remove the 6 side-plate screws.
5. Tap the brake side axle to lift the side-plate.
6. Wiggle off the side-plate
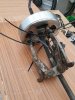
7.. pull out the motor core.
8. Remove the tiny O-ring on the laxle
9. Pull off the clutch.
10 Remove the circlip in front of the spur gear.
11. Remove the three screws that hold the spur gear.
12 Remove the spur gear.

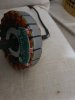
The main problem was to separate the rotor from the stator. The magnets keep them locked together and my puller couldn't latch on to anything. After thinking about it for a night, I had a solution.

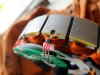
13. Fix cable ties to three spokes of the rotor and tie them to the puller legs with three more cable ties.
14. Pull rotor from stator.
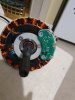
15. Remove 2 pcb screws.
16. Prise out hall sensors, which are partly retained by a thin fibreglass insulator.
17. Unsolder the three hall sensors.
18. Swap over the red insulators on the legs
19. Solder in the new hall sensors.
20. Test that the new hall sensors are switching properly.
21. Add some epoxy to retain the hall sensors in their slots.
22. Clamp and wait overnight for epoxy to cure.
23. Unclamp and insert and tighten the 2 pcb screws.
24. Reverse all the assembly steps 1 to 14
25. Test that motor works.
26. Put motor wheel back on bike.
27. Test it up and down the road.
28. Try and figure out how the weird throttle works with its secret button.
29. Realise that you made a massive mistake.

Did you stop at the right time to avoid the mistake. Answers below. I'll post some photos later when Gmail wakes up enough to upload them.
 

saneagle

Esteemed Pedelecer
Oct 10, 2010
9,512
4,242
Telford
Here's the hall sensor removed. You can see the thin yellowish fibreglass that had to be bent up a bit to let it out. ID is 413F, which I think is a temperature compensated one, whatever that means. I used standard SS41.

64376

Here's the puller arrangement:

64377

View of the pcb:

64378

And the new ones in before gluing. You can see why I needed to clamp while the epoxy set:

64379

Anybody spotted the mistake yet? I bet, just like me, you won't it, and you would do the same.
 

saneagle

Esteemed Pedelecer
Oct 10, 2010
9,512
4,242
Telford
How about 0 because you didn't repair the damaged cable?
It was the bit of the motor cable that comes out of the controller that got squished. The controller was replaced with a new one. When it still didn't work, he asked me to investigate, which is when I found the halls not switching.
 
  • Like
Reactions: Woosh

saneagle

Esteemed Pedelecer
Oct 10, 2010
9,512
4,242
Telford
At Point 8, was there also a circlip holding the clutch to be removed?
That was point 10.

OK, I'll take you all out of suspense. You're all going to kick yourselves just like I did. I guess you'd all have made the same mistake. Learn from my stupidity. What about the speed sensor? That should be at step 0, so I failed before I even started. The motor runs fine, but it's going to switch off after 5 or 10 minutes.

Sealed connectors makes it difficult to bodge and I can't remove the pcb without complete disassembly and unsoldering all the hall sensors because the speed sensor is on the reverse side of the pcb. Plus, the motor cable wires are cut tight to the exact length, so the pcb can't be lifted, and if I unsolder them, there's no way to get them back through the holes.
 
Last edited:

Tony1951

Esteemed Pedelecer
Jul 29, 2025
313
94
That was point 10.

OK, I'll take you all out of suspense. You're all going to kick yourselves just like I did. I guess you'd all have made the same mistake. Learn from my stupidity. What about the speed sensor? That should be at step 0, so I failed before I even started. The motor runs fine, but it's going to switch off after 5 or 10 minutes.

Sealed connectors makes it difficult to bodge and I can't remove the pcb without complete disassembly and unsoldering all the hall sensors because the speed sensor is on the reverse side of the pcb. Plus, the motor cable wires are cut tight to the exact length, so the pcb can't be lifted, and if I unsolder them, there's no way to get them back through the holes.
Oh dear -

This story reminds me of the number of times I have finished a mechanical reassembly and realised that I still had an unused screw or bolt from somewhere deep inside whatever it was I was mending. Only in this case it is worse, because the cables will not allow disassembly without ruination, so it isn't just time at stake.

At this point at my place, the 'mended' item gets thrown in the scrap and a new one is sent for.
 

saneagle

Esteemed Pedelecer
Oct 10, 2010
9,512
4,242
Telford
Oh dear -

This story reminds me of the number of times I have finished a mechanical reassembly and realised that I still had an unused screw or bolt from somewhere deep inside whatever it was I was mending. Only in this case it is worse, because the cables will not allow disassembly without ruination, so it isn't just time at stake.

At this point at my place, the 'mended' item gets thrown in the scrap and a new one is sent for.
I'm going to bodge it with a speed sensor spliced into a motor extension cable. There's plenty of room in the downtube for excess motor cable, so all you'll see is the motor cable coming out, like before, and the speed sensor wire coming out. The splice and other connector can be pushed inside, so it'll be a neat job, but cost about £15, compared with a few quid for just the speed sensor - if I could have found a way to solder it in.
 
  • Like
Reactions: Tony1951

Woosh

Trade Member
May 19, 2012
21,651
17,442
Southend on Sea
wooshbikes.co.uk
That was point 10.

OK, I'll take you all out of suspense. You're all going to kick yourselves just like I did. I guess you'd all have made the same mistake. Learn from my stupidity. What about the speed sensor? That should be at step 0, so I failed before I even started. The motor runs fine, but it's going to switch off after 5 or 10 minutes.

Sealed connectors makes it difficult to bodge and I can't remove the pcb without complete disassembly and unsoldering all the hall sensors because the speed sensor is on the reverse side of the pcb. Plus, the motor cable wires are cut tight to the exact length, so the pcb can't be lifted, and if I unsolder them, there's no way to get them back through the holes.
We keep 9-pin motor tails in stock for jobs like this. They are more supple than 9-pin motor extension cable. Still, I did use extension cable once, with brute force to pull it through the 90 degree bend.
 

saneagle

Esteemed Pedelecer
Oct 10, 2010
9,512
4,242
Telford
We keep 9-pin motor tails in stock for jobs like this. They are more supple than 9-pin motor extension cable. Still, I did use extension cable once, with brute force to pull it through the 90 degree bend.
Thanks, I'll bear that in mind. It would be a massive job on that motor to replace the cable completely. It's quicker and easier to scrape the insulation off a motor extension cable and splice on the speed sensor - 3 solder joints. Also, you never have to worry about the magnet inside the motor detaching.
 

Woosh

Trade Member
May 19, 2012
21,651
17,442
Southend on Sea
wooshbikes.co.uk
Thanks, I'll bear that in mind. It would be a massive job on that motor to replace the cable completely. It's quicker and easier to scrape the insulation off a motor extension cable and splice on the speed sensor - 3 solder joints. Also, you never have to worry about the magnet inside the motor detaching.
My recollection from the last time I did that was straightforward. I cut off the old cable,pulled that out. Strip about 4 ins of the sheath on the new tail. Attach a string to the new cable, pull the string through the channel, add a blob of grease and pull the cable through. It was 5 minutes for me because Andy did the soldering. Talk to Andy. He does all the motor repairs now.
 

saneagle

Esteemed Pedelecer
Oct 10, 2010
9,512
4,242
Telford
My recollection from the last time I did that was straightforward. I cut off the old cable,pulled that out. Strip about 4 ins of the sheath on the new tail. Attach a string to the new cable, pull the string through the channel, add a blob of grease and pull the cable through. It was 5 minutes for me because Andy did the soldering. Talk to Andy. He does all the motor repairs now.
That makes sense when you have a damaged motor cable, but it's a massive job:
  • Completely dismantle the motor
  • Thread the cable through
  • Unsolder the phase wires
  • Unsolder 15 joints on the pcb
  • Find out what type of sensor it is and where to get it from
  • Unsolder the old one from the pcb
  • Solder the new one to the pcb
  • Cut and trim all the motor cable wires
  • Solder them all back together - 18 joints
  • Rebind the phase wires to the coils
  • Complete reassembly of the motor
My method - no dismantling, no unsoldering, only three joints instead of 18, no reassembly:
  • Buy cable and sensor
  • Scrape insulation off the motor cable outer and three wires
  • Solder on three wires and insulate them
  • Mount the speed sensor and tie the cable
  • Unplug the motor and connect the new plugs
  • Stuff the surplus cable into the downtube
 

Woosh

Trade Member
May 19, 2012
21,651
17,442
Southend on Sea
wooshbikes.co.uk
I think Andy just had to link the new 9 wires to the stumps that I left behind when I cut the old cable. Each wire is of course insulated with heat shrink tubing. It was straightforward enough if I remember correctly.
 

saneagle

Esteemed Pedelecer
Oct 10, 2010
9,512
4,242
Telford
I think Andy just had to link the new 9 wires to the stumps that I left behind when I cut the old cable. Each wire is of course insulated with heat shrink tubing. It was straightforward enough if I remember correctly.
You're not getting it. To replace the speed sensor, you have to remove the pcb, which means that you have to free every solder joint - 9 for the halls and 6 for the motor cable.
 

Woosh

Trade Member
May 19, 2012
21,651
17,442
Southend on Sea
wooshbikes.co.uk
You're not getting it. To replace the speed sensor, you have to remove the pcb, which means that you have to free every solder joint - 9 for the halls and 6 for the motor cable.
Was it not just the Hall sensor marked Hs on the pcb?
 

Tony1951

Esteemed Pedelecer
Jul 29, 2025
313
94
Solder sucker, flux and wicking copper braid. You can get any amount of connections free, with good flux and braid. Just dont overheat the tracks and raise them from the pcb.

Much better not to have to do it though, and at the price of chinese motors, some would think it not worth the trouble.
 

Woosh

Trade Member
May 19, 2012
21,651
17,442
Southend on Sea
wooshbikes.co.uk
I now understand why you have to do all of that.
 

saneagle

Esteemed Pedelecer
Oct 10, 2010
9,512
4,242
Telford
I now understand why you have to do all of that.
OK. If the hall sensor was on the front of the pcb, like a normal one, it would be about 30 minutes work - still longer than splicing three wires and plugging a couple of connectors.

Also there's the danger of breaking one of the hall sensor legs, which is really easy to do, then I'd be in serious trouble because I did a good job of epoxying in the halls.
 
  • Like
Reactions: Woosh

Advertisers