Battery Care over Winter

cyclebuddy

Esteemed Pedelecer
Nov 2, 2016
1,561
742
Beds & Norfolk
This is a simple little project made in ½ hour from scrap parts I had lying around which I thought I’d share: The idea was to enable me to:

1) Partially discharge a fully charged e-bike battery to a suitable storage level for winter
2) Exercise the battery to extend its’ life when my e-bike batteries aren’t getting used much
3) Measure the true capacity of the battery

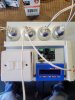
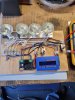
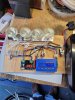
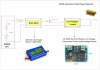
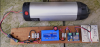
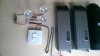
All this really involves is having a suitable load to drain the battery. I used 3 x 40-watt 12v halogen B&Q lamps I had spare. Wired together in series, this gives an ideal load of 120 watts for my two Phylion Lithium 36-volt, 374 watt, 10.4 amp e-bike batteries. The load is comparable to normal leisurely on-bike use: It’s neither too demanding for the cells, yet not so relaxed it takes ages to discharge. I added an on/off switch for ease and a 5-amp fuse for safety.

Ebike_bat_dis_1.jpg

The idea came about simply because neither of my two e-bike batteries get used much over winter. Both are usually left stored at half-capacity after a ride. If the weather looks fair and I plan a morning ride, I’ll charge one/both to full capacity the evening before. If the weather then turns out to be truly horrible, I could be left with a fully charged battery that ends up not being used – perhaps for several weeks. Rather than leave the battery in this “stressed” fully charged state, an hour using this takes about 30% of the charge back out, 1¼ hours about 40% – perfect!

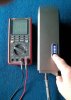
You can use a multi-meter to periodically check battery voltage, but the LED’s on the pack is probably enough to tell if the battery is at half-charge for storage, or near empty when the BMS should in any case cut-off the circuit when the cells are near flat before any damage occurs. Timing the battery over a full discharge gives you a good indication of what capacity is left in the battery: For me: A fully charged 374w battery / 120w load should take a shade over 3 hours if the cells are still performing as new (which they do seem to be).

Ebike_bat_dis_2.jpg

There are probably neater ways of doing this, but for ½ hour time and a few spare garage bits, this works really well for me.
 
  • Useful
Reactions: LeighPing
D

Deleted member 4366

Guest
Those lamps are only nominally 60w. They could be wildly off, so you should be careful about making any judgements about the power or health of the battery other than it's working, but if you put a wattmeter between the lamps and the battery, you would get a reasonable measurement of its actual capacity and voltage.

The voltage when fully charged and at the cut-off point tells you the state of balance too.

https://www.ebay.co.uk/itm/100A-60V-DC-RC-Helicopter-Airplane-Battery-Power-Analyzer-Watt-Meter-Balancer-BG/292119038805?epid=1694235544&hash=item4403a6cb55:g:NrIAAOSwxH1UG-pp
 

cyclebuddy

Esteemed Pedelecer
Nov 2, 2016
1,561
742
Beds & Norfolk
Those lamps are only nominally 60w. They could be wildly off, so you should be careful about making any judgements about the power or health of the battery other than it's working, but if you put a wattmeter between the lamps and the battery, you would get a reasonable measurement of its actual capacity and voltage.

The voltage when fully charged and at the cut-off point tells you the state of balance too.

https://www.ebay.co.uk/itm/100A-60V-DC-RC-Helicopter-Airplane-Battery-Power-Analyzer-Watt-Meter-Balancer-BG/292119038805?epid=1694235544&hash=item4403a6cb55:g:NrIAAOSwxH1UG-pp
Yes, quite so... the lamps could be a little off their 40w rating. Rather than a dedicated watt-meter though (which I didn't have to hand) I use a Uni-T UT81B to measure voltage and current (measures up to 10A DC)... and these lamps do measure the rated 40w (+/- a very small margin of error). So it's pretty accurate as a simple, low-cost DIY discharger.

Ebike_measure.jpg
 

Ray Winder

Pedelecer
Apr 13, 2017
93
26
71
North Yorks
Yes, quite so... the lamps could be a little off their 40w rating. Rather than a dedicated watt-meter though (which I didn't have to hand) I use a Uni-T UT81B to measure voltage and current (measures up to 10A DC)... and these lamps do measure the rated 40w (+/- a very small margin of error). So it's pretty accurate as a simple, low-cost DIY discharger.

View attachment 22446
Appreciate that this is an old thread but interesting to me. I'm sure many expensive batteries would last much longer with some attention during winter months,.
Having read this I intend to build a similar discharger myself, I have ordered a discharge monitor to add in which will cut off at a predetermined voltage so that I can regulate the how far the battery is discharged.
 
  • Like
Reactions: Bikes4two

cyclebuddy

Esteemed Pedelecer
Nov 2, 2016
1,561
742
Beds & Norfolk
I did change that to 4 x 40w lamps: 12 x 3 =36v, and as we all know, a 36v battery charges to 42 v, so 3 are kind of over-volting a bit. The 4 lamps are still working.

I also did eventually add the wattmeter d8veh/vfr400 suggested; for a few quid, it's less hassle that putting a multi-meter in circuit, and gives you a lot of info inc. total/true battery capacity in Wh etc.

Those 2 old batteries in the above pic date from 2016 - they still measure 370Wh capacity. I cycle them once every 3 months or so as that ebike isn't used a lot as it's at a different location now.

For a few quid more (£10?), I was going to add a charge control board (switches charger on when voltage falls too low, and off at a user-set upper level - say 38v for storage). I didn't because those batteries don't use CanBus, so don't drain much at all on their own.

When you think about it you could really go to town: My idea was to keep it simple from crap I already had in the shed.

I'll look forward to seeing what you do.
 
  • Like
Reactions: Bikes4two

Ray Winder

Pedelecer
Apr 13, 2017
93
26
71
North Yorks
Interesting to hear how well your system works, given the price of batteries it seems to be a sound investment.
Just waiting for the bits I've ordered to arrive then I'll set it all out and test it before I mount it on a board.
Two questions
Do you have a link to the watt meter you used? I've a fluke meter and a clamp ammeter but the watt meter sounds like a good idea.
The battery in your picture looks like the one on my halfords bike, which slots are the power output? I can't quite see in the pictures.
I also have a hopper shopper I bought for my wife but it has never been used so I will be using 24v and 36v batteries on my rig.
 

cyclebuddy

Esteemed Pedelecer
Nov 2, 2016
1,561
742
Beds & Norfolk
The wattmeter vfr400 suggested is the blue one here. It's worth using IMHO for the info it gives you, but especially total capacity over a full discharge.

Yes, they're Phylion SF06's, the same as Halfords Carrera but without the smart BMS's. The 4 centre slots are connected if you have the smart BMS, but it's always the outer two for +/- voltage.

I have three e-bikes and 4 batteries now - but you can't use them all at the same time. The occasional charge to full+balance, discharge, and partial charge to storage level again of those sitting most idle seems to keep everything working well.

I made a second simpler one too, just for draining a fully charged battery down a bit:

Ebike Battery Discharge.JPG
 

Ray Winder

Pedelecer
Apr 13, 2017
93
26
71
North Yorks
Bits all finally arrived, so I'm looking how to lay this out and mount on a board.
I intend to use one of the switches to interrupt power, and the other switch to cut in or out the fourth lamp, that way I can use with both my 24v and 36v batteries. I'm also wondering about feeding the watt meter and voltage control directly from the input and just use the power switch to connect the lamps.
 

Attachments

  • Like
Reactions: Bikes4two

cyclebuddy

Esteemed Pedelecer
Nov 2, 2016
1,561
742
Beds & Norfolk
I only used a 2-gang switch because that's what I had spare in the shed, and I only used any switch at all to stop sparking when connecting the lamps to the battery.

When I later added the wattmeter, because it was a 2-gang switch, one switch was used to disconnect the circuit completely, one used after the wattmeter to disconnect the load so the wattmeter (still powered by the battery) would retain it's values without then still applying the load.

So I guess for you, you can omit a main on/off switch as the wattmeter/lvc circuit on their own shouldn't draw enough to spark, and do:

battery - wattmeter - lvc - switch 1 - lamp 1/2/3 - switch 2 - lamp 4.

Switch 1 can be a 1-way, switch 2 would need to be a 2-way, but with MK, they're usually both the same - either 1-way or 2-way.
 
  • Like
Reactions: Bikes4two

Ray Winder

Pedelecer
Apr 13, 2017
93
26
71
North Yorks
You highlighted my exact thoughts, don't want any sparking to damage the battery terminals and I would like to retain the watt meter readings.
Need to think it through and try to get it right, but these kind of projects seem to evolve and become modified.
At the moment I have rigged it up on a temporary basis to try the watt meter, in the next few days I will cut some board and make a better job.
So far I have spent just over £20 but I think it's a sound investment as i intend to use it to cycle my tool batteries as well as the bike batteries.
 
  • Like
Reactions: Bikes4two

matthewslack

Esteemed Pedelecer
Nov 26, 2021
1,632
1,207
Bits all finally arrived, so I'm looking how to lay this out and mount on a board.
I intend to use one of the switches to interrupt power, and the other switch to cut in or out the fourth lamp, that way I can use with both my 24v and 36v batteries. I'm also wondering about feeding the watt meter and voltage control directly from the input and just use the power switch to connect the lamps.
A detail to watch for is the lamps themselves: halogens get very hot, so if to be left unattended, be sure nothing nearby can get dangerously hot.

Also, I like to have an additional lower value fuse in the circuit than the battery fuse, so any minor misdemeanors on my part have limited impact. 5 or 10A depending on what I have lying around.
 
  • Like
Reactions: Bikes4two

Ray Winder

Pedelecer
Apr 13, 2017
93
26
71
North Yorks
A detail to watch for is the lamps themselves: halogens get very hot, so if to be left unattended, be sure nothing nearby can get dangerously hot.

Also, I like to have an additional lower value fuse in the circuit than the battery fuse, so any minor misdemeanors on my part have limited impact. 5 or 10A depending on what I have lying around.
Yes I discover that the lamp get hot, (ouch) that's when I nipped to toolstation and bought 4 of the ceramic sockets for them. I'm thinking of mounting the sockets on an aluminium strip, I am using an inline fuse which takes car type blade fuses 5 amp at the moment but may have to use 10 amp with the 36v batteries and 4 lamps.
 

Ray Winder

Pedelecer
Apr 13, 2017
93
26
71
North Yorks
I was all set to make the rig but it's freezing in my garage and I decided to order some soft silicon wire and do the final build in warmer days.
But I did a bit of a test rig, the kinder ones among you may call it a prototype.
It works fine and I can use it on 20v tool batteries 24v shopper battery or 36v batteries just by moving the blue wire to different terminals on the terminal strip which connects the lamps.
One design flaw I discovered is that the lamps are direct in your eyes and make it difficult to see the watt meter, need to look at that.
 

Attachments

  • :D
Reactions: Bikes4two

Bikes4two

Esteemed Pedelecer
Feb 21, 2020
896
398
Havant
Thanks to @Ray Winder and @cyclebuddy for sharing their ideas on the battery discharger gizzmo and I've now 'knocked up' one for myself.

Here's some aditional details that might be useful to others and encourage greater takeup.
  1. A basic schematic showing connectivity from the battery through the Watt Meter and Low Voltage cut-off device to the Load.
  2. For my load I've used a 100w 18 ohm resistor which gets VERY HOT (around 270 degC). I used a resistor and that only drawing about 2A from the battery.
  3. I put the switch 'after' the watt meter so that I could disconnect from the load without powering down the watt meter and loosing all the recorded data.
  4. Setting up the low voltage cut-off device (XH-M609) required a bit of internet searching to work out how to do it - the youtube clip here was useful in this respect. In summary:
    - by default, the display shows the input/output voltage (they are the same value as the switching is done via a relay)
    - setup is done through the the two push buttons marked '+' and '-'
    - the are 4 settings:
    (1) calibrate the display voltage reading against an external meter.
    (2) set the low cut-off voltage
    (3) set the off-set voltage for the device to switch back on, e.g. if the cut-off voltage were 30.00v and you wanted the device to switch back on at 32.00v then you'd set the off-set to 2.00v
    (4) this is a time delay between the when the 'back-on' voltage is achieved and the device actually switches on. Values are 0-5 but I don't know what exactlythe units are but '0' is no delay and '5' is arond 30s.

    To access:
    - Calibration - long press of '+'
    - Low voltage cut-off - double click the '+'
    - Offset - double click '-'
    - time delay - long press of '-'

    Once into either of the above, use the +/- to adjust the value. Once the value is reached, leave the buttons alone and after a few seconds the display returns to the input/output voltage.

    That's it - be aware that the press buttons are cheap items and so may not always registers presses
  5. The schematic:46006
  6. The 'Heath Robinson' item!46005
 

Ray Winder

Pedelecer
Apr 13, 2017
93
26
71
North Yorks
That will do the job, I used two switches one between the inlet power and the watt meter to avoid any possibility of a spark when connecting the battery.
The other switch is between the load and the voltage cut off , to disconnect the load while keeping the watt meter live.
The small halogen lamps provide a load just under 4 amps which falls off slightly as the voltage sags when approaching full discharge.
I tried a resistor as a load but I didn't like it getting too hot so I settled on the lamps which don't ge quite so hot.
 
  • Like
Reactions: Bikes4two

Bikes4two

Esteemed Pedelecer
Feb 21, 2020
896
398
Havant
Hi @Ray Winder - I agree that the halogen lamps are a better idea rather than the concentrated heat from the power resistor. If I can find a source of resonably priced 12v halogen lamps, I shall probably go that way. I might pop to my local car scrappy and get some car headlamp bulbs :cool: .
 

Advertisers