Help! beginner considering battery rebuild needs advice

minexplorer

Esteemed Pedelecer
Aug 22, 2017
532
93
55
Four Lanes,Cornwall
Hi,sorry this may be long.
So this is further to a thread i posted back in feb 2020 battery needs repair.Havent used the bike for over a year because of the failing battery.
Basically 3 an half years ago i got a bbshd kit and 52v batt from electron cycles.They advertised their samsung 30Q batt,as the best for the job. i learned much later the 30Q is crap,with issues after as little as 50 recycles.Ive verified the cells are definately genuine.After 11 months and 70 odd full recharges.I started getting battery failing to charge fully to 58.8v ,LVC tripping at 47-48v usually due to an increased load,despite set at 41v. Tried maually balancing through the BMS with a mobile phone charger,but it soon got bad again.
I stored the batt fully charged and havnt re charged in a year. today the cell groups read at the BMS 6x 3.77v ,5 x 3.48-3.61v and one each 3.16v, 2.98v, 2.28v. Thats with not having recharged.
A repair back when was going to cost 400 odd.so i didnt bother. Now im thinking maybe i should buy a cheap battery spot welder thingy an make it a project to learn how to repair it myself.
It seems likely theres 30 good cells and perhaps 25 more half decent ones. Its a 450 quid loss now as it stands. I was going to strip down all the cells and charge them up a few at a time,with my e cig charger,to root out the bad.Buy any i need to get a 5 parallel batt.
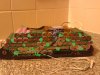
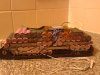
Does that sound feasible. Im puzzled over many things. Why when i understood a 52v was strings of 14 cells, i expected to see 5 parallels of 14 connected cells,yet they seem to be in sets of ten cells.These then are further connected to each other seemingly randomly.Likewise the white wires going to the BMS seem to be attached randomly.
Also i understand the sensor ,balancing wires to the BMS are 10.13,14 due to the number of cells in a string for 36,48,52v. But that means they must read one cell in each parallel doesnt it,rather than all the cells in one string .Or have i got that all wrong.
Lastly i began to snip the connecting strip between two cells.Yet despite both being positive ends i got a flash of a short as if id touched the snips across a positive and negative. How on earth do you strip these down.
Much thanks if anyone can give me some pointers.
The cells i tried to seperate were at the top left end in the picture
IMG_20220704_043006.jpg
 
Last edited:

StuartsProjects

Esteemed Pedelecer
May 9, 2021
1,694
952
Why when i understood a 52v was strings of 14 cells, i expected to see 5 parallels of 14 connected cells,yet they seem to be in sets of ten cells.
If you draw a schematic of how you would connect 14 sets of 5 cells as a battery pack then why there appear to be 'sets of 10' would become clear.

I dont understand your battery replacement logic though, if these are known poor cells, then if you replace the poor cells, its highly likley the others are going to go 'poor' fairly soon.
 
Last edited:
  • Agree
  • Like
Reactions: Woosh and Bikes4two

minexplorer

Esteemed Pedelecer
Aug 22, 2017
532
93
55
Four Lanes,Cornwall
If you draw a schematic of how you would connect 14 sets of 5 cells as a battery pack then why there appear to be 'sets of 10' would become clear.

I dont understand your battery replacement logic though, if these are known poor cells, then if you replace the poor cells, its highly likley the others are going to go 'poor' fairly soon.
hi stuart. Obviously i wasnt going to attempt anything without some full guides on how to build batteries hence i used the title beginner need advice.just wanted some explanation of things that puzzeled me.as i thought it would be 5 sets of 14 cells.then those 5 sets connected. i imagine groups of 5 if a 5P battery 4 if a 4P ? but why then 10. i did put two battery packs on my bbs01 a 6P and 5P connected parallel,that seemed simple 11 all used at same time ,just in two containers. i just dont understand why the sets of 10,13,14 cells depending on if its 36v,48v or 52v are interconnected in a more complicated way than simply being seperate and just joined at point of the plus ,minus terminals. in the same way as the two bbs01 packs power cables are joined at a splitter.

Anyway im just trying to salvage SOMETHING out of this mess. even if its just a 4P 48v from the best cells remaining. i havent got another 450 quid for a battery. this one has only had 70 odd full re charges. many cells should still be good.
 
Last edited:

Nealh

Esteemed Pedelecer
Aug 7, 2014
20,134
8,230
60
West Sx RH
The pack is indeed 14s, in your pic 7 x groups of cells connected in series.
On the other side 1 & 14 will simply be connected in paparallel with no other connection to an adjcent cell group. #1 on the other side is the 0v reading on the and is B-, it has the B- BMS wire connected & #14 is he last cell group with the POS take off and will have the SOC reading from it.
IMG_20220704_043006.jpg


The short you encountered trying to cut the strip on the POS end is because you have shorted or the strip has shorted the NEG edge of the cell can.

Taken from your pic below.
The Blue pointer shows the POS insulator slightly lifted, the whole side and top edge/ circumference is NEG, the only POS part is the central cap that sits on 3 or 4 legs where the welds are. It is easy to contact the edge (by damaging the cell wrap) between the cell cans when snipping the series strip.

Even if one isolates all 14 x 5p cell groups, one can still cause a short when removing the strip from the POS end. One has to develop a technique if removing the strips by using snub nose pliers in a rolling mode across the cell top and a =n insulator to roll the pliers on. A thin bit of stiff card /wood or plastic can be used between the pliers and cell top.
IMG_20220704_043006.jpg
 
Last edited:

Nealh

Esteemed Pedelecer
Aug 7, 2014
20,134
8,230
60
West Sx RH
For a good spot welder with some control over weld strength one is lookking imv at the bear minimum of a Malectric arduino welder and a good 3s high rate lipo battery, the pair alone is arounf the £200 mark.
 

Nealh

Esteemed Pedelecer
Aug 7, 2014
20,134
8,230
60
West Sx RH
Whether one wants to bother deconstructing and then rebuilding in a differing P & S config is your call, for a spare get you home battery it may be worth the effort if one wants to learn how to spot weld.
30Q's have a habit of self discharging so is aflawed cell, personally I would also chnage the BMS as well as it isn't known if this is a factor as well.
 

Nealh

Esteemed Pedelecer
Aug 7, 2014
20,134
8,230
60
West Sx RH
If deconstructing one first needs to remove all wire conenctions from bms and the bms. remove all the positive wiring to leave a bare battery pack.
Place it on a nice non conductive protected surface.
Start at either #14 on the side shown or #1 on the other face as this is the neg end of the can with no positive input except at the series connection of each adjoining cell.
Pry up the edge of the nickel and with good thin nose pliers get a good grasp and roll the nickel on to the next cell end, before rolling the pliers place an inulator/cell end protector so one roll the pliers on to. As mentioned anything thin enough will do strong card, thin plastic or wood, make sure a part from the pliers there are no other metal objects close or nearby that include the wearing of any jewellery chain , rings watches /bracelets etc even including exposed metal cloth buttons/zips.
 

Nealh

Esteemed Pedelecer
Aug 7, 2014
20,134
8,230
60
West Sx RH
The shorting/ sparking risk occurrs most in a sterile clean situation when one encounters the positve end, only the very center disc area is positve which sits on three or four legs. The outer ring/edge of the can on this end is negative hence why on a good build one will also see a cloth/card insulator ring added tp prevent the series or parallel buss from causing a short. Without the insulator heat can melt the pvc wrap or a sharp edge from the buss connector can pierce the wrapper.

If working on a battery whether building new or deconstructing and old one I use cereal box card taped to the exposed cell ends and only leave the ones I'm working on exposed. One won't get a shock but it you roll or lay your bare arm across the battery one will feel aslight tingle as the voltage /current passes through the skin.
 

Woosh

Trade Member
May 19, 2012
19,529
16,466
Southend on Sea
wooshbikes.co.uk
Anyway im just trying to salvage SOMETHING out of this mess.
don't do it.
The only viable repairs to an e-bike batteries are:
- replacing fuses and contact blades
- replacing the lock
- replacing switches if there are any
- replacing the BMS
- replacing the plastic case

For the rest: don't. It's just not worth the risk, especially if

- there are signs of corrosion
- you don't know very well your battery.

To replace a shorted cell: if the pack is brand new, it may be just about worth it. You will need a fair bit of knowledge and skill. You'll need the right PVC shrink tube, Kapton tape, nickel strips, scissors, welding gun and a 100W soldering iron. You may also need a discharging kit and a reputable source of cell suppliers.
Your battery is a string of 10 blocks of 5 cells, connected in series. That why you see the 9 connecting strips connecting 10 cells: the positive electrodes of the one block of 5 to the negative electrodes in the next block of 5 cells.
If one cell in one block has died, the 4 remaining cells in that block are seriously damaged. You should replace the whole block of 5 using identical cells. They must be new same model as the original cells, you can't buy pulled cells, the replacement cells must preferably have the same batch code. You then end up with a battery that has permanently one block newer than the rest, increasing the risk of your battery becoming imbalanced, leading to BMS and protection failure.
You can see why manufacturers make it nigh impossible even to remove the shrink wrap tubing in new batteries.
 

minexplorer

Esteemed Pedelecer
Aug 22, 2017
532
93
55
Four Lanes,Cornwall
thanks woosh,ive given up on the idea,way too complicated and more expensive for those spot welders than i imagined thought they were less than 50 quid ones ive seen for battery packs. was quoted 400 quid for a repair a year ago by a local battery center. cld buy a new one for that tho.
 
Last edited:
  • Like
Reactions: Woosh

Advertisers