Yep I'm very happy with it! Just need to put some RTV gasket on the drive side I think to stop rust getting in again.
Some random tips for anyone looking to repair this motor in the future, as there doesn't seem to be a lot of info on the G010 series:
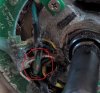
- Accessing the motor: If your housing is intact you can do all of the work without unlacing the motor housing. If you are just replacing the cable, you can remove the six small bolts on the drive side and lift the drive side casing off, though you may need to whack it a few times with a hammer to free it up before it will lift off. You do not need to remove the gears to do this (on the freewheel version at least). If you thereafter need to access the planetary gears you will likely need to take a hammer to the non-drive side axle in order to slide the whole motor unit out of the casing. During reassembly I recommend replacing the bolts with new ones as they are quite prone to stripping with corrosion etc. You shouldn't need to remove the six large bolts on the non-drive side but if you do, be careful not to overtorque them back in as they will collide with the planetary gear platform.
- Splayed cable: This motor can encounter the usual issue of the torn motor cable at the point where it enters the axle. Mine lasted about 2 years/probably 1000 miles usage before I noticed the outer insulation was torn and I imagine it would not have lasted much longer than that. You can replace it by getting a standard 9-pin Julet extension cable and just cutting the female side off. The trickiest part (per earlier posts) is getting the replacement cables to sit flat enough that they don't contact the hub, and getting heatshrink on them with the very limited space. Try and put some more strain relief on the cable to stop it happening again (stronger spring etc), and make sure you fit this onto the cable before you thread it through the axle!. Don't forget to silicone seal the entry point and re-mount the wheel to the bike with the axle gap pointing downwards to prevent water getting in.
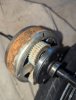
- Main bearings: These motors use two 16001-2RS sealed ball bearings, one on the drive side and one on the non-drive side. In my case the drive side was easy to hammer out of its housing, but unlike in all the videos where it pops out nicely the non-drive side was absolutely jammed onto the axle and required a bearing puller. When fitting new bearings, hammer them in with a socket or similar round tool that is the same diameter as the outer bearing track and no smaller. If you hammer them in any other way you will damage the casing.
- Circlips: For the love of god get a decent circlip plier, it will make your life a million times easier, tweezers just do not work the same way. The main axle circlips are M14 size. The planetary gear circlips are M8 size so make sure you get some particularly small pliers too. I recommend buying some spare circlips (you can get a huge kit of them for like £6) in case the factory ones get deformed or shatter during the process.
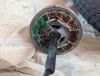
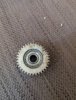
- Planetary gears: This motor uses three standard 38mm x 12mm 36-teeth gears. The gears are fitted with standard 608ZZ bearings. If your gear teeth are OK you can just knock out the bad bearing with a chisel and fit another. These bearings are easy to dent/deform when fitting so I recommend you buy some extras anyway. On my unit there wasn't a detachable key for the planetary gear platform like there is on some larger motors - just one that was part of the axle itself.
- Greasing: I used brake and clutch cleaner to get the existing grease off. I used Super Lube synthetic grease and brushed it onto each of the gear teeth with a hard bristle brush, and then same again onto the teeth of the non-drive side casing. This was the only relatively inexpensive one I can find in the UK - alternatively you need proper aviation grease like Mobil 28. Take care not to over-grease as you will get drag from viscosity effects.
- Rusty housing: If yours has accumulated rust the same way mine did, Hammerite Kurust seems to take it off nicely. I did one pass, used brake cleaner to remove the excess, then did another thin layer as the protective coat.
You don't have to worry too much about sealing the side-plate. It's quite difficult for water to get in there. I've serviced many waterlogged motors, and the water has always entered along the cable through the axle, in most cases because the wheel had been wrongly fitted with the cable exiting upwards instead of downwards. It's the cable you should seal if you can, but even that probably won't help considering points below.
Water can also get in through the disc holes if the screws are loose or missing and the holes are not blind. I'm pretty sure AKM motors have blind holes, so no problem; however, I know for certain that at least some Bafang motor have holes right through, so it's a good idea to seal them as well.
The biggest problem with motors and water is the change in temperature. When you use the motor, it becomes warm and the air inside expands. When you park up, the motor cools down, the air contracts and socks in any water that's in the path that the air would take, which is why you must have the cable exiting downwards. It's also best to lean your bike with the cable on the lowest side.