Hi!
I've purchased an elderly but apparently unused Yamaha XPC-26 Pedelec which has a few problems. Any help would be very useful.
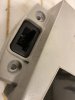
The first problem is that the battery pack is beyond recovery. I've managed to get three spare battery casings and made a 24v 5Ah SLA battery which works albeit with limited range and intend to make a 20Ah Li Ion battery over the next month or two. The batteries I can do but my problem is that the bike came with no battery charger. I can even do chargers but the sticking point is the connector for the battery pack input. The battery pack has a four blade male connector which looks to be vaguely generic and requires the corresponding free female that would have been a part of the original charger. Does anyone know that this connector is, where I might be able to get two or three or have a redundant/broken charger I can cannibalise?
The second problem is that I have zero documentation. Ideally I would like to get hold of a full service/repair manual so I can get a better understanding of the mechanisms and circuits but anything would be better than nothing. Can anyone help?
The third problem is that the front basket originally supplied with the bike is missing. I'm sure I can make something suitable but it would be nicer to get one of the originals. Anyone?
That's it for now folks!
I've purchased an elderly but apparently unused Yamaha XPC-26 Pedelec which has a few problems. Any help would be very useful.
The first problem is that the battery pack is beyond recovery. I've managed to get three spare battery casings and made a 24v 5Ah SLA battery which works albeit with limited range and intend to make a 20Ah Li Ion battery over the next month or two. The batteries I can do but my problem is that the bike came with no battery charger. I can even do chargers but the sticking point is the connector for the battery pack input. The battery pack has a four blade male connector which looks to be vaguely generic and requires the corresponding free female that would have been a part of the original charger. Does anyone know that this connector is, where I might be able to get two or three or have a redundant/broken charger I can cannibalise?
The second problem is that I have zero documentation. Ideally I would like to get hold of a full service/repair manual so I can get a better understanding of the mechanisms and circuits but anything would be better than nothing. Can anyone help?
The third problem is that the front basket originally supplied with the bike is missing. I'm sure I can make something suitable but it would be nicer to get one of the originals. Anyone?
That's it for now folks!