Torque arms, my first project..

scofield

Pedelecer
Sep 12, 2021
30
1
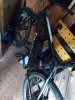
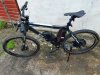
Hi. This is my first project, I've started converting a 2nd hand Carrera Vengeance with a 1000w rear hub motor. My first concern is with the torque arms, as I can't bear the thought of the wheel coming off or the frame/motor getting wrecked, nevermind myself.

I've bought 2 of those common kits with the 2 arms to do both sides, but not sure the best way to go about it.
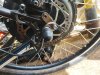
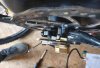
I'm not keen on the design of these kits, I feel it's not going to be rigid enough using 2 plates bolted together and then a jubilee clip on the frame. So without being able to make my own, I'm thinking whats the best way to use them. An idea for 1 side is to bolt 1 end of the arm to the caliper mount and then drill a hole to bolt the arms together. See the pic to see what I mean and let me know if this would be a good idea?
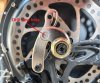
TorqueArm1.jpg

Top view:

top view.jpg

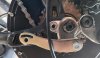
For the other side I'm not so sure about, I might have to use the clip like this:

TorqueArm2.jpg

Any advice / opinions appreciated
 

Nealh

Esteemed Pedelecer
Aug 7, 2014
19,990
8,173
60
West Sx RH
Yes omit the joob clip as certainly a weak link, your option is one which others have used and much better. A one piece solution is best and the two piece option is next best.
 

scofield

Pedelecer
Sep 12, 2021
30
1
Yes omit the joob clip as certainly a weak link, your option is one which others have used and much better. A one piece solution is best and the two piece option is next best.
I wish I had a 1 piece method, I'm not sure how I could do it, not bothered if it's a bit ugly.

Also, whats with those torque washers that come with the kit? surely the tooth is meant to sit inside the dropout? it would have to go down about 6mm to get there.
 

vfr400

Esteemed Pedelecer
Jun 12, 2011
9,822
3,985
Basildon
Some people add a bead of weld afterwards, which makes them much better. You have the right idea. When the azle piece is at right angles to the tie-bar you get the best resistance, but the far end of the tie-bar goes backwards and forwards, so the clips are not the best way to hold them, especially as the clips break quite easily. Your first photo is the best solution. If they're good quality torque arms, they'll be made of hardened steel, which can't be drilled with a normal drill. You need a 5% cobalt one; however, your ones look like cheap stamped ones, so are probably mild steel, and it's only the axle piece that needs to be hardened. Your 14mm axle is not as bad as a 12mm one because the axle piece has a better chance of getting a grip due to the slot being longer.

It's OK to drill your frame as long as there is plenty of meat around the hole. It's better to drill the drop-out casting rather than the tubes in the stays.
 

Nealh

Esteemed Pedelecer
Aug 7, 2014
19,990
8,173
60
West Sx RH
Yes axles are only 9mm for QR so with the 14mm hub axle you need to have the axle flat fully in the drop out so the D/O requires filing deeper, in your case 3 or 4mm even with the T/A's in place. The A/R tabbed washer sits also into the drop out, they are there just to locate the axle in place The T/A's are the belt and braces to resist the rotation and spinning out of the hub motor.
 

scofield

Pedelecer
Sep 12, 2021
30
1
You need a 5% cobalt one; however, your ones look like cheap stamped ones, so are probably mild steel, and it's only the axle piece that needs to be hardened.
I got them off ebay £6 a set, it says "iron and aluminum"...

Yes axles are only 9mm for QR so with the 14mm hub axle you need to have the axle flat fully in the drop out so the D/O requires filing deeper, in your case 3 or 4mm even with the T/A's in place. The A/R tabbed washer sits also into the drop out, they are there just to locate the axle in place The T/A's are the belt and braces to resist the rotation and spinning out of the hub motor.
I just filed it enough for them to sit at the bottom of the dropout by filing the bottom sides, something I read to do on here I think, although deeper would be better. Every video I've seen of these conversions show these washers with the tab just flapping over the top, and they point at 45 degrees, makes no sense to use them! I'll concentrate on the arms for now.
 

vfr400

Esteemed Pedelecer
Jun 12, 2011
9,822
3,985
Basildon
The tab washers don't really do anything, which is why you need torque arms. You do need to file the dropouts to at least get the axle fully in. One other point is that if you don't file deeper, the centre of the axle will be about 3 to 4mm off centre, which might bring the disc out of position in relation to the pads.
 

scofield

Pedelecer
Sep 12, 2021
30
1
Good point on the disc. I'll have to check that before I go drilling the brackets. Was hoping just getting the axle touching the bottom of the dropout would be sufficient and not have to file too much metal off.
I expected this to be the easiest part of the conversion but obviously not, but the arms and brakes have got to be priority before it can be completed, not worth the risk.
 

scofield

Pedelecer
Sep 12, 2021
30
1
Ok so I managed to drill through the torque arm bracket as planned, after half an hour and 3 drill bits later..so I'm satisfied the metal is strong enough, half the price of most too!
thumbnail_20210916_144536.jpg

Got the battery yesterday, left it on charge overnight..light was green on the charger this morning and battery was quite warm on 1 side, not sure thats a bad sign? it was half charged before I put it on so it should've finished charging hours ago..

Getting things in place now none the less. Think I'll get a front hydraulic brake and a different mount for the controller next though.

Could probably start a new thread for each issue, but would rather keep my journey contained in 1.
 

Nealh

Esteemed Pedelecer
Aug 7, 2014
19,990
8,173
60
West Sx RH
Yes best to keep the whole project within one thread.
 

scofield

Pedelecer
Sep 12, 2021
30
1
Any thoughts on the 'possible' battery issue? I told the seller, he said not to use it as a possible fault and is sending new 1 out tomorrow!
I was desperate to just see if things were working today so i loosely hooked things up and gave it a blast around the garden, it felt good!
 

Nealh

Esteemed Pedelecer
Aug 7, 2014
19,990
8,173
60
West Sx RH
With battery you are best not to go to sleep leaving it on all night, use a wall timer set for a 2 -4 hrs then finish charge off if needed when you wake up.
How long a battery charges for depends on the capacity and the voltage SOC.

It might not be anything to worry about, if they don't want it back open it and have a look to see if anything look amiss. The heat be a duff cell or might be one of the BMS mosfets, with it open (once SOC has been discharged ) charge it and see if you can detect where the heat may be coming from. You may well could end up with a range extender for nothing.
 
Last edited:

scofield

Pedelecer
Sep 12, 2021
30
1
Noted thanks. The seller is sending 1 tomorrow and should get by Monday. No mention of returns at all, which is pretty surprising for something as expensive. It's a Bespov 48v 13ah.

So I've got the controller mounted in the included bag, with all the wires stuffed inside it. I was hoping to get a box to put there but there isn't enough room unless the battery can be mounted further up, which I can't do. I don't plan to use in the rain. But would be good if it could handle a light shower if needed.
controller.jpg
Got to do a bit more cable management, fit the PAS sensor, hydraulic brake and brake sensors.
 

Nealh

Esteemed Pedelecer
Aug 7, 2014
19,990
8,173
60
West Sx RH
My controllers are in a under slung top bar bag or in a under slung saddle tool bag, none have issues riding in the rain.
 

scofield

Pedelecer
Sep 12, 2021
30
1
Thought I'd update my progress here. I've had a nightmare with couriers, finally got the parts and got it put together.
All working well but not gone for a full on test yet. I upgraded the front brake to hydraulic shimano m615, it's left hand but it was £32 brand new, so I can live with that. Also upgraded the front disc from 160mm to 203mm.

The battery mount didn't line up with both holes of the bottle holder, so it's just screwed into 1 hole. Even with that, it felt sturdy as those 2 rubber pads underneath really help, but I added a velcro strap around it for extra support.
Right gear shifter decided to stop working, but it's usable for now with just the front 3 speeds.
 

Attachments

scofield

Pedelecer
Sep 12, 2021
30
1
Given it a bit of a test now. Was dreading the big hill to get out of my village, but with a bit of pedalling managed to get my heavy 17 stone backside up there. So far I'm impressed, I just need to get used to the handling of the bike as I had a couple of sketchy moments! My back wheel didn't come off either so thanks for all the advice!