SimonMikkelsen
Members
-
Joined
-
Last visited
Everything posted by SimonMikkelsen
-
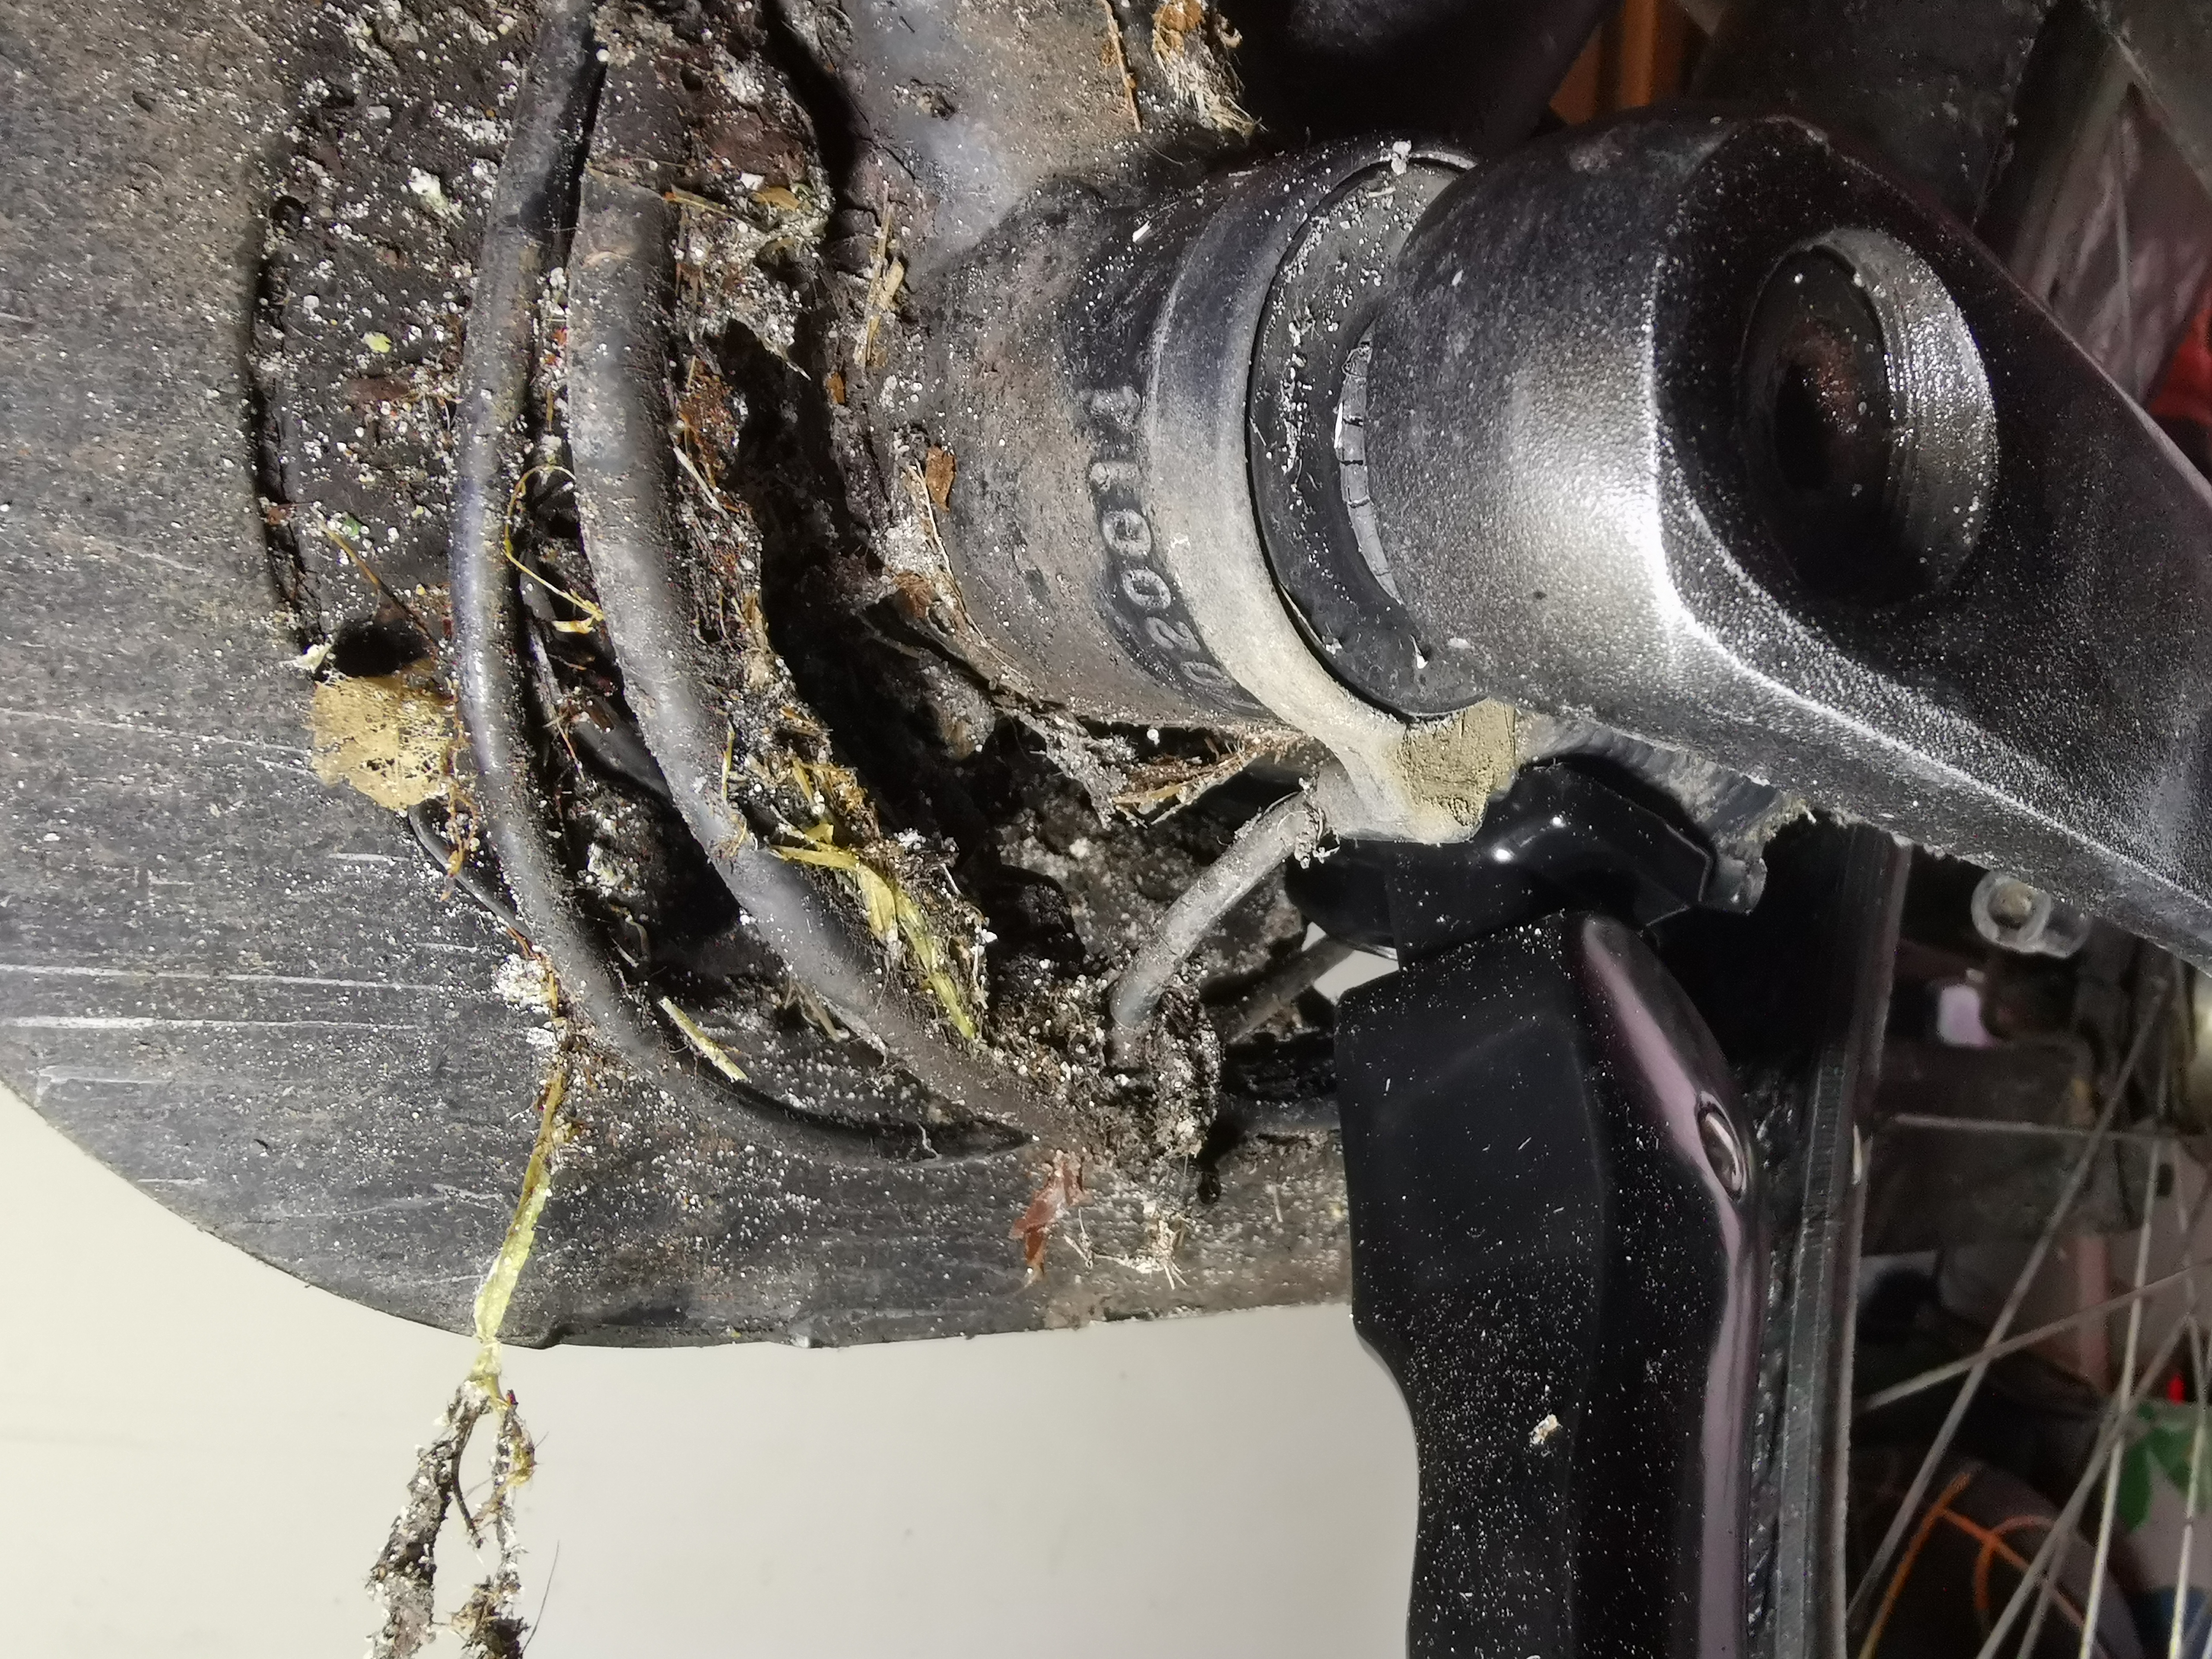
Thanks for all the advise: This is a writeup of what I ended up doing. I would have taken a couple of additional images and drawn on those I got, but as I have been constrained on time this is what I ended up getting out, as advise and inspiration to people who may want to do this on their own Brinckers bike. By writing to Brinckers they provided me with 2 addresses of companies in Denmark from which I could get technical support and spare parts. One would come to my town and fix the bike and the other could only sell parts. Well, the ones that would fix it never returned with a date, despite e-mails and phone calls so I ended up doing it myself. Buying from outside of EU is not really and option, as I in Denmark must pay import tax and VAT of even the cheapest goods. The expensive part is the fee I have to pay for paying tax and VAT. So I ended up getting the official sensor from Brinckers. The new sensor is not an exact copy of the old one: They seem to have fixed some of the issues they had with the old one. Most importantly: The sensor and the disc with magnets were only held together with friction on the bike, which was not enough, so Brinckers had added 2 O-rings to push them together. A real hacked DIY solution. The new sensor had 3 small plastic hooks to keep them together. The problem with this is, that the ring with the magnets are held very strongly to the crank shaft with friction, so when I tried to remove it to clean the area better, 2 of them broke off. So I added 2 O-rings to hold it together. The proper way to remove the new sensor is to use a flat screw driver to push it off, not pull in the sensor! The inner ring with magnets can be seen around the crank shaft. In the top of the shaft you see one of the broken bits that should hold the sensor better together. 1/3 to the left the only non broken one can be seen. The new sensor also had much tighter tolerances, requiring a very good cleaning in order to get all bits into the proper bits: Image: All those teeth had to be cleaned a lot more, because there pretty much was an exact fit to the new sensor. The problem with the old sensor was wear and the tiny tiny magnets that was mostly rusted away. The sensor is made of a plastic disc with magnets that rotates inside the main sensor, which is also plastic. Nothing is neither water nor dirt proof so it will wear out when plastic against plastic is rotating along with water and dirt. A cheap and bad solution. Pretty worn ring with magnets that are mostly rusted away. The non moving part of the sensor, also pretty worn but seems to be working fine. The cable was about 90 cm long, which is longer than necessary, but that was good in my case: The cable runs under the fender, requiring a lot of disassembly to replace it. So I just stripped it to the frame. Less pretty but much easier to replace. My cabling is not pretty, but I did not have to get the back wheel off, which would require a lot of work (for me at least). You can also spot one of the 2 O-rings I used (as in the original Brinckers solution) between the pedal arm and the sensor. My plan is to get a sensor or 2 on Amazon.de. They goes for €15 but there is no tax fee. An extra cost is that Brinckers has split the 3 cables from the sensor into 2 different connectors, where all the standard sensors have 3 cables in one. Perhaps to discourage people from buying standard off brand sensors? So I have to get a crimping kit and some connectors to make it work. Currently I don't have the courage to replace display and controller. What I have works ok and there is a lot of cabling involved in that. With little kids time is also a factor. Bonus: A shot of the controller, when I had it out. Probably a totally standard thing:


-
... Thank you very much. I will try to take it apart the next time I have the time. Probably a weekend. I will post the result of my findings. I also like the suggestion about replacing the controller etc. with something better and unlocked.
-
Hi I have attached a few images but a more comprehensive set (including the motor) is in the album https://www.jottacloud.com/share/oou9uah6pkjq I am guessing this cable could go to the PAS sensor, as you see the pedal crank is attached to the bike. By just looking at it I have no idea how to disassemble it. I have not tried to take off the pedal crank, but that is my only guess. The connection to the motor: The display: The display looks a lot like the one on Das Kit. There is material that states, that when using a lot of these displays, you can press + and - for some seconds, enter a code and get into the settings menu. On this bike I can press SET for some seconds and get directly into the menu. However, I cannot set the speed at which the motor stops helping. The motor will start fading out at 25 km/h and I can set a speed it will fade to. Setting it to infinite lets me get about 50% at 27 km/h and 25% at 29 km/h. I think it is safe to say, that Brinckers does not make their own parts but have everything assembled in China or the East. Except the tail light, because that is made in Europe and (this is a guess) to not have to ship them to China they get the batteries without a tail light (the whole for the tail light cable is glued shut) and put a tail lights with AA batteries on in Europe. Except for the battery the bike has worked fine despite heavy use in all kinds of danish weather. Regarding powerlevel, I have it set to power, but the issue will show even at a low power level, e.g. when I follow the kids to school up a steep hill. It seems to happen more often when I turn the pedals slowly, but it still happens when I turn them fast. 1½ year ago I got my battery renovated at at place that promises to use high quality batteries. They could fit 20 Ah into the case, where the original only came with 10 Ah. It is also correspondingly heavier and have a corresponding longer range. So my starting point is that the battery is ok.


-
In the latest months, my e-bike has started to cut power for roughly 0.3-0.5 seconds when I ride. The shortest cuts can just be felt as a short stop of help from the motor while the longer can be seen as an actual power cut in the display. The cuts feel exactly like, if I stop pedaling for at very short while and starts again. For that reason I'm thinking about the sensor that tells the bike I'm turning the pedals. No bike shop will touch the bike, because they are not certified (see below) so I have to fix it myself. Any hint to what I should start take apart, look for etc? Any online guides or just guesses at what part could be bad. I have tried searching for the sensor types the bike could use, but I have not been able to pinpoint a specific type. I do basic mechanical bike repairs regularly and has a good understanding of electronics and computers in general. But I have never worked on the electrical parts of an e-bike before. The bike is a standard front wheel hub motor bike from 2018: I set it to power level 1-9 and when I turn the pedals it will help with this power and fade it out at 25 km/h. It is a Brinckers Brooklyn F7. Brinckers was only sold and serviced in Denmark by a shop named Hellorider, which closed a couple of years ago. Because no one else are certified in Brinckers nor can get parts, I cannot get any bike mechanic to look at the electrical parts. Actually a lot of independant shops were service partners, but they cannot get parts and will not touch the bike. Brinckers are big in Holland, but does not want to help in any way.
-
When a bike is going 25 km/h it has a kinetic energy, i.e. potential energy. You only use energy to get to this point (accelerate), but unless another force is acting upon the bike it takes no additional energy isneeded to stay at your current velocity. That is why space crafts can travel for many years on a single burn, because there is no resistance from air. In the real world you have friction in the bike, from the road, from the air and from gravity (when going up hill) which subtracts energy from your system (you + bike). That has nothing to do with the potential energy and is much more complicated to calculate than just squaring the speed. Kinetic/potential energy has nothing to do with the energy needed to maintain a given speed. You mostly have to think about your kinetic energy when braking, because then you want to remove it.
-
I think I need to find the extended manual. There was only a single max speed (SET2 in the manual) and no options for PA levels (which like you say would be nice with only 6 instead of 9). I tried holding + and - down for a long time but got no pincode screen (or anything else), like in the video. When switched of or set to PA 0 I hear the motor is switched off. When PA is 1 or higher I can hear the motor working a bit even when going so fast it should not help. So I think the motor part is ok. Because I experience the problem even when going fast with everything switched off, I have thought about a sensor or some part of the system that end up holding a charge for longer than intended. E.g. like a capasitor that when charged above a certain level, would cause the motor to switch off - but only on PA level 9. Obviously I don't know if you two have a history, but personal battles are no good in public. To clarify, my bike draws maximum power both a low speeds and up to about 25 km/h. From a general electric point of view the battery should be pushed as much at 10 km/h as at 35 km/h (where it should not help at all) but I don't know the finer implementation details of e bikes, so I'll have to ask the experts about what is really happening when I go fast and the motor should not help me.
-
I didn't find the extended manual either (searched the forum on manual and Bigstone on your user) but I tried the max speed setting of the manual you posted, and upping it from 26 km/h to just 27 helped a bit and 28 even more. But I did a test: I turned off the bike (i.e. the display) and drove down hill with at least 35 km/h, turned it on while still speeding. Then it did the same. When I drive with PAS 0 I can hear the motor a bit, but when I turn it off is says nothing. I guess that the motor or battery should not be active when the LCD is turned off. Btw. when I set max speed to 40 km/h the bike gradually turned down power already at the usual 26 km/h so I guess this bike is definately has its limits.
-
Here are 2 pictures with the LCD control panel turned on and with all possible symbols turned on (while starting). Thanks.


-
A year ago I bought an ebike from dutch Brinckers, the dealer said the electric system is provided by Batavus. The motor is in the front wheel. It has 9 power levels, 1-9 where 9 is max. If I go a bit past 25 km/h, like 27, the motor will kick out already at about 22 km/h when I am in power level 9. If I change to 8 (which is lower power) it will work just fine, but of cause it only provides the power of level 8. The general formula is that the faster and the longer I go past 25 km/h the longer time level 9 will not work. All other levels works just fine all the time. It is very frustrating in a hilly city, where I can go with 40 km/h down hill and when I have to go up hill it will be with 20-22 km/h where the bike with my help would go 27 km/h. The motor isn't just overheating. After going like 30 km/h level 9 will completely stop working for a while but level 8 (and the others) will work just fine. So I will get motor power by going to a lower power level. Does anybody know about such a behavior? It is quite frustrating in several ways.