
I returned to cycling with the help of electric bikes a few years ago and managed to build my fitness levels to the extent I no longer need the electric assist. I built up a fair amount of DIY kit which I've now decided to sell off as we need the space.
If you've opened this thread you probably already know about the pros and cons of the Tongxin motor but to summarise, they are lightweight, quiet and uniquely, with the minimum rolling resistance allow you to ride the bike as normal without too much drag so that you only need to engage the motor perhaps on the steeper hills. They should be used to assist your pedalling and in particular should not be expected to get you moving from a standing start otherwise they can be susceptible to breakage. If you search around on the forum you will find many fans that have used them for thousands of miles without problems when used in the right way. They are also used by the company Cytronex who provide lightweight stealthy bike conversions.
Collection in person from St Albans would be the most straightforward but I can look into postage if necessary.
I would prefer to sell everything in one go but may consider breaking it up if I can't find a buyer for everything. I'm looking for £300 for the lot.
This should only be purchased by a competent DIYer and someone who's confident they can fit it to their bike and use it without blowing themselves up or otherwise injuring themselves. It's all at your own risk.
Here's what I have:
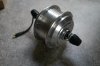
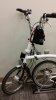
1) Tongxin 36V 190rpm motor fitted into mavic 700c A319 Rim. I fitted this to my wife's bike with the vain hope of getting her into cycling which she never did - It's done a maximum of 10 miles. It has a 3 pin push connector fitted.

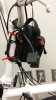
2) A123 Batteries, controller, fuse, anti-spark MOSFET circuit, connectors etc.
The batteries are about 3 years old and have only been charged approx. 50 times. They are configured as two 6S packs. They still seem remarkably well balanced and are still charged up after a year idle. They seem to be good quality cells and I suspect have plenty of life yet but can't guarantee this.
The batteries are connected to the controller via deans connectors. Also included in the circuit is a 10A fuse and a MOSFET circuit which prevents the nasty spark many ebike kits suffer when the battery is connected.
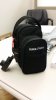
There is also a 9-pin female push socket included which attaches all this to the wiring 3) below. Typically you would conceal all this inside a largish saddle bag or rack bag with just the 9-pin connector poking out.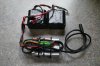
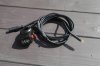
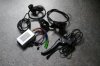
3) Throttle control & bike wiring. This is a simple thumb throttle with an on/off switch and battery level gauge. You would attach the wiring to the bike using some cable ties. The bike wiring connects to the motor at the front and the 9 pin connector attached to the battery/controller in 2) above.
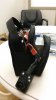
4) Spare Tongxin 190 rpm 36V motor. This is unused apart from spinning it up to check it works. It has suffered a couple of small dings in the metal casing which occurred in the shipping from China but they don't affect the operation. It comes fitted with a 3-pin push connector. I will also supply the corresponding push connector attached to a length of lead.
5) Turnigy Accucell 6 battery charger with power supply. This can be used to do a full healthy charge which ensures the batteries are kept in correct balance. You can only do one battery pack at a time with this.
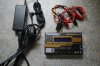
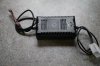
6) "Quick and dirty" chargers. Using this you can charge both packs in series at the same time. I have two of these. One has a cracked case but works fine. I used to keep one at work and the other at home. You could use these for day to day charging but do a balancing charge using the turnigy charger every few weeks to keep the cells healthy.
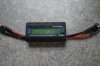
7) Turnigy power meter. You can use this to measure power usage of the kit in use, or how much power you push into the batteries when charging. Not essential but interesting if you're an engineer like me! The screen looks scratched in the photo but that's just because I never removed the protective film. It's actually in much better condition than it looks.
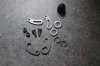
8) Random hardware - torque arms, spacers. A torque arm may be overkill for a Tongxin motor but should probably still be fitted for peace of mind. You may need to find some additional nuts, bolts & washers to fit this.
9) Various other controllers, throttles, brake lever etc. The controller is a smaller design than the one used in the kit above but I never got round to fitting it.
If you've opened this thread you probably already know about the pros and cons of the Tongxin motor but to summarise, they are lightweight, quiet and uniquely, with the minimum rolling resistance allow you to ride the bike as normal without too much drag so that you only need to engage the motor perhaps on the steeper hills. They should be used to assist your pedalling and in particular should not be expected to get you moving from a standing start otherwise they can be susceptible to breakage. If you search around on the forum you will find many fans that have used them for thousands of miles without problems when used in the right way. They are also used by the company Cytronex who provide lightweight stealthy bike conversions.
Collection in person from St Albans would be the most straightforward but I can look into postage if necessary.
I would prefer to sell everything in one go but may consider breaking it up if I can't find a buyer for everything. I'm looking for £300 for the lot.
This should only be purchased by a competent DIYer and someone who's confident they can fit it to their bike and use it without blowing themselves up or otherwise injuring themselves. It's all at your own risk.
Here's what I have:
1) Tongxin 36V 190rpm motor fitted into mavic 700c A319 Rim. I fitted this to my wife's bike with the vain hope of getting her into cycling which she never did - It's done a maximum of 10 miles. It has a 3 pin push connector fitted.
2) A123 Batteries, controller, fuse, anti-spark MOSFET circuit, connectors etc.
The batteries are about 3 years old and have only been charged approx. 50 times. They are configured as two 6S packs. They still seem remarkably well balanced and are still charged up after a year idle. They seem to be good quality cells and I suspect have plenty of life yet but can't guarantee this.
The batteries are connected to the controller via deans connectors. Also included in the circuit is a 10A fuse and a MOSFET circuit which prevents the nasty spark many ebike kits suffer when the battery is connected.
There is also a 9-pin female push socket included which attaches all this to the wiring 3) below. Typically you would conceal all this inside a largish saddle bag or rack bag with just the 9-pin connector poking out.
3) Throttle control & bike wiring. This is a simple thumb throttle with an on/off switch and battery level gauge. You would attach the wiring to the bike using some cable ties. The bike wiring connects to the motor at the front and the 9 pin connector attached to the battery/controller in 2) above.
4) Spare Tongxin 190 rpm 36V motor. This is unused apart from spinning it up to check it works. It has suffered a couple of small dings in the metal casing which occurred in the shipping from China but they don't affect the operation. It comes fitted with a 3-pin push connector. I will also supply the corresponding push connector attached to a length of lead.
5) Turnigy Accucell 6 battery charger with power supply. This can be used to do a full healthy charge which ensures the batteries are kept in correct balance. You can only do one battery pack at a time with this.
6) "Quick and dirty" chargers. Using this you can charge both packs in series at the same time. I have two of these. One has a cracked case but works fine. I used to keep one at work and the other at home. You could use these for day to day charging but do a balancing charge using the turnigy charger every few weeks to keep the cells healthy.
7) Turnigy power meter. You can use this to measure power usage of the kit in use, or how much power you push into the batteries when charging. Not essential but interesting if you're an engineer like me! The screen looks scratched in the photo but that's just because I never removed the protective film. It's actually in much better condition than it looks.
8) Random hardware - torque arms, spacers. A torque arm may be overkill for a Tongxin motor but should probably still be fitted for peace of mind. You may need to find some additional nuts, bolts & washers to fit this.
9) Various other controllers, throttles, brake lever etc. The controller is a smaller design than the one used in the kit above but I never got round to fitting it.
")


