
Thought I'd submit a short resume of my E-Bouncer build...
03 09 2014 – Ordered Bpm2 (200rpm) built into a 26” wheel; S-12s controller; Lcd3 display etc. from BmsB.
12 09 2014 – Order shipped through Fedex.
18 09 2014 09:50 – Order delivered )
)
On unpacking, it was obvious the box was open at one end, but nothing was missing (Maybe customs, but not resealed).
Everything was in good order, but the wheel, although true & round, played a polyphonic little tinkling tune when bumped: Half the spokes on one side were less than finger-tight, so it's just as well it needed dishing to sit centrally in the frame. This is a first-time job for me, but a couple of hours diddling with a spoke key did the job OK & the wheel seems to have stood up to the rigours of its first day on the trails.
The swinging arm of this bike is all steel with 5.0mm thick dropouts, so I haven't fitted a torque stay.
Now it was time to rethink the placement of the controller:
I had intended to bung it in a Wedge bag, under the saddle & had ordered a Topeak wedgie ( small) for the purpose; Unfortunately, I was totally unprepared for the sheer ginormosity of said controller – It's truly hooge!
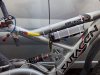
The only other place, really, was in the small frame triangle, but even this would only accommodate the Hulk on its flat; so that's where it jolly well sits.
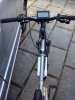
Cabling to the motor & from the pas sensor & throttle were of manageable length, but the umbilical from the handlebar display needed coiling under the controller, out of sight; And the lead on the brake sensor I had lying about, needed extending.
The motor cable runs down the main tube & under the swingarm pivot, but is a tad unsightly there, so I'll re-route it inboard if I can be arsed to ferniggle the connectors out from their snug hideaway between the rear damper braces: Should be done really – spoils the look of the thing.
The Ezee 14ah flatpack battery goes in a backpack, surrounded by 1/2” thick, high-density closed-cell polyethelene packing & connects, via an umbilical of 2.5mm cable, about a metre long, to the Anderson-equipped short cable seen wrapped round the seatpost.
The Andersons disconnect without any undue tugging (as proven todayboth when I fell orf & when I forgot to disconnect before walking away!).
One thing worth a mention, is that I route the umbilical down the right side of the backpack, then across my crotch, to connect in front of the seatpost: This way, I can mount & dismount by swinging my leg over the saddle without pulling apart the connectors. Any slack cable is tucked under the waist strap of the pack.
It works well & is perfectly comfortable & very practical in use.
I've set-up the Display parameters so that I have throttle control even when pas assistance is off: This enables me to use fine throttle control when negotiating tricky sections, although I'm finding that level 1 pas is very usable on many tracks, 2 gets me up pretty steep climbs, and I haven't even tried the higher settings in earnest yet – The grunt this thing produces inspires serious respect.
For now, I'm running it in Torque-simulation mode, but will try speed-mode once I feel comfortable with it; and as for Cruise Control... You can stick that where the sun don't shine – It has No place on singletrack! It frightened the bejaysus out of me when it kicked-in on my first test-run around the block.
The only thing left to do now is to sort out some means of hiding the controller & wires from view:
My first thought was to use some thin stainles-steel sheet, from domestic boiler trunking, that I have somewhere in the black 'ole I call my shed; but maybe I can fabricate something from a battered pannier bag that came second in a contratemps with a gatepost, lined with some 3 or 4mm closed-cell polyethylene or neoprene – like a kind of sleeve that goes over the top tube & controller.
I think I'll leave the red/yellow power connector exposed, as an indicator the bike's 'lectric, in case of accident.
Anyone struck by inspiration?
I guess I could always chop orf a leg of my old wetsuit – a bit of velcro...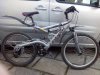
03 09 2014 – Ordered Bpm2 (200rpm) built into a 26” wheel; S-12s controller; Lcd3 display etc. from BmsB.
12 09 2014 – Order shipped through Fedex.
18 09 2014 09:50 – Order delivered
)On unpacking, it was obvious the box was open at one end, but nothing was missing (Maybe customs, but not resealed).
Everything was in good order, but the wheel, although true & round, played a polyphonic little tinkling tune when bumped: Half the spokes on one side were less than finger-tight, so it's just as well it needed dishing to sit centrally in the frame. This is a first-time job for me, but a couple of hours diddling with a spoke key did the job OK & the wheel seems to have stood up to the rigours of its first day on the trails.
The swinging arm of this bike is all steel with 5.0mm thick dropouts, so I haven't fitted a torque stay.
Now it was time to rethink the placement of the controller:
I had intended to bung it in a Wedge bag, under the saddle & had ordered a Topeak wedgie ( small) for the purpose; Unfortunately, I was totally unprepared for the sheer ginormosity of said controller – It's truly hooge!
The only other place, really, was in the small frame triangle, but even this would only accommodate the Hulk on its flat; so that's where it jolly well sits.
Cabling to the motor & from the pas sensor & throttle were of manageable length, but the umbilical from the handlebar display needed coiling under the controller, out of sight; And the lead on the brake sensor I had lying about, needed extending.
The motor cable runs down the main tube & under the swingarm pivot, but is a tad unsightly there, so I'll re-route it inboard if I can be arsed to ferniggle the connectors out from their snug hideaway between the rear damper braces: Should be done really – spoils the look of the thing.
The Ezee 14ah flatpack battery goes in a backpack, surrounded by 1/2” thick, high-density closed-cell polyethelene packing & connects, via an umbilical of 2.5mm cable, about a metre long, to the Anderson-equipped short cable seen wrapped round the seatpost.
The Andersons disconnect without any undue tugging (as proven todayboth when I fell orf & when I forgot to disconnect before walking away!).
One thing worth a mention, is that I route the umbilical down the right side of the backpack, then across my crotch, to connect in front of the seatpost: This way, I can mount & dismount by swinging my leg over the saddle without pulling apart the connectors. Any slack cable is tucked under the waist strap of the pack.
It works well & is perfectly comfortable & very practical in use.
I've set-up the Display parameters so that I have throttle control even when pas assistance is off: This enables me to use fine throttle control when negotiating tricky sections, although I'm finding that level 1 pas is very usable on many tracks, 2 gets me up pretty steep climbs, and I haven't even tried the higher settings in earnest yet – The grunt this thing produces inspires serious respect.
For now, I'm running it in Torque-simulation mode, but will try speed-mode once I feel comfortable with it; and as for Cruise Control... You can stick that where the sun don't shine – It has No place on singletrack! It frightened the bejaysus out of me when it kicked-in on my first test-run around the block.
The only thing left to do now is to sort out some means of hiding the controller & wires from view:
My first thought was to use some thin stainles-steel sheet, from domestic boiler trunking, that I have somewhere in the black 'ole I call my shed; but maybe I can fabricate something from a battered pannier bag that came second in a contratemps with a gatepost, lined with some 3 or 4mm closed-cell polyethylene or neoprene – like a kind of sleeve that goes over the top tube & controller.
I think I'll leave the red/yellow power connector exposed, as an indicator the bike's 'lectric, in case of accident.
Anyone struck by inspiration?
I guess I could always chop orf a leg of my old wetsuit – a bit of velcro...
Last edited:


