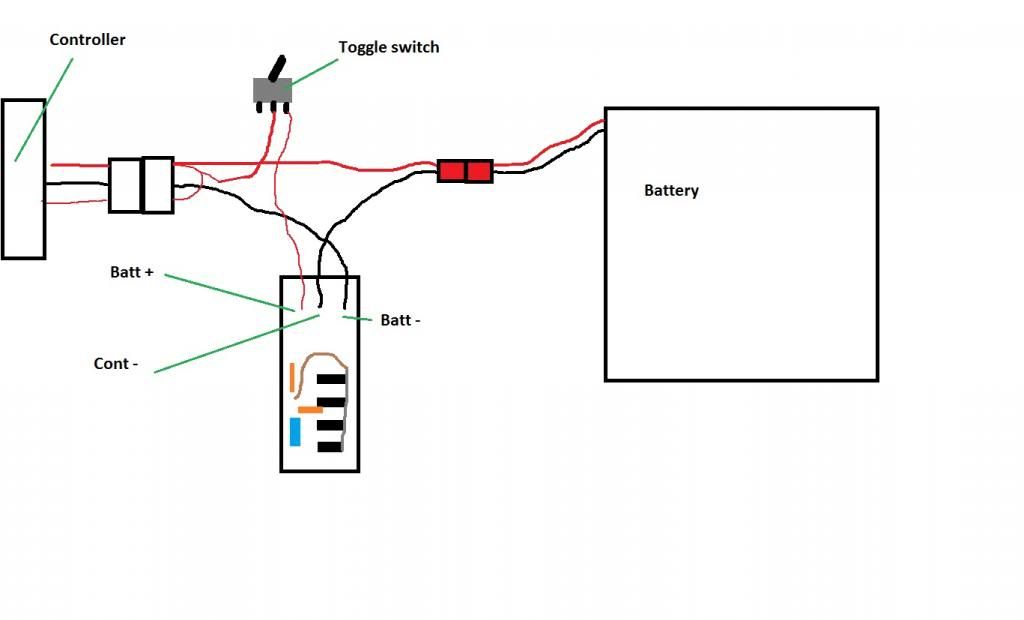
Bridge from battery to controller

Old_Dave

Esteemed Pedelecer
Sep 15, 2012
1,211
2
Dumfries & Galloway
I've done loads of model aeroplanes
I've crashed more than I built :rolleyes: (and got called a few choice words)

Old Dave's idea about the wood grain is good except that all your joints will show through too.
Lol.... grain match or veneer.. if thats not possible, don't have the joints where they can be seen then :D
 
D

Deleted member 4366

Guest
I've crashed more than I built :rolleyes: (and got called a few choice words)


Lol.... grain match or don't have the joints where they can be seen then :D
I was thinking about it having rounded corners like mine otherwise it'll look too boxy, and you can't have grain around the curve, so itwould be a bit tricky to hide the joints. My frame of reference is how I constructed mine, but maybe there's a better way.
 

103Alex1

Esteemed Pedelecer
Sep 29, 2012
2,228
67
The thin red wire loop that you made is necessary for the controller to give power. If you put a switch on it, it would switch the motor on and off, but not the controller, so, if you left your bike for a day or so, the battery would be flat even when switched off. To avoid that, you need an additional switch between the battery and controller that can manage more than 30 amps. Most can't, so people often disconnect the battery at the end of their ride, which isn't easy if it's inside a box. Now you can see the advantage of the electronic switch.
That makes perfect sense and the electronic switch a definite must.

Those FETs that I linked to will be fine. If you want genuine ones, I can supply you with the complete switch for £15.
Where do I sign ? :D

Covering with Solarfilm takes quite a lot of practice. I've done loads of model aeroplanes, so it was easy for me and I have the special iron. It might be better to use a filler primer and then spray with car paint.
OK. The spray paint idea is definitely better than the Solarfilm for me I think (albeit a domestic will almost certainly ensue when I appear with a can of that lol) - presumably I'm going to have to give it a load of coats unless I can brush on a translucent epoxy coating over the top ?

I'm always coming from a boat angle on this stuff I'm afraid .. bikes and models are all new adventures and the when I had one the car just went off to the nearest garage or bodywork shop ;) (oh the wasted opportunities over the years ...)
 

103Alex1

Esteemed Pedelecer
Sep 29, 2012
2,228
67
Yes... its in all probability its Solarfilm :p

O'h the wheels on the bus go round and round, hahahahha
lol. I'm like this with everything - in case you hadn't guessed by now. Used to drive my teachers demented :eek: and likely nothing's changed !!
 

Old_Dave

Esteemed Pedelecer
Sep 15, 2012
1,211
2
Dumfries & Galloway
I'm like this with everything
But its a good thing .... A foolish person is one that does not ask questions nor explore possible solutions.

If the convention is to push the broom... try pulling it, you never know what may happen (apart from the broom head falling off, lol)
 

103Alex1

Esteemed Pedelecer
Sep 29, 2012
2,228
67
But its a good thing .... A foolish person is one that does not ask questions nor explore possible solutions.
That's reassuring - still drive myself round the twist on a regular basis grappling with accepting all sorts of things until I understand why (or more usually when it comes to having things "why not"). The house design was "interesting" as I'm sure you can well imagine. Funny thing is we got there fine working with engineers but 10 architects walked off the job in succession... along with their glossy catalogues. I kid you not ;). Some of their ideas looked nice but most of them were completely impractical to regularly maintain, fund upkeep or use day-to-day. Good design looks good, feels good and works too. That's the way we like it :cool:.

If the convention is to push the broom... try pulling it, you never know what may happen (apart from the broom head falling off, lol)
But the boom head on most brooms sold these days falls off if I push too .. lol !
 
Last edited:
D

Deleted member 4366

Guest
lol. I'm like this with everything - in case you hadn't guessed by now. Used to drive my teachers demented :eek: and likely nothing's changed !!
Your easy compared to the kids I've been teaching for the last 10 years. At least you look in the right direction when we're showing you.

I'll try and make the switch on Sunday or Monday. If you don't hear anything by Monday night, give me a reminder.
 

103Alex1

Esteemed Pedelecer
Sep 29, 2012
2,228
67
I'll try and make the switch on Sunday or Monday. If you don't hear anything by Monday night, give me a reminder.
That's great - many thanks. :)
 

103Alex1

Esteemed Pedelecer
Sep 29, 2012
2,228
67
Okayyyyyy ...... After feeling pleased with myself for doing some more soldering I fear I may need a new controller lol. Possible disaster but having been through everything and checked / rechecked I still have no idea what I did wrong.

First thing I did was to solder on a deans male to the cable connecting controller to battery which I made the other end of this week.

Took great care to make sure the red positive wire was soldered onto the positive pin on the Deans. Did the same with the negative.

Then took apart the connector on the battery making sure wires never touched and +ve was insulated at all times. Soldered negative onto negative pin of Deans female and positive onto positive pin after negative completely insulated.

So far so good - may need some bigger shrinkwrap to pop over the male and tidy up the battery end but all looked fine otherwise :

20130203_021516[1].jpg20130203_021543[1].jpg20130203_021615[1].jpg

Then connected battery to controller to check all fitted together and a big spark came out of the controller socket where the black negative on the controller socket joined the connector lead.

I am a bit disheartened to be honest - followed all instructions, watched vids on how to correctly solder Deans connectors and mirrored the male / female direction of the Kettle plugs in the Deans plugs. Took crazy amount of care with everything !

I obviously fear I may have damaged the controller. Not sure what to do - what have I f****d up ? lol. :rolleyes:

I don't have a multimeter for testing any voltages etc. and can't connect the motor till my torque plate is back or the wheel will likely do my dropouts in. They say experience comes at a price - just hope the battery is OK and I can get a KU123 from somewhere without ordering from China if it's knackered or I'll be licking my wounds good & proper lol

Help !!!!!

Edit : - after mulling over whilst packing away should mention that said spark flew when Deans connector male / female were joined and I then attached the other end of the lead to the controller box. Perhaps this meant the wire was live when I tried to join it to the connector instead of fitting that end first and then joining the Deans :confused: .. I know next to nowt about such things so would need warning if there are connection sequencing considerations ! On the plus, I haven't burned the house down yet lol.
 
Last edited:

banbury frank

Banned
Jan 13, 2011
1,565
5
Hi Alex I am up and just awake very busy today have Bikes and kits for dispatch on Monday

First a meter with all you need

DIGITAL LCD MULTIMETER VOLTMETER AMMETER AC DC METER OHM CIRCUIT TESTER | eBay

second the 5 small wires on the 8 pin are + and - 5 volts and the 3 hall sensors

3rd it is normal when connecting the battery to the controller to get a large flash as the main capacitors in the controller charge UP

Looks Good so far

Frank
 
D

Deleted member 4366

Guest
Sound perfect to me. You were ready roll. You want to try connecting 60v: The spark is nearly enough to melt the connector, but is otherwise harmless. That's why you need that switch I'm making for you!
It makes you jump when you connect, but it's not enough volts to give you a shock, so just be confident when you connector. Try not to throw it across the room.
 
Last edited by a moderator:

NRG

Esteemed Pedelecer
Oct 6, 2009
2,592
10
You could place a precharge resistor accords the switch contact to reduce or eliminate the spark. It would mean of course the controller would never be truly off unless you switch the resistor as well.
 
D

Deleted member 4366

Guest
You could place a precharge resistor accords the switch contact to reduce or eliminate the spark. It would mean of course the controller would never be truly off unless you switch the resistor as well.
Good point, but within a couple of days he'll have a proper remote switch with inrush control, so in this case, he doesn't need the pre-charge resistor.
 

103Alex1

Esteemed Pedelecer
Sep 29, 2012
2,228
67
Sound perfect to me. You were ready roll. You want to try connecting 60v: The spark is nearly enough to melt the connector, but is otherwise harmless. That's why you need that switch I'm making for you!
It makes you jump when you connect, but it's not enough volts to give you a shock, so just be confident when you connector. Try not to throw it across the room.
Thank the lord for that - I honestly thought I'd broken it last night and had resigned myself to humbly seeking a solution for my newbie screw-up !

The spark wasn't a problem in itself - have had a few volts through me unplugging dodgy plugs in Africa as a child so am somewhat non-plussed about the odd "power surge". Wakes you up lol. Was just that I didn't expect it owing to no experience and feared the worst ;) .. hopefully will get my torque arm back by Tuesday and so can test the motor in the dropouts with it fitted to make sure I don't b***** them in the process :)
 

103Alex1

Esteemed Pedelecer
Sep 29, 2012
2,228
67
That's fantastic - clear as day :D

Just to confirm then - the wires from battery +ve on the switch to the toggle switch and toggle switch to controller connector are thin red wires from flex like I made the loop with ?

Where the wire from toggle switch joins the 'loop' on the controller connector, is this just a case of :

1. cutting a section of insulation away from the middle of the existing 'loop' leaving the wire intact

2. sliding a piece of shrinkwrap up the wire from the toggle switch ready

3. wrapping the exposed end of the wire from the toggle switch around the exposed wire in 1 and soldering it on so there's a 'T-join of sorts

4. sliding the shrinkwrap up over the soldered joint to tidy up

If so then just got to get off my butt and pick up the toggle switch ... and get my head around how long I need the wires to the toggle switch to be depending on where this will be installed :cool:
 
D

Deleted member 4366

Guest
Yes, you got it absolutely right. You can use any wire you like to the switch as long as it's thick enough not to break off easily. The thin red wire you used before looks about right, but don't worry about the colour.
 

103Alex1

Esteemed Pedelecer
Sep 29, 2012
2,228
67
The thin red wire you used before looks about right, but don't worry about the colour.
OK. I can use one of the other wires from the flex that came out of (cut off the plug from an old Sony Laptop power lead and cannibalised the wires from within).
 

103Alex1

Esteemed Pedelecer
Sep 29, 2012
2,228
67
If you want a more permanent solution, you can use either XLRs (micriohone type) or DC power jack and socket. [/url]
Heck, it's not easy to find ones with water/dustproof covers is it lol. Been at it for hours and finally tracked this down for use with an XLR male :

3-Pin XLR female chassis socket with end waterproof cap XLR123,View 3-Pin XLR female chassis socket with end waterproof cap,Accuracy Pro Audio Product Details from Ningbo Central Star Electronic Technology Co., Ltd. on Alibaba.com

... looks perfect to go on my box (I think). There is something virtually identical on the Kalkhoff battery cases for on-bike charging if you don't want to take the battery off (except it's a 4-pin for coupling to the incoming XLR cable which is a 4-pin) :

20130205_024328[1].jpg

... you can always rely on the Germans to sort out the details and get the sensible fittings lol.

Only thing is ...... I don't need 500 of the blooming things and can't for the life of me find them for sale anywhere retail. If anyone knows how to get hold of one of these would be very grateful for a contact.

Thanks. :cool:

Edit :

Altenatively, would these be suitable to substitute the kettle plugs on battery charger with orientation female socket built in connected to battery, male plug on charger, and cap on female when not in use :

http://www.canford.co.uk/Products/20015/41-391_NEUTRIK-XLR-NC3FD-S-1-B-Female-panel-screw-terminal

http://www.canford.co.uk/Products/22107/41-032_NEUTRIK-XLR-NC3MXX-Male-cable

http://www.canford.co.uk/Products/2006273/40-791_NEUTRIK-NDF-DUMMY-PLUG-XLR-female

The female socket which the battery would be connected to comes in screw terminal, crimp or solder versions ... does it matter much which on this application :confused: ? Oh the joys of electrics .. never would have dreamed there were so many options for these things - makes me grateful the 3-pin mains plug is standardized ! :rolleyes: :eek:
 
Last edited: