Help! Crossfire KT Upgrade

Eejit

Finding my (electric) wheels
Sep 19, 2020
13
0
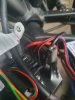
I haven't been able to repair my MK 2 Display and a replacement will cost approx £130. I have assumed that the problem with my cut-out has been the pin on the display but of course might not be.

I've searched the forums and noticed that the electronics can be replaced with a KT system but I've not been able to ascertain what this system comprises of. I've seen mention of PAS, speed sensor and LCD3 but cannot find these. A link gives a 404 error.

Does anyone have a definitive list for this kit and the links? I'd rather spend money to replace the electronics and have a working system than spend money on a new display that only MIGHT fix the problem.
 

vfr400

Esteemed Pedelecer
Jun 12, 2011
9,822
3,985
Basildon
You can choose either of these kits depending on where you want to install the controller. I prefer the one with block connectors because it's easier to test when you install it. Other guys used the one with moulded connectors so that it could be installed in the same place as the present one. Get a throttle even if you don't want to fit it because they're useful for testing.

You'll need a pedal sensor (best not a 12 magnet one); A speed sensor in case of problems with the one in your motor; a motor cable that matches the controller at the controller end (the other end wil be cut off to solder the wires; and an LCD (not LCD1).


  • Like
Reactions: Eejit

Eejit

Finding my (electric) wheels
Sep 19, 2020
13
0
That's fantastic. Thanks very much. A couple of questions.

I assume that when you say "block connectors" you're talking about

Why not 12 magnet one? more not better? So BZ-10C or 8PAS?

I understand the present controller is in the battery holder at the bottom?

Is there a guide on carrying out the replacement? I could probably work it out but a guide is infinitly better, especially for my 60+ year brain. :)
 

vfr400

Esteemed Pedelecer
Jun 12, 2011
9,822
3,985
Basildon
Take off the battery and disassemble the compartment at the bottom of the receiver, then you'll see what you have to do. All you need to do is wire in the controller kit to the two battery wires the right way round, and join the motor cable wires to the ones coming out of the motor. The rest of the stuff is plug and play. You can put the controller wherever you want. It doesn't have to be in that compartment. There are all sorts of boxes that attach to the frame, ot you can use a bag. I prefer mine in an under-seat saddle bag, which I need anyway to carry emergency lights and a puncture repair kit.
 
  • Like
Reactions: Eejit

Eejit

Finding my (electric) wheels
Sep 19, 2020
13
0
Once again thank you vfr400. I 've opened up the controller to get an idea of what's going on.

The battery connector is obvious with the +ve & -ve but what are the other three wires, red, blue and orange. What are these and are they needed for the KT system?

The motor wires are the red, blue and green, but there are six other wires coming from the motor, green,blue, black, white, red and yellow. Again what are these and are they required?

Almost ready to buy :)
 

Attachments

Nealh

Esteemed Pedelecer
Aug 7, 2014
19,988
8,170
60
West Sx RH
The six thin motor wires are the hall sensors, the white one being the internal speed sensor. One would simply match the colours to the KT controller wiring.

Red, Blue & Orange you may have to try and trace the wiring, they could be for brake sensors ? If you disconnect them you could test the brakes to see if the motor cuts out or not.
In pic one the Red, Black & Green I assume is for PAS ?
 

vfr400

Esteemed Pedelecer
Jun 12, 2011
9,822
3,985
Basildon
The other wires are for the lcd and the torque sensor, both of which will be chucked, as they won't be needed with the new controller, which will have its own pedal sensor and LCD. You can fit a throttle too.
 

Eejit

Finding my (electric) wheels
Sep 19, 2020
13
0
Thanks guys, the Red, Blue & Orange go direct to the controller from the battery connector, along with the RED & BLACK power wires, so I've no idea what their function is. All the others are as vfr400 said fairly straight forward
 

vfr400

Esteemed Pedelecer
Jun 12, 2011
9,822
3,985
Basildon
They'll be for communication. Just to be sure that the conversion would still work, measure the voltage on the battery terminals that connect to the power wires to check that you have the the full voltage.
 

Eejit

Finding my (electric) wheels
Sep 19, 2020
13
0
I get the full 36V from the battery so the wires appear not to do anything unless they communicate with the BMS to shut the battery down under certain conditions so I can see is no issue there. Just need to snip and seal.

The upgrade looks very straightforward except possibly the PAS. As I understand it, the Crossfire is fitted with an optical torque sensor. How straightforward is it to replace this with a PAS?
I came across this thread regarding the torque sensor. Does all of this need stripping out?
 

Eejit

Finding my (electric) wheels
Sep 19, 2020
13
0
Last question (I hope).
You said best not a 12 magnet one for the PAS.
What is the reason for this? I've been looking at the options and the KT-V12L PAS seems the simplest and tidiest option but am I missing something?
What would be your recommendations for a PAS for the Crossfire?
 

vfr400

Esteemed Pedelecer
Jun 12, 2011
9,822
3,985
Basildon
For a normal fitting on a square taper crank, the 8 and 10 magnet discs work very well and are the most compatible with all controllers. The reason I say to avoid 12 magnet ones is because a lot of people come on this forum saying that they can't get them to work. We don't know what they've done or why they have the problem. Sometimes we are not able to get to s solution that makes them work. If you buy a KT controller with a 12 magnet sensor with the right connector, it should work as long as you do the settings right. I only say use 8 or 10 magnet ones because they seem to work first time without complications. I can't detect any difference in performance between an 8 and 12 magnet one.
 

Eejit

Finding my (electric) wheels
Sep 19, 2020
13
0
Well finally got everything changed and working :) Got the 24V 250W / 36V 250W controller KT Torque Simulation Sine Wave Controller Julei Waterproof plug S06S controller with the LCD3, KT-V12L PAS and 130X throttle. The controller fitted nicely where the old controller sat and the motor cable matched up colour for colour with the original screen being used as the black wire. I did have to replace the bottom bracket for a 73mm x 127.5mm to fit the PAS. However, the P and C settings are proving a little obscure.
P1 = 87, P2 = 1, P3 = 1, P4 = 0, P5 = 12
C1 = 6, C2 = 0, C3 = 8, C4 = 0, C5 = 10, C6 = 3, C7 = 0, C8 = 0, C9 = 0, C10 = n, C11 = 0, C12 = 4, C13 = 0, C14 = 2

The second issue is fitting the brake sensors. I know that some don't use them and would turn the battery off if the throttle stuck, rather that pulling on the brakes, but I'm considering doing the same mod to my wife Crossfire-E and she wouldn't have a clue.

Can anyone suggest the correct parameters for this and the Suntour HESC 250W 36V motor and how best to fit the brake sensors to the TEKTRO Vela brakes?
 

Attachments

Nealh

Esteemed Pedelecer
Aug 7, 2014
19,988
8,170
60
West Sx RH
P1 is a setting based on the motor magnets x the gear ratio, most hubs with a 4 - 5:1 ratio works out at value of approx. 84 - 87.
If the above figures aren't known one can use a GPS to set the value. Set the display cut off speed to 25km/h or 15.5mph and go for a ride, adjust the P1 value up or down so the display speed readout match's the GPS. Value up increases speed change and value down lowers the speed change, Start with p1 87 and go from there.
P2 is set to however many motor speed magnets there are, if the speed read out is wildly out then the value is wrong.
P3 is current control leave as is.
P4 is throttle 1 is legal and pedal 1st, 0 is always active.
P5 is battery meter damping on the the display, but as you have a proper voltage readout ignore P5.
C1 looks fine you can try value 5 or 7 as well to see if it feels any better, the setting is for the PAS sensor.
C2/0 leave well alone unless the phase signal changes.
C3/8 is fine. It is PAS memory level to the last used setting. 0 -5 setting means which ever you select is which Pas level will show when you turn the display on.
C4 is throttle. 0 is used if P4 is 0. 1 is 6km/h, 2 is speed limit defined by setting the speed.
C5 current 10 = max.
C6 = Backlight brightness, 3 levels.
C7 is cruise leave as is.
C8 Is motor temp. most motors don't have a temp sensor.
C9 pass word setting.
C10 system restore.
C11 as is.
C12 is lvc level. ignore as one relies on the battery BMS. value 4 is 30v for 36v or 40v for 48v.
C13 Braking regen, leave as is.
C14 PAS signal strength 1-3 low to high.
 

Eejit

Finding my (electric) wheels
Sep 19, 2020
13
0
Nealh, that's fantastic. Thank you.

Now just to figure out how to attach the brake sensors
 

Nealh

Esteemed Pedelecer
Aug 7, 2014
19,988
8,170
60
West Sx RH
Which sensor type ?
Also you really only need to fit one to the rear lever, two can be problematic as you never know which one is faulty when an issue arises.