
Okay, so after riding 200 miles on a standard setup (48v 500w with VLCD5 screen) I have decided to experiment with the Open Source Firmware. The standard performance is more than adequate and with a 14.5Ah battery I have been managing 60 miles on a full charge. On the other hand the drive is not particularly smooth when compared to a Shimano Steps or Bosch equipped bicycle, especially around the 25kph cut off point and to get the best out of it I have to constantly flit between modes to vary the assistance on undulating terrain.
You may also note that I have not plumped for the legal 250w motor. Shop bought eBikes adhere to the ‘nominal rating of 250w’ or however it is worded, but essentially some perform better than others and most have peak power outputs quite a bit higher than 250w - that much is evident when you ride them. I have test ridden a few legal shop bought bicycles with the crank drive motors mentioned above and they both felt no less powerful than my so called 500w. Like those my motor is limited to 25kph. I intend to keep it that way and sleep soundly thank you very much.
You can display quite a bit more data by using one of the universal screens that are available, but these need to be rewired to a Tongsheng display lead and some need programming also. I am happy with the stock VLCD5 display so am keeping that. Assistance at higher speeds can be unlocked using the standard setup so that is not the motivation for installing the Open Source Firmware. It is the possibility of quieter running, smoother power delivery and possibly better economy/range. Oooh Yass")
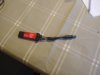
So to begin with an interface is required to connect the motor to a pc or laptop. A company in the US - eco-ebike.com - sells them or you can make your own from an ST-Link programming dongle and part of a Tongsheng Speed Sensor extension lead - as per some great instructions courtesy of Empowered People.

Software exists for Windows, Mac & Linux operating systems. We use Linux at home but from a dire experience trying to get an OBD lead to work with some software on my penguin powered PC a few years ago, I begrudgingly borrowed my youngest daughters wreck of a Windows 10 Laptop for the task which (I also begrudgingly must add) performed the task without a hitch.
Github user ‘emmebrusa’ provides brill instructions for what to download and where to install it on your hard drive and so that is what I did. However, before pressing GO! I had a bit of a crisis. What if it did not work and the pretty fine as it is ebike was rendered unusable? Emmebrusa says that their installer allows you to revert back but I was not convinced, so in a better safe than sorry moment I had another look on the web and was directed back to eco-ebike.com who have the original firmware available to download. They use some of the same software used by Emmebrusa along with some updated drivers so I installed them also.
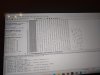
So, following the instructions on eco-ebike.com I ran the ST Visual Programmer software, configured it to match the ST-Link dongle being used and connected it to the speed sensor lead coming out of the TSDZ2 motor. Their instructions then guide you to read the firmware already in the motor in the tab OPTION BYTE. I did the same on the other two tabs also - PROGRAM MEMORY & DATA MEMORY - and like magic, the firmware map appeared in hexadecimal and I did not understand a single bit of it. I took a photo of each tab before loading the standard firmware files into the software. Some patience was required here but I compared the hexadecimal to the photos taken and the PROGRAM MEMORY ones were identical. The DATA MEMORY ones were slightly different but easy enough to alter manually should I need to reinstall them at any point. Phew.
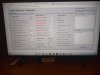
With that little confidence boost I opened up the java software to install Emmebrusa’s Open Source Firmware. Here the mysterious hexadecimal was forsook for a nice graphical interface to choose options and alter parameters. The whole thing was pre-populated but needed tailoring to suit the motor voltage, battery and tyre size at the very least.
From start to finish I did the following:
Basic Setting tab
And then I took a deep breath and clicked on Compile & Flash. A terminal window opened that listed in text what the software was doing from compiling the file to installing it on the motor. When completed I unplugged the dongle, reconnected the speed sensor lead, entered the largest wheel size into the VLCD5 display and had a quick roadtest. The difference it must be said was night & day. The power delivery is super smooth as promised around the 25kph cutoff speed in particular and the motor is noticeably quiet.
Today I put a further 12 miles on it and continued to be impressed. There is now less need to change the assistance settings as often if at all if you do not mind a little effort, although getting into the swing of letting the motor take the strain, I did up the power on some steep bits. If there is one niggle it is that the motor seems a bit too keen to help now in the lowest power setting so that whereas the drop off is smoother at 15.5mph, plodding at around 8mph in places on a canal towpath for example the power could be felt taking up the drive. After another 20 miles or so I think I will hook her up to the laptop again to reduce some of the numbers to try and improve that some more.
I must finish off this instalment by saying that this little adventure in hackery has been totally worth the small expense and effort thus far. The only aspect that I do not yet know has been improved upon or made worse is the economy and the effect that will have on the range it will get from the 14.5Ah battery. 60 miles of range is a high bar to have set really. I was extremely pleased that the standard out of the box firmware gave assistance for such an impressive distance and if truth be known will not be disappointed if that number is not improved upon, although I would not want it to be worsened either!
Expect updates as the miles pass by
Isla...
P.S: The links to where I bought the parts from are just that, not an advertisement and they are likely available elsewhere.
P.P.S: Yes, that is my rather impressive nose in the first picture. Apologies for that!
You may also note that I have not plumped for the legal 250w motor. Shop bought eBikes adhere to the ‘nominal rating of 250w’ or however it is worded, but essentially some perform better than others and most have peak power outputs quite a bit higher than 250w - that much is evident when you ride them. I have test ridden a few legal shop bought bicycles with the crank drive motors mentioned above and they both felt no less powerful than my so called 500w. Like those my motor is limited to 25kph. I intend to keep it that way and sleep soundly thank you very much.
You can display quite a bit more data by using one of the universal screens that are available, but these need to be rewired to a Tongsheng display lead and some need programming also. I am happy with the stock VLCD5 display so am keeping that. Assistance at higher speeds can be unlocked using the standard setup so that is not the motivation for installing the Open Source Firmware. It is the possibility of quieter running, smoother power delivery and possibly better economy/range. Oooh Yass
So to begin with an interface is required to connect the motor to a pc or laptop. A company in the US - eco-ebike.com - sells them or you can make your own from an ST-Link programming dongle and part of a Tongsheng Speed Sensor extension lead - as per some great instructions courtesy of Empowered People.
Software exists for Windows, Mac & Linux operating systems. We use Linux at home but from a dire experience trying to get an OBD lead to work with some software on my penguin powered PC a few years ago, I begrudgingly borrowed my youngest daughters wreck of a Windows 10 Laptop for the task which (I also begrudgingly must add) performed the task without a hitch.
Github user ‘emmebrusa’ provides brill instructions for what to download and where to install it on your hard drive and so that is what I did. However, before pressing GO! I had a bit of a crisis. What if it did not work and the pretty fine as it is ebike was rendered unusable? Emmebrusa says that their installer allows you to revert back but I was not convinced, so in a better safe than sorry moment I had another look on the web and was directed back to eco-ebike.com who have the original firmware available to download. They use some of the same software used by Emmebrusa along with some updated drivers so I installed them also.
So, following the instructions on eco-ebike.com I ran the ST Visual Programmer software, configured it to match the ST-Link dongle being used and connected it to the speed sensor lead coming out of the TSDZ2 motor. Their instructions then guide you to read the firmware already in the motor in the tab OPTION BYTE. I did the same on the other two tabs also - PROGRAM MEMORY & DATA MEMORY - and like magic, the firmware map appeared in hexadecimal and I did not understand a single bit of it. I took a photo of each tab before loading the standard firmware files into the software. Some patience was required here but I compared the hexadecimal to the photos taken and the PROGRAM MEMORY ones were identical. The DATA MEMORY ones were slightly different but easy enough to alter manually should I need to reinstall them at any point. Phew.
With that little confidence boost I opened up the java software to install Emmebrusa’s Open Source Firmware. Here the mysterious hexadecimal was forsook for a nice graphical interface to choose options and alter parameters. The whole thing was pre-populated but needed tailoring to suit the motor voltage, battery and tyre size at the very least.
From start to finish I did the following:
Basic Setting tab
- Motor Type - 48v
- Wheel Circumference - 2220mm (from Schwalbe’s website)
- Battery Capacity (Wh) - 696 (14.5Ah x 48v)
- Battery Cells Number - 13 (48v batteries have 13 cells in series - with multiples of these in parallel for extra capacity - they are only asking for the number of cells in series)
- Battery Cut Off Voltage - 37.7v (this is the number of cells in series multiplied by 2.9v - the voltage of an empty cell - so in this case 13x2.9=37.7v)
- Display Type - VLCD5
- Units Type - mph (please note that the manual states that if using mph, on your VLCD5 display you must set the wheel size to the largest size on there - 35 in my case - I did so and it seems to work fine)
- eMTB mode - Enable on startup (this was recommended as the best option by the Empowered-People Peeps)
And then I took a deep breath and clicked on Compile & Flash. A terminal window opened that listed in text what the software was doing from compiling the file to installing it on the motor. When completed I unplugged the dongle, reconnected the speed sensor lead, entered the largest wheel size into the VLCD5 display and had a quick roadtest. The difference it must be said was night & day. The power delivery is super smooth as promised around the 25kph cutoff speed in particular and the motor is noticeably quiet.
Today I put a further 12 miles on it and continued to be impressed. There is now less need to change the assistance settings as often if at all if you do not mind a little effort, although getting into the swing of letting the motor take the strain, I did up the power on some steep bits. If there is one niggle it is that the motor seems a bit too keen to help now in the lowest power setting so that whereas the drop off is smoother at 15.5mph, plodding at around 8mph in places on a canal towpath for example the power could be felt taking up the drive. After another 20 miles or so I think I will hook her up to the laptop again to reduce some of the numbers to try and improve that some more.
I must finish off this instalment by saying that this little adventure in hackery has been totally worth the small expense and effort thus far. The only aspect that I do not yet know has been improved upon or made worse is the economy and the effect that will have on the range it will get from the 14.5Ah battery. 60 miles of range is a high bar to have set really. I was extremely pleased that the standard out of the box firmware gave assistance for such an impressive distance and if truth be known will not be disappointed if that number is not improved upon, although I would not want it to be worsened either!
Expect updates as the miles pass by
Isla...
P.S: The links to where I bought the parts from are just that, not an advertisement and they are likely available elsewhere.
P.P.S: Yes, that is my rather impressive nose in the first picture. Apologies for that!
Last edited: