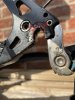
I'm still also wondering about buying some new drop outs like these below, grinding them and then glueing them on. Would gluing them on be strong enough? some kind of epoxy resign im guessing, or metal glue. Any idea what I would use for that?
Shop Derailleur Gear Hanger Raleigh Claud Butler Falcon Marin KHS Shogun Jamis Silver. Free delivery and returns on all eligible orders.
www.amazon.co.uk
Glueing, when done correctly, can often be better than welding. You only have to slightly rough up all the areas to be glued, then clean "intimately", using Meths and throwaway plastic gloves (get at least a dozen or more), as fingerprints are detrimental to the quality of the "hold"!
Make the glueing area as large as you can, to increase the holding power. Once fully cured, wrap & support with either Fiber glass fine weave (car repairs!) bandage, or carbon fiber bandage, if you can get it!
Do "soak" the bandage well to leave no voids.
Maybe try first on some bits of metal that are unimportant, then attempt to break them apart.
The quick hardening versions of Fiber Glass Resin, I would not recommend, even though they have got much stronger over the years, they may harden faster than you can work, and that might make for a messy joint.
Remember, you need Methylated spirits for cleaning, for 3 reasons:-
1) Cleaning of glueing surfaces before applying resin
2) Cleaning of skin, but BEFORE THE RESIN HARDENS!
3) Cleaning of metal surfaces that have collected too much glue, but again, before it hardens only.
After it hardens, you will need files and a grinder!
Look around on the internet for good infos, YouTube especially.
Treat all gluing as if you were a emergency room nurse, sterilising a wound before bandaging, "cleanliness is next to Godliness!".
Many here will say, without have the slightest inkling of how a proper repair, made with Epoxy (no other fiber glass resins please! For instance not Polyester please as it is difficult to work with for a beginner, and is ALWAYS repaired with Epoxy once hard anyway!!), can be really fantastic. Ask instead car builders and repairers, boat builders and sailors, fisherman and their fiber glass rods, usually made with carbon fiber nowadays, but I still have a 6ft 2 piece Spinning rod, made from a £3.00 Kit, over 60 years ago (I was 13), which still sees occasional usage when fishing! I could beat someone to death with it and only need to wipe off the blood stains!
If you DO decide to have a go, as I said before, get used to the materials first.
The really good and strongest Epoxy glues need at least 24 hours, in a normal warm room, to harden. And a further 2 - 4 days, to "cure" to full strength. Givng you a lot of time to get it right....... Do read the instructions first!
Getting the mix correct with resin and hardner is MOST IMPORTANT.
Best wishes and a good dose of luck, if you do it.
regards
Andy