
Part 2
The build…
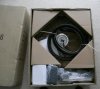
The arrival of the 8Fun kit
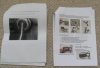
Instructions that came in the kit were extremely poor with b/w pictures most of which I couldn’t make out, so I immediately sent an email to the suppliers on ebay and they quickly emailed back their own very good instructions with good colour photos.
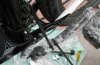
Kit arrived with all wires connected except for the wire to the battery & to the hub motor – when the 2 wires to the battery wire were connected they didn’t seem to click in place so used electrical tape to make it more secure.
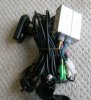
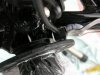
All connectors are different so you can’t connect the wires wrongly ‘cos they wouldn’t fit!
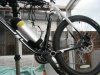
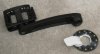
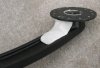
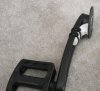
No space for pedelec magnets disc on bottom bracket axle
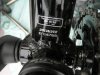
Hoped the disc would fit on the rim at the end of the crank arm and luckily after some cutting it did (pics below)
So, as anticipated got the miracle epoxy resin out to start to create bespoke fittings to attach the pedelec magnets disc and sensor to the crank on the other side from the chainset.
I find surfboard repair sticks to be the best. Milliput epoxy putty sounds like it should be the same but in my experience it doesn’t have anywhere near the same strength and takes ages to cure. I’ve also tried the Evo-Stik epoxy putty and although extremely strong it sets rock hard within 10 mins (in a huge burst of heat) so a bit of a rush whereas these surfboard sticks seem to set gradually in 10-30 mins and are fully cured in 1 hr. Used about half of a 7” stick in total.
Temporarily attached the battery, and controls etc. in order to test the pedelec sensor
When fitting the bottle battery mounting I used a sheet of rubber cut from an old inner tube between the mounting and the down tube to protect the frame.
I cut away the axle grips in the centre of the pedelec disc then used a miniature sanding drum attachment on a B&D Wizard to make a hole big enough to fit on the rim of the crank arm. It was very easy to cut and sand so suspect a file or even sand paper would have done the job reasonably quickly. When sanding I used a paper template which I stuck to the disc to make sure it was a good fit. N.B. it didn’t have to be a perfect circle because the epoxy resin would fill any imperfections.
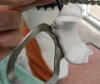
Then I trialled it with the disk and sensor held in place with blutack!
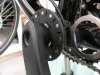
Found that even on the wrong side the pedelec disc still needs to travel in the direction of the arrows but the sensor has to be upside down (kept metal ring on sensor for time being to make it easier to hold).
Loosely wrapped crank arm in cling film & fitted pedelec disc by moulding epoxy resin into the inside of the crank arm and covered in more cling film then loosely fitted cable ties to create grooves where the cable ties will eventually hold it in place.
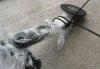
Fitted crank arm back onto bike before the epoxy resin set
And ensured that disc set in a position that spun true when crank was turned
Removed ties and cling film when set but not fully cured
Fitted parts back together when fully cured
And secured with cable ties
(Will eventually paint epoxy resin matt black and should blend in very nicely but better to be white in photos for time being.)
Covered stay with cling film and used same procedure to mould a fitting suitable for the pedelec sensor

Removed cling film and cable tie when set
(go to Part 3)
The build…
The arrival of the 8Fun kit
Instructions that came in the kit were extremely poor with b/w pictures most of which I couldn’t make out, so I immediately sent an email to the suppliers on ebay and they quickly emailed back their own very good instructions with good colour photos.
Kit arrived with all wires connected except for the wire to the battery & to the hub motor – when the 2 wires to the battery wire were connected they didn’t seem to click in place so used electrical tape to make it more secure.
All connectors are different so you can’t connect the wires wrongly ‘cos they wouldn’t fit!
No space for pedelec magnets disc on bottom bracket axle
Hoped the disc would fit on the rim at the end of the crank arm and luckily after some cutting it did (pics below)
So, as anticipated got the miracle epoxy resin out to start to create bespoke fittings to attach the pedelec magnets disc and sensor to the crank on the other side from the chainset.
I find surfboard repair sticks to be the best. Milliput epoxy putty sounds like it should be the same but in my experience it doesn’t have anywhere near the same strength and takes ages to cure. I’ve also tried the Evo-Stik epoxy putty and although extremely strong it sets rock hard within 10 mins (in a huge burst of heat) so a bit of a rush whereas these surfboard sticks seem to set gradually in 10-30 mins and are fully cured in 1 hr. Used about half of a 7” stick in total.
Temporarily attached the battery, and controls etc. in order to test the pedelec sensor
When fitting the bottle battery mounting I used a sheet of rubber cut from an old inner tube between the mounting and the down tube to protect the frame.
I cut away the axle grips in the centre of the pedelec disc then used a miniature sanding drum attachment on a B&D Wizard to make a hole big enough to fit on the rim of the crank arm. It was very easy to cut and sand so suspect a file or even sand paper would have done the job reasonably quickly. When sanding I used a paper template which I stuck to the disc to make sure it was a good fit. N.B. it didn’t have to be a perfect circle because the epoxy resin would fill any imperfections.
Then I trialled it with the disk and sensor held in place with blutack!
Found that even on the wrong side the pedelec disc still needs to travel in the direction of the arrows but the sensor has to be upside down (kept metal ring on sensor for time being to make it easier to hold).
Loosely wrapped crank arm in cling film & fitted pedelec disc by moulding epoxy resin into the inside of the crank arm and covered in more cling film then loosely fitted cable ties to create grooves where the cable ties will eventually hold it in place.
Fitted crank arm back onto bike before the epoxy resin set
And ensured that disc set in a position that spun true when crank was turned
Removed ties and cling film when set but not fully cured
Fitted parts back together when fully cured
And secured with cable ties
(Will eventually paint epoxy resin matt black and should blend in very nicely but better to be white in photos for time being.)
Covered stay with cling film and used same procedure to mould a fitting suitable for the pedelec sensor
Removed cling film and cable tie when set
(go to Part 3)
Last edited:


