

Okay, I've had a couple more weeks to refine and enjoy the ghEttoBIKE and I have to say that it no longer feels 'ghetto' at all. Here is a photo in its current state:
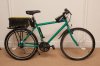
As you can see, I gave up on the idea of mounting the batteries in the frame triangle. Having clamped up a single battery to the frame and going for a short test ride, I found that my knees kept on hitting it, so that was that idea out the window.
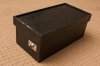
Rather randomly, while I was was in Ikea, I came across this:
PRÄNT Box with lid - IKEA
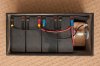
As it turns out, it is the perfect size for 12v 7ah SLA's, but way too tall. Made from 5mm plywood, I was a little unsure if it would be rigid enough, but at less than 4 quid, I thought it was worth a go. I cut each piece to the required height with a jigsaw and Dremel and and put it together. To finish, I sprayed it black and riveted on a peice of alluminium plate salvaged from a heatsink from a broken coffee machine. To this I attatched a power socket to match the charger I bought and added another to the controller. I have also bought a key switch, which I have not yet fitted. Here is the finished result:
Once constructed, the box is definitely strong enough for the task, although I don't know how many times it would survive, say, hitting the pavement from a moving bike. The sprayed finish is quite nice (pretty muddy in the above photo), although already starting to wear due to the way I've mounted it to the rack. For this I've used a combination of l-brackets and a bunjee cord:


Although slightly cumbersome to attach and remove, the bungee cord and l-bracket combination keeps the box mounted secure to the rack. I still want to find a better way to mount it using a clamp mount, although I still haven't worked out a good way to do this yet. This will do for now though.
After my first ride with the box, my only complaint was that the batteries inside rattled around far too much. To remedy this, I made a battery brace from a couple of screw feet salvaged from a broken desk and a long nut made from polymorph (LOVE this stuff btw and used it a few times on this project). I also lined the box with black sheet foam where appropriate. This has almost rid the box of rattles altogether. All in all I'm pretty happy with the result.
I have also made a few frugal purchases. From the pound shop (don't laugh - I'm quite handy at finding the good stuff), I bought a saddle bag to mount the controller, a pump and mudguards (also used polymorph here to mount under the rack). I also ordered a waterproof phone case/bag which mounts to the front of the crossbar. Here I also carry a puncture repair kit, tools, fuses and other miscelaneous items.
One thing that has made a huge difference to the asthetics, was removing all the decals from the frame. Why do manufacturers insist on covering frames with those? After doing so, the bike looks very nice and I'm also starting to like the green frame.
Having also deliberated over this for a few weeks, yesterday, I decided to carry out a shunt mod on the controller. I upped the current from 10 to 14 amps and all I can say is WOW, what a difference it has made. The acceleration is much improved, reaching a now slightly higher top speed of 16-17mph in about 3 seconds on flat ground. The biggest difference however is it's hill-climbing ability. The bike now eats up 25% hills for breakfast, although probably batteries for lunch and dinner after doing the shunt mod. Prior to the mod, the journeys I have been doing have left me with a half-empty battery, so I think an additional 4 amps should be okay. Also, the bike just ploughs through thick mud and over obstacles that would have stopped it before.
All in all, I am chuffed to bits with my bike as it stands, although I think that there's still a few more mods to come.....
As you can see, I gave up on the idea of mounting the batteries in the frame triangle. Having clamped up a single battery to the frame and going for a short test ride, I found that my knees kept on hitting it, so that was that idea out the window.
Rather randomly, while I was was in Ikea, I came across this:
PRÄNT Box with lid - IKEA
As it turns out, it is the perfect size for 12v 7ah SLA's, but way too tall. Made from 5mm plywood, I was a little unsure if it would be rigid enough, but at less than 4 quid, I thought it was worth a go. I cut each piece to the required height with a jigsaw and Dremel and and put it together. To finish, I sprayed it black and riveted on a peice of alluminium plate salvaged from a heatsink from a broken coffee machine. To this I attatched a power socket to match the charger I bought and added another to the controller. I have also bought a key switch, which I have not yet fitted. Here is the finished result:
Once constructed, the box is definitely strong enough for the task, although I don't know how many times it would survive, say, hitting the pavement from a moving bike. The sprayed finish is quite nice (pretty muddy in the above photo), although already starting to wear due to the way I've mounted it to the rack. For this I've used a combination of l-brackets and a bunjee cord:
Although slightly cumbersome to attach and remove, the bungee cord and l-bracket combination keeps the box mounted secure to the rack. I still want to find a better way to mount it using a clamp mount, although I still haven't worked out a good way to do this yet. This will do for now though.
After my first ride with the box, my only complaint was that the batteries inside rattled around far too much. To remedy this, I made a battery brace from a couple of screw feet salvaged from a broken desk and a long nut made from polymorph (LOVE this stuff btw and used it a few times on this project). I also lined the box with black sheet foam where appropriate. This has almost rid the box of rattles altogether. All in all I'm pretty happy with the result.
I have also made a few frugal purchases. From the pound shop (don't laugh - I'm quite handy at finding the good stuff), I bought a saddle bag to mount the controller, a pump and mudguards (also used polymorph here to mount under the rack). I also ordered a waterproof phone case/bag which mounts to the front of the crossbar. Here I also carry a puncture repair kit, tools, fuses and other miscelaneous items.
One thing that has made a huge difference to the asthetics, was removing all the decals from the frame. Why do manufacturers insist on covering frames with those? After doing so, the bike looks very nice and I'm also starting to like the green frame.
Having also deliberated over this for a few weeks, yesterday, I decided to carry out a shunt mod on the controller. I upped the current from 10 to 14 amps and all I can say is WOW, what a difference it has made. The acceleration is much improved, reaching a now slightly higher top speed of 16-17mph in about 3 seconds on flat ground. The biggest difference however is it's hill-climbing ability. The bike now eats up 25% hills for breakfast, although probably batteries for lunch and dinner after doing the shunt mod. Prior to the mod, the journeys I have been doing have left me with a half-empty battery, so I think an additional 4 amps should be okay. Also, the bike just ploughs through thick mud and over obstacles that would have stopped it before.
All in all, I am chuffed to bits with my bike as it stands, although I think that there's still a few more mods to come.....
Last edited:
")


