Hi,
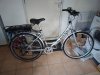
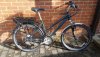
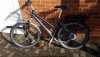
I've just completed my first conversion using the Woosh XF08C kit, rear hub motor with cassette freehub and I chose the version which included the battery mounted on a rear carrier. The whole process has gone very smoothly and I'm really pleased with the outcome.
The bike to be converted is my wife's 2007 Dawes Oasis.
My pre-sales queries to Woosh were answered speedily and ensured that the kit I'd chosen was appropriate (I wanted to keep it's current 7 speed Shimano Hyperglide cassette) and the advice highlighted the need for the following options:
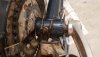
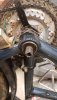
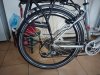
Once the cassette had been swapped over, fitting the new rear wheel was very straightforward as the bike has 135mm width rear dropouts. I retained the two thin washers on either side of the axle and fitted the anti-turn washers on the outer sides with the nuts. The axle was a pretty tight fit in the dropouts, but it all fitted securely. I had to tweak the bracket attaching the chainguard as the chain line was now slightly closer to the chainstay, but this was a good outcome as the bike previously had a habit of the chain occasionally dropping off the cassette and jamming between the smallest sprocket and chainstay. Fitting the rear rack was also straightforward, it was almost a direct swap for the previous rack and it allows plenty of adjustment (a choice of 4 holes for the upper arms and 3 for the stay height) which means that it fitted well. The left side pedal sensor fitted perfectly and was just a simple push on after removing the crank.
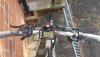
Probably the hardest job was removal and refitting of the handlebar grips to mount the throttle as they're a very tight fit. Stupidly, I removed both grips for some reason even though the throttle only required the right grip to be removed, I've no idea what I was thinking. I trimmed a small amount (approx 1cm) off the grip to make space for where I wanted to position the throttle. I also discovered that I needed to leave a small gap between the throttle and the brake/shifter to prevent the top trigger fouling on the throttle ring. The LCD control fitted really neatly in a central position on the bars and time will tell whether this position is easy to use of whether it needs to be position closer to the left grip. Fitting the inline brake sensors required shortening of both cable outers by about 3cm and then re-adjustment of both brakes. A small adjustment of the rear pads was needed due to the new rim.
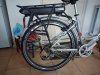
The final item to fit was the speed sensor on the left chain stay and magnet. I chose a position where the sensor was closest to the spokes.
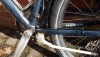
All that was left to do was decide on the routing of all the cables. I spent a long time thinking about what might look the neatest, but once I'd attached the main controller cable to the downtube the best positions for the other cables seemed a lot clearer. It really helped that the whole kit was supplied with the all of the cables connected to their sensors and this avoided any confusion and potential damage if I'd attempted to connect the wrong sensors. I used plenty of cable ties and some lengths of spiral cable tidy (from B&Q) and I was pretty pleased with the result.
I've done about 4 miles in my test rides and although this is my first experience with an e-bike, I found the assistance from the rear hub motor very natural and I quickly felt comfortable using either the different levels of PAS or the throttle. The rim brakes provide plenty of braking power and the brake sensors work perfectly. I've also tried riding the bike without the battery attached and the small additional weight of the hub motor isn't noticeable and there's no resistance from the motor. It rides just as it did previously, but of course it's far more preferable to have the battery attached.
The fitting instructions provided with the Woosh kit were comprehensive and easy to follow and combined with all the information available on this forum it all went very smoothly. I'm a very happy Woosh customer and I hope my wife enjoys using it as much as I have during both my test rides and the process of the conversion (it's her combined Christmas/Birthday present).
I've just completed my first conversion using the Woosh XF08C kit, rear hub motor with cassette freehub and I chose the version which included the battery mounted on a rear carrier. The whole process has gone very smoothly and I'm really pleased with the outcome.
The bike to be converted is my wife's 2007 Dawes Oasis.
My pre-sales queries to Woosh were answered speedily and ensured that the kit I'd chosen was appropriate (I wanted to keep it's current 7 speed Shimano Hyperglide cassette) and the advice highlighted the need for the following options:
- Inline brake sensors as the bike has combined rapid fire brakes/shifters (the inline sensors are very neat and easy to fit)
- Left side pedal sensor as the bike has a triple chainset plus a chainguard which means there's no space on the right side (sensor was very easy to fit)
- 4mm cassette spacer (the XF08C freehub is 8-11 speed so needed a spacer for 7 speed cassette)
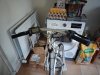
- Cassette tool for solid axles (I only realised this after attempting to use my normal cassette tool, but this didn't have the required through-hole for the axle/motor cable)
- New tyres: Schwalbe Marathon Greenguard (26x2.00)
Once the cassette had been swapped over, fitting the new rear wheel was very straightforward as the bike has 135mm width rear dropouts. I retained the two thin washers on either side of the axle and fitted the anti-turn washers on the outer sides with the nuts. The axle was a pretty tight fit in the dropouts, but it all fitted securely. I had to tweak the bracket attaching the chainguard as the chain line was now slightly closer to the chainstay, but this was a good outcome as the bike previously had a habit of the chain occasionally dropping off the cassette and jamming between the smallest sprocket and chainstay. Fitting the rear rack was also straightforward, it was almost a direct swap for the previous rack and it allows plenty of adjustment (a choice of 4 holes for the upper arms and 3 for the stay height) which means that it fitted well. The left side pedal sensor fitted perfectly and was just a simple push on after removing the crank.
Probably the hardest job was removal and refitting of the handlebar grips to mount the throttle as they're a very tight fit. Stupidly, I removed both grips for some reason even though the throttle only required the right grip to be removed, I've no idea what I was thinking. I trimmed a small amount (approx 1cm) off the grip to make space for where I wanted to position the throttle. I also discovered that I needed to leave a small gap between the throttle and the brake/shifter to prevent the top trigger fouling on the throttle ring. The LCD control fitted really neatly in a central position on the bars and time will tell whether this position is easy to use of whether it needs to be position closer to the left grip. Fitting the inline brake sensors required shortening of both cable outers by about 3cm and then re-adjustment of both brakes. A small adjustment of the rear pads was needed due to the new rim.
The final item to fit was the speed sensor on the left chain stay and magnet. I chose a position where the sensor was closest to the spokes.
All that was left to do was decide on the routing of all the cables. I spent a long time thinking about what might look the neatest, but once I'd attached the main controller cable to the downtube the best positions for the other cables seemed a lot clearer. It really helped that the whole kit was supplied with the all of the cables connected to their sensors and this avoided any confusion and potential damage if I'd attempted to connect the wrong sensors. I used plenty of cable ties and some lengths of spiral cable tidy (from B&Q) and I was pretty pleased with the result.
I've done about 4 miles in my test rides and although this is my first experience with an e-bike, I found the assistance from the rear hub motor very natural and I quickly felt comfortable using either the different levels of PAS or the throttle. The rim brakes provide plenty of braking power and the brake sensors work perfectly. I've also tried riding the bike without the battery attached and the small additional weight of the hub motor isn't noticeable and there's no resistance from the motor. It rides just as it did previously, but of course it's far more preferable to have the battery attached.
The fitting instructions provided with the Woosh kit were comprehensive and easy to follow and combined with all the information available on this forum it all went very smoothly. I'm a very happy Woosh customer and I hope my wife enjoys using it as much as I have during both my test rides and the process of the conversion (it's her combined Christmas/Birthday present).