
That reminds me of Groucho Marks saying, "This is so simple, a 7-year-old could do it. Go find a seven-year-old, I can't make head nor tails of it".That was done with Tinkercad, which is a free online tool for kids. It's extremely simple to use. That design was done with nothing more than cylinders and cuboid added together and stretched one way or another. It's simple in the way it works, but you need a logical brain to figure how to get the shape and size you want by combining and stretching the basic shapes.
3-D Printer
- Thread starter saneagle
- Start date

3D printers are nuts, had my Kickstarter FDM Creality CR6 SE for nearly three yrs now and it still runs great, as we speak it's churning out parts for model 1:32 scale traffic cones in various colorways (cpl pics below), that I sell on ebay.
I use mainly PLA/PLA+ and use branded Sunlu/Eryone/eSun/Jayo
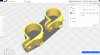
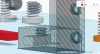
This is the only ebike related part I've printed, it's for the display controller as previous one snapped after over-tightening. Remixed in Tinkercad it's the right one with bigger lugs - a remix of one I bought online.
Also printed & painted loads of accessories for our 1:32 slot car track!
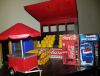
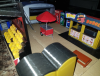

F1 cones
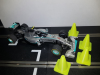
Traffic cones

I use mainly PLA/PLA+ and use branded Sunlu/Eryone/eSun/Jayo
This is the only ebike related part I've printed, it's for the display controller as previous one snapped after over-tightening. Remixed in Tinkercad it's the right one with bigger lugs - a remix of one I bought online.
Also printed & painted loads of accessories for our 1:32 slot car track!
F1 cones
Traffic cones
I am impressed by your skills. How long does your printer take to print one of those cones?
Last edited:
Probably about 1.5 hrs for 4 cone parts slicing at 0.12 resolution (high quality) so that's the base/top ring/middle ring/bottom ring. Half that time for 0.2 resolution slice (standard quality).
However that's not how I print the cones, I tend to do 16 of one part at a time (sometimes 32), and just leave it running, requires minimal interaction with printer and just shove them in parts bin ;-)
Some of the new printers on market under £500 mark will print significantly faster, the tech is moving so fast...
Most of the slot car stuff above is available free on thingiverse, they are mostly not my designs. ;-)
Stuff I've done is here (had over 1200 downloads): https://www.thingiverse.com/portals999/designs
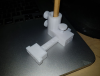
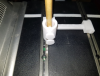
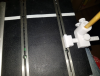
I'm no 3D designer but get by using Tinkercad, you can do some quite cool stuff. This device is for painting track limit/colouring lanes lines on 1:32/1:24/routed/etc slot car tracks but is adjustable depending on what your track is.
It blew me away when I found out I could print screws and embed threads accurately in PLA that work reliably....this is an original design from scratch
However that's not how I print the cones, I tend to do 16 of one part at a time (sometimes 32), and just leave it running, requires minimal interaction with printer and just shove them in parts bin ;-)
Some of the new printers on market under £500 mark will print significantly faster, the tech is moving so fast...
Most of the slot car stuff above is available free on thingiverse, they are mostly not my designs. ;-)
Stuff I've done is here (had over 1200 downloads): https://www.thingiverse.com/portals999/designs
I'm no 3D designer but get by using Tinkercad, you can do some quite cool stuff. This device is for painting track limit/colouring lanes lines on 1:32/1:24/routed/etc slot car tracks but is adjustable depending on what your track is.
It blew me away when I found out I could print screws and embed threads accurately in PLA that work reliably....this is an original design from scratch
Tinkercad is also nuts. Few hrs and you can do this, they have great tutorials, jump in.....
Attachments
-
 1.4 MB Views: 1
In case you don't know, you can make and use round cylinders: Take a normal cylinder; give it 60 sides; copy and rotate 2 deg; copy and rotate 2 deg; combine; save in your created shapes. It's then available to use whenever you need a round cylinder.Tinkercad is also nuts. Few hrs and you can do this, they have great tutorials, jump in.....
View attachment 54422
In tinkercad one can change the shape of an object.I don't get it. How do you give sides to a round cylinder?
That said having played with tinkercad , I can see Croxden's point of view and have not found it straight forward to use initially . I expect if I play with it for another or 3 months I might get the hang of it , but it wastes so much of my time.
Last edited:
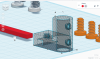
It's not a real cylinder. It's made of polygons. Nearly all CAD software works like that. Circles are made of straight lines. The more lines (sides) you have, the rounder the circle. The roundness doesn't show when it's a small circle, but when you make it big, it becomes a very noticeable polygon. Look at the faces on the cylindrical part in post #24. That's the default number of sides, but there's a slider in the object properties where you can increase the faces (sides) to over 60, which would make it look a lot rounder, but by duplicating, rotating and adding two times, 60 faces becomes 180. You can make it as round as you want with that method, but if you go too far, it'll take too long to replot the image each time you make a change.I don't get it. How do you give sides to a round cylinder?
Just do it, and you soon figure it out. Whenever you can't do something, use Google to get the answer. I never used Tinkercad before. I watched the 10 minute tutorial on how to make a spanner, then I was able to make that battery box with no further instruction. I'm now making a helical Ugrinski wind turbine. I had to use Google twice for that to see how to get smooth cicles and do the twist. There's no clever way to do the twist, so I invented my own by using step and repeat.OK, I get it now. Still a lot to learn.

I would go through the Tinkercad tutorials, the methodology and workflow to create shapes is a case of taking basic shapes as building blocks then tweaking them and grouping them together to make bigger shapes. To remove stuff you use another shape but make it a hole. I've used Photoshop for over 25yrs and I find the process not dissimilar to graphic design.In tinkercad one can change the shape of an object.
That said having played with tinkercad , I can see Croxden's point of view and have not found it straight forward to use initially . I expect if I play with it for another or 3 months I might get the hang of it , but it wastes so much of my time.
The other popular tool that there is a free version of is Autodesk Fusion 360 - this is the big brother of Tinkercad and workflow is pretty different. Here you would draw a 2D shape then extrude it in the 3rd dimension to create shapes. It's a pro grade tool but the learning curve is very very steep...I didn't get on with it tbh...it's on the list for a rainy day...
We used Pro Desktop at School. It's more or less the same as Fusion 360 AFAICS. It's very confusing if you don't get it. The process for every feature is:I would go through the Tinkercad tutorials, the methodology and workflow to create shapes is a case of taking basic shapes as building blocks then tweaking them and grouping them together to make bigger shapes. To remove stuff you use another shape but make it a hole. I've used Photoshop for over 25yrs and I find the process not dissimilar to graphic design.
The other popular tool that there is a free version of is Autodesk Fusion 360 - this is the big brother of Tinkercad and workflow is pretty different. Here you would draw a 2D shape then extrude it in the 3rd dimension to create shapes. It's a pro grade tool but the learning curve is very very steep...I didn't get on with it tbh...it's on the list for a rainy day...
1. Choose or define a workplane
2. Choose or define a shape
3 Process the shape (e.g. extrude)
People often miss out step 1.
I use autodesk123 but autocad discontinued it for a number of years now. It's lightweight and very fast. You click on an object and enter its dimensions very simply. None of the new CAD stuff is as simple as it. I am playing with OnShape at the moment but find it hard to learn.
Tinkercad (and Autodesk Fusion 360 ), allow you to click on an object and manually enter the dimensions too, Tinkercad is probably as simple as you'll get these days but you can great results with some effort.I use autodesk123 but autocad discontinued it for a number of years now. It's lightweight and very fast. You click on an object and enter its dimensions very simply. None of the new CAD stuff is as simple as it. I am playing with OnShape at the moment but find it hard to learn.
Yes, the 'snap' value is important, you can set it to 'off' be more granular so you can align everything, frustrating experience otherwiseTinkercad allows metric or imperial , metric one can input 0.01mm increments .
I have found that when stacking stuff , aligning is the most hard bit and I don't even own a printer. I'm just tinkering to see if I need a printer or not.
I can help you with that. The number of 3-D printers you need is N+1, where N is the number you already have. Applying that rule to your circumstances, N=0 and N+1= 1. Therefore you need one 3D printer at the moment.I have found that when stacking stuff , aligning is the most hard bit and I don't even own a printer. I'm just tinkering to see if I need a printer or not.
Tinkercad has an 'align' button, when you learn how to use it life becomes a little simpler.. ;-)I have found that when stacking stuff , aligning is the most hard bit and I don't even own a printer. I'm just tinkering to see if I need a printer or not.
Related Articles
-
 MTF Enterprises announces acquisition of EMU Electric Bikes
- Started by: Pedelecs
-
 Wisper 806T folding bike wins Which? ‘Best Buy’
- Started by: Pedelecs
-
 Sustrans calls for protected cycle lanes
- Started by: Pedelecs
-
 Amazon launch their first UK e-cargo micromobility hub
- Started by: Pedelecs
