!!!!! HELP me with my 26" Bafang Rear Wheel Build please !!!!!

D

Deleted member 4366

Guest
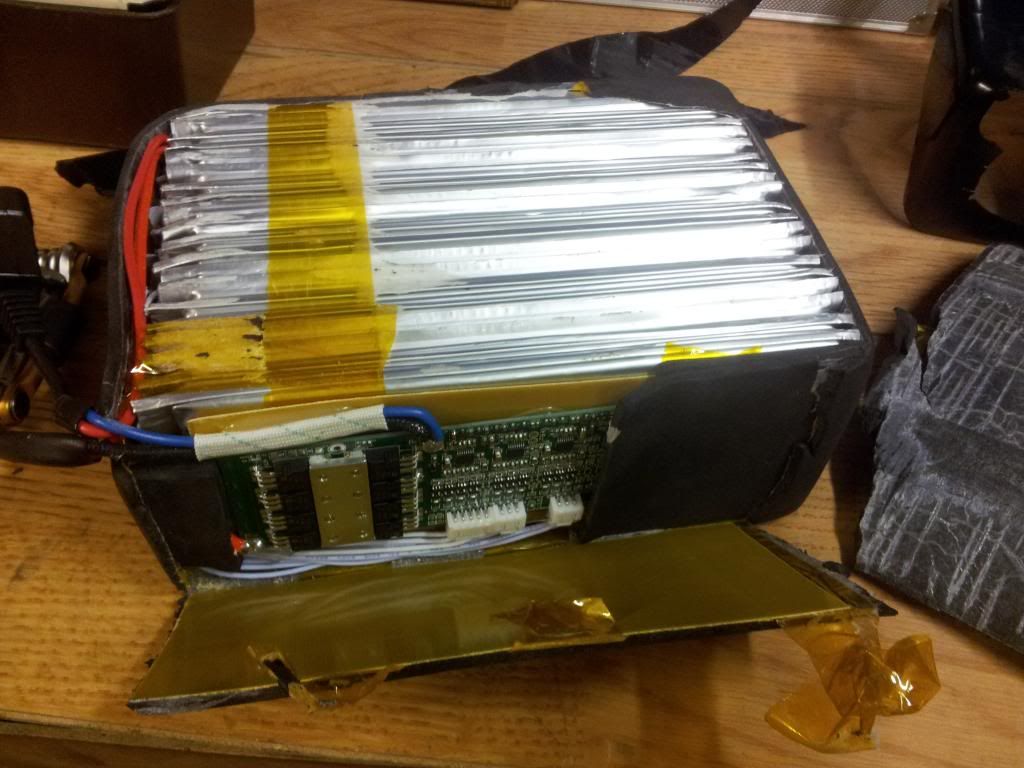
The battery has a BMS inside the wrapping, so it's completely protected against over-discharge. Your controller also has LVC so you're double protected. Here's a photo of the inside showing the BMS:


103Alex1

Esteemed Pedelecer
Sep 29, 2012
2,228
67
It was 42v immediately after charging, but i rechecked after a couple of mins, charger all working fine, fan came on, fuse is fine as is polarity.
Good stuff !

How do i monitor the battery as to not to over-discharge or is there no need with these ?
I think they'll likely cut out before they over-discharge. d8veh can advise. (EDIT :- he just did whilst I was typing !).

I powered it up with bike upside again but with tyres on etc and the throw in the wheel is very visible now, i also tried it correct way up suspended by holding the bikes seat and it's very unbalanced.
Do you mean your wheel's out of true ? You can work this out with a spoke key yourself or a decent LBS will likely do it for about a tenner. The $1 BMS spoke keys are OK else one of these will work :

CYCLEPRO 6 WAY SPOKE KEY FITS SIZES 10-15G CPT306 | eBay

I ordered an extra charger, will inbox details :)
Thanks a lot. My XLR connector just turned up for it today, right on cue :cool:.
 
Last edited:

bilabonic

Esteemed Pedelecer
Feb 20, 2013
294
6
Cheers guys, should be on the road today once i figure out what throttle to use with brakes/gear changers in the way, don't like the full throttle one bit.

What voltage will it 'cut out' approx so i have a rough idea when to recharge, i will only be doing small trips and want to charge as little as possible.

I think the 'throw' in the wheel is mainly from the axle directly, the cassette has a lot of play on it when spinning, thinking i may put pressure on it whilst fitting the torque arm which is held via jubilee clip.
 
Last edited:
D

Deleted member 4366

Guest
Are you sure that you haven't cross-threaded the freewheel (free-wheel gears not cassette). When you put it on, it should screw up easily with your fingers. The other common problem is the tyre not straight. Check the line around the rim is the same distance all round on both sides.
 

bilabonic

Esteemed Pedelecer
Feb 20, 2013
294
6
Are you sure that you haven't cross-threaded the freewheel (free-wheel gears not cassette). When you put it on, it should screw up easily with your fingers. The other common problem is the tyre not straight. Check the line around the rim is the same distance all round on both sides.
Definately not crossthreaded it, i will check the tyre later.

Got problems with rear pressure brake switch now, cut end perfect but there is NO WAY the collar/olive will fit over the brake line, it's nothing special just plain plastic dual core line.

It must be slightly bigger then Magura line ? Or is it like an SWA gland and i need to remove the outer black sheathing a rely on the inner tube for the compression fitting ??
 
Last edited:

103Alex1

Esteemed Pedelecer
Sep 29, 2012
2,228
67
Definately not crossthreaded it, i will check the tyre later.
Got problems with rear pressure brake switch now, cut end perfect but there is NO WAY the collar/olive will fit over the brake line, it's nothing special just plain plastic dual core line.

It must be slightly bigger then Magura line ?
Uurgh .. that might be a problem. How is the pin as far as fitting in the end of the inner core ? The hose end should be the same diameter as the pin (or near as) if I remember right.

Trouble is my guess is that if you size down the outercable to fit switch diameter it may not fit your caliper and shifters ... :confused:
 

bilabonic

Esteemed Pedelecer
Feb 20, 2013
294
6
The pin head is slightly smaller (less than a mm), i have also compared it to my Elixir brake lines on my Spesh mountain bike and its the same size.

This has got to be the unluckiest build ever !!!!

UPDATE - a slight dremel and wet/dry and i got it to fit, hope the integrity is not compromised but i doubt it, the amount removed was micro.
 
Last edited:

103Alex1

Esteemed Pedelecer
Sep 29, 2012
2,228
67
The pin head is slightly smaller (less than a mm), i have also compared it to my Elixir brake lines on my Spesh mountain bike and its the same size.

This has got to be the unluckiest build ever !!!!
You're joining Morphix and I in the luck stakes :(. Check out those complete XT Shimano brakes with combi-shifters I linked a while ago .. £80 brand new for the whole set. I've got exactly the same ones on my bike - they were hundreds when they first came out.

EDIT :- just read your post update. As long as it's properly crimped and the pin is soundly seated in the line you may be OK as long as the olive crimp is sound on both sides and the pin is tightly compressed against the hole in the middle of the switch. You need to really check for leaks after you've fitted and bled the system. Pump the gear shift lever several times, leave it an hour and do it again and repeat - if there's a problem you'll start getting fluid oozing from the join so dry off all excess. Even a micro leakage will quickly lead to failure so must be sound. Fingers crossed !

These self builds have to be a labour of love even if they're a kit. When you first get on it you'll get a boost so hang in there till you at least get it on the road for a test ride. Once you start a build .... lol.
 
Last edited:

bilabonic

Esteemed Pedelecer
Feb 20, 2013
294
6
Well it turns out my rear lever is faulty and i have returned it to Clarks, i temp put the rear brake/pressure sensor on the front just to 'have a go'

The battery is VERY tight and i can not see me fitting in the bag with controller and there is NO WAY i would be happy with it sited on the rear.

I did not wire up the brake sensor but tested with meter and it switches fine plus no leaks.

Really do not want to go down the road of building a 'box' for the triangle but can see no other choice at the moment.

I did try it up my steep hill near me and it powered up there easily, the rear wheel is no where near true and as informed earlier has a lot of loose screws.


If only the bag was slightly larger on the RHS i could get the controller in, if i put it at the side of bag you can not close it.

I am wondering if i can open the controller/adapt it to make it smaller somehow.?
 
Last edited:
D

Deleted member 4366

Guest
If you look at my photo in post#141 above, you'll see that the battery cells have very little protection. Whatever you do, don't let the corners bang against the frame. The edges of the cells will get damaged and short-out. To me, it looks like you get a new frame or mount the battery on the rack! Hopefully you can find a third solution.
 

bilabonic

Esteemed Pedelecer
Feb 20, 2013
294
6
If you look at my photo in post#141 above, you'll see that the battery cells have very little protection. Whatever you do, don't let the corners bang against the frame. The edges of the cells will get damaged and short-out. To me, it looks like you get a new frame or mount the battery on the rack! Hopefully you can find a third solution.
Yep, i checked that pic and it looks as if the way i have it mounted is ok, the PCB seems to end towards the end at cable entrance but not to sure about the opposite bottom most end but i would not expect the PCB to run the full length of the battery , been googling for pics but can not find one.

Sacko - I could make one of them easily enough, but in no way would i trust that in rain, i could fit it inti a junction box and just attach that to the post or just mount in a weatherproof rear pannier which would also allow me to carry other items....... even though i have done all my cables to go to centre bag !!!!!
 
D

Deleted member 4366

Guest
The problem is not the BMS, but rather the cells themselves, which are relatively soft and easily damaged. You need to put something rigid around them or lay the pack flat so that the weight is evenly distributed.
 

103Alex1

Esteemed Pedelecer
Sep 29, 2012
2,228
67
Yep, i checked that pic and it looks as if the way i have it mounted is ok, the PCB seems to end towards the end at cable entrance but not to sure about the opposite bottom most end but i would not expect the PCB to run the full length of the battery , been googling for pics but can not find one.

Sacko - I could make one of them easily enough, but in no way would i trust that in rain, i could fit it inti a junction box and just attach that to the post or just mount in a weatherproof rear pannier which would also allow me to carry other items....... even though i have done all my cables to go to centre bag !!!!!
My triangle is about the same size as yours by the looks of it. I think the PCB is at the cable end like you say. It's incredibly hard to mount both in the frame - spent hours trying to work out how to do it. The only way was to square the battery in the top right hand corner. My battery is completely rigidly suppoprted by the solid box construction and cannot move in any direction once installed. It has foam beneath and along left and right sides, but the weight is taken at bottom left and bottom right corners. Polystyrene epoxied onto the hidden face which centralises it in the foam slot :


Ignore the little switch box (the photo was during assembly before controller inserted) - but controller pushes into slot up in the triangle to stop it moving.


The panel side facing you in the pic just has some bubblewrap between cables and battery and between cables and panel. But the construction is such that the battery cannot move to that panel face when installed.

I thought long and hard about using a bag at the start for this combo but couldn't work out how to underpin the squared off battery to accommodate the controller (and everything else in there). There may be a way but you'd need very dense cushioning material and strong fabric on the bag I'd have thought.
 
Last edited:

103Alex1

Esteemed Pedelecer
Sep 29, 2012
2,228
67
Been thinking about it ... can you cut a piece of the thick polystyrene block packaging (like the block the wheel presumably came wedged into in the shipping box) to fit underneath the battery and square it off up in the seat tube / top tube corner of the bag ? This might enable you to get your controller to fit along the downtube further up towards the handlebars if the bag will allow it. Might have to cut off the bracket mounting extensions.

I guess you could also try using polystyrene to cushion it from banging against the frame tubes. You've very little wiring or switchgear to accommodate relatively speaking and it would likely all fit above the controller. Nice short thick wires = efficient too.

Polystyrene has the advantage of being much denser than foam, a doddle to cut, equally light, can help the bag hold its shape and one of the best things I can think of for keeping a big heavy battery rigidly supported/cushioned in there if it's cut right to pack out voids.
 

bilabonic

Esteemed Pedelecer
Feb 20, 2013
294
6
I just tried what you stated and the ONLY way the battery will fit between the triangle is as in my pic, even without the bag.:mad:

Think its a risk i will have to take as i do not want it on the rear.

So i have no brakes (sent rear lever off to Clarks), all my wiring set up to reach the controller in bag (which will have to go on rear pannier) and a wheel which needs truing.....

May as well of bought a Xipi or BH Emotion Carbon (i know totally different spec).:confused:
 
Last edited:

103Alex1

Esteemed Pedelecer
Sep 29, 2012
2,228
67
I just tried what you stated and the ONLY way the battery will fit between the triangle is as in my pic, even without the bag.

Think its a risk i will have to take as i do not want it on the rear.

So i have no brakes (sent rear lever off to Clarks), all my wiring set up to reach the controller in bag (which will have to go on rear pannier) and a wheel which needs truing.....
That's a bummer. What are the dimensions of the battery they sent you ?

Perhaps your frame triangle angle is a bit more acute on that Carrera ? Guess if it's any (small) consolation those Samsung packs take up the whole triangle too so you'd still have been left with the problem of externally siting /housing the controller having spent a small fortune on one. PITA though ! The rewiring exercise is definitely a :mad: consequence especially when you've done stuff well the first time.

You shd be able to get wheel trued for £10 at a LBS and presumably the brake lever comes back under warranty or something ? Nothing's ever simple when a plan changes tho' - and the waiting gets very frustrating !

May as well of bought a Xipi or BH Emotion Carbon (i know totally different spec).:confused:
Guess you won't really know till you actually .. er .. fly them - and yours. Even with the replacement battery and rewiring, a few more hundred in the mishap contingency kitty I'd have thought before you hit anything like those prices ! ;).

Ready made bikes / 2-hour kit fits can save a whole load of hasstle and delay - which may well be worth a few hundred quid more to get you up and riding without all the complications of a build. But there are a few compatibility trade-offs so definitely all depends on your priorities and whether you had the donor bike already. The closest Xipi kit to your setup is about £1,400 so the gap can be easier to close with a few mishaps or any serious outlays on the bike to fit around the build constraints.

As to the carbon eBike thing ... afraid I just laugh when I see the £3.3k price tag of a BH carbon ... Shimano 105 shifters, with a 9Ah battery. ROFLOL ! [EDIT :- OK it's 13.2Ah now but still..]
 
Last edited:

bilabonic

Esteemed Pedelecer
Feb 20, 2013
294
6
I 'll measure it tomorrow, are the BH that much !!!!

Going to stick with the bag and carry on, where did you get that self amalgamating tape that seems very sticky, looks like silicone when set. I have loads of big 4" stuff from work used for repairing cables but you have to cover it with normal tape as it does not stick well.

I also want to leave a waterproof external plug to charge if possible to save unzipping the bag to charge. Did you not use one ?
 

103Alex1

Esteemed Pedelecer
Sep 29, 2012
2,228
67
The tape is this stuff - shop around as the shipping cost is silly from lots of the usual trade suppliers :

Everbuild SILWELD black Silicone Self Fusing Repair Tape

I used it to wrap the rear cables into a loom and also reinforce weatherproofing and protection of a load of shrinkwrap joints which might otherwise be at risk of any friction rubbing. Been through 2 rolls of the stuff. The more you stretch it before wrapping over itself the better the fused join. It's expensive but really great stuff. Clean what you're wrapping first too - helps. It's self-fusing so no sticky residue or glue if you cut it off.

I rewired the battery & charger (whole thread on that wiring debacle ! - but it works now) ... used a locking XLR chassis socket mounted through the box which allows you to disconnect internally if you want to take the battery out of its enclosure without removing the housing. It's used in audio setups mainly.

The weatherproofing comes from a dummy plug principally but behind there is also a large rubber boot which fixes rigid against the box on the inside. My box covering material does the rest. I'm not sure how well it would it would work in a soft mount context like a bag. You'd need to cut a hole in it and be able to get the socket to adhere permanently to the bag material. It can be tricky with nylon in an external environment - velcro flap over it might be a thought and give you lots of options.

FWIW these are the parts I used :

Socket connected to battery and screwed in against face of the box on the outside :

NEUTRIK XLR NC3FD-V-B Female PC mounting vertical

Plus this when not in use (I got a few in case I lose them ) :

NEUTRIK NDF DUMMY PLUG, XLR female

and this on the back of the chassis socket to protect the pins and hold the cable nice and rigid as much as anything else .. it's very good :

NEUTRIK SCDR Insulating cover for D-series panel connectors, black

On charger :

NEUTRIK XLR NC3MXX-B Male cable

As ever it's the shipping that winds it all up cost-wise. There might be plastic socket options for use with a bag that would be easier to work with. I'd have a browse around see what other options you can find along similar lines. Health warning tho' - can go bonkers looking at parts catalogues !
 
Last edited: