Review Bafang BBS01b 250w DIY fitting - traps, pitfalls and review

DodgyTicker

Pedelecer
Dec 29, 2020
27
12
I'm new here and new to the world of e-bikes. When researching there seemed to be some gaps in information regarding the fitting and use of these things.

My kit arrived yesterday and I fitted most of it yesterday as well (31/12/2020)

I intend to update and add to this thread as and when. As I've said above I got most of it fitted to make it useable but still need to do the brake and gear change sensors.

First of all, me and my background;
Early 50's bloke in the UK. I've always messed about with bikes ever since I got hold of some spanners as a child. I've also messed about with cars and have quite an extensive set of tools. I consider myself reasonably competent on bikes the only thing I draw the line on is wheel building!
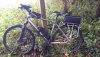
The bike;
A 2019 Boardman MTX 8.8 aluminium framed hydrid. Front aero forks, shimano hydraulic discs and a 2x10 shimano drive train. I've also added a rear disc rack, full mud guards and even a Pletcher stand (anyone else remember those from the 70's / 80's? ... still as good as they ever were, well you can still buy them and they are brilliant!)

My concerns prior to buying the Bafang BBS01b;
Only one and that was if there was enough room between the motor body and the bottom bracket shell to allow cables and more importantly the hydraulic brake pipe. I couldn't find anything definitive online about this so it was very much a case of seeing how things would go. I'm happy to report that neither the brake pipe of rear gear cable caused an issue. The motor body could have swung a little further towards the downtube but if it had it would have crushed the brake pipe. Hopefully I've nipped up the motor lock rings enough, more on that later...

Tools needed;

General tools, 15mm spanner for the pedals, various sized allen (hex) keys, cable side cutters etc.

Special tools, chain breaker or quick plink pliers, crank arm puller, bottom bracket socket (mine was a standard square taper type in a 68mm bottom bracket shell). One thing also to consider with regard to removing the bottom bracket; they can be 'kin tight so a long breaker bar and large socket to fit the BB socket is a good idea.

A powerful soldering iron if you want to neatly install the power cables from the battery to the motor, on my kit they were very long and being quite fat difficult to hide. Also heatshrink tube and or insulating tape.

Rivnut tool and some M5 rivnuts, 7mm HSS drillbit and an electric drill. Note; I was lucky on my bike being an XL sized frame that I could get the drill inside the frame triangle. On smaller frames, this could be tricky and you'll probably need a right angled drill.

Oh, and cable ties, get some more, a bag of 100 should do it !


That is it for this post, next up preparing the bike... (and if anyone wants to chip-in with any better or alternative advice, please do so)
 

Fordulike

Esteemed Pedelecer
Feb 26, 2010
3,802
1,537

egroover

Esteemed Pedelecer
Aug 12, 2016
970
575
56
UK
Welcome and good luck with the build. Plenty of really useful info on the board and just ask if any help or advice required. Once you are up and running, you'll be wanting to tweak and improve what you have...here's a useful thread for this

The Boardman's make great conversions, here's my 2014 BBS01 MX Comp (in more summer spec, now reverted to road tyres and full mudguards for winter)

40003
 
Last edited:
  • Like
Reactions: DodgyTicker

Fordulike

Esteemed Pedelecer
Feb 26, 2010
3,802
1,537
Welcome and good luck with the build. Plenty of really useful info on the board and just ask if any help or advice required. Once you are up and running, you'll be wanting to tweak and improve what you have...here's a useful thread for this
Snap :D
 

DodgyTicker

Pedelecer
Dec 29, 2020
27
12
Thanks for the replies.

Next part, remembering that I'm just a keen DIY'er...

Preparing the bike;

Quite simply you need to remove the crank and chainwheel, the bottom bracket, the front derailleur and cable and gear shifter.

The cranks come off usually with an 8mm allen key to remove the securing bolt(s) and then using a crank puller to force the chainwheel and crank off of the tapered botttom bracket spindle.

The bottom bracket itself can be tight. I find it easier to use a long (600mm / 2ft) breaker bar to do this as you have more control and are less likely to have the tool slip which enevitably leads to you hurting yourself!

The front derailleur is easy, release the cable, then undo it from the frame. You then need to split the chain to remove the derailleur from the chain (why there cannot be a screw to split the derailleur I don't know. I'm lucky as my chain has a split link, which with the right pliers makes it very easy to do. Otherwise you will need an old fashioned chain splitting tool. Once the derailleur is off, remake the chain.

The gear shifter on my bike required me to take off the bar end, the grip and the brake lever. You have to remove these anyway to fit the throttle later on.

At this point I cleaned everything up ready for the motor fittment and applied some Dinitrol corrosion inhibitor to the inside of the bottom bracket shell.


Next up... fitting the motor
 

DodgyTicker

Pedelecer
Dec 29, 2020
27
12
Motor fitting;

I trial fitted the motor and only managed to wriggle it part way in. This was due to the cable guide plate (under the bottom bracket) screw not being entirely flush. I simply undid it half a turn (it was still tight after that) and then the motor went in.

Next off was fitting the triangular plate, the face with the projections facing the BB shell, just finger tight for now, 2 bolts.

Then I turned my attention to the final position of the motor. I rocked the motor to and fro carefully watching how it interacted with the hydraulic brake pipe which passes under the bottom bracket shell. The motor could have gone tight up against the downtube but would have crushed the brake pipe. I settled on a position just back from that.

Next is the inner lock ring. To do this you need the special Bafang spanner (which I forgot to mention in the first post). The tool I bought with the kit serves two, no actually three purposes;
1, Inner lock ring
2, Outer lock ring
3, Pastry cutter. It has this little pastry cutter wheel on the other end. I have no idea what it was for therefore concluded it was for use in the kitchen.

The spanner is short so getting the inner lockring tight was a worry. To sole this I took the pastry cutter off which allowed me to put an adjustable spanner on the end of the Bafang spanner and nip it up nice and tight. (I hope that makes sense).

Next thing is to fit the chainwheel, 5 or six 6 allen headed bolts, then the crank arms and then swap over your pedals.


Next up battery fitting....
 

Raboa

Esteemed Pedelecer
Aug 12, 2014
715
273
52
Great thread.
Fitting the battery holder. Masking tape, 7mm wood Brad point drill bit or hinge drill, blacksmith short drill bits, I used a 3mm and 7mm bit (eBay etc), M5 long bolt, washer, M5 nut and spanner or right angle rivet nut tool

Raised frame bottle cage threads (mine are not exactly flush with the frame
1. Cover top of down tube in in masking tape
2. Put a straight edge (wood, spirit level) against the side of the frame bottle cage threads and draw a straight line extending towards head tube, repeat each side .
3. Measure distance between both frane lines and mark the middle point of the lines
4. Put masking tape on the end of the battery holder, measure holder width and mark middle point
5. Attach holder to frame using one bolt, line up both the frame and holder middle marks, tighten bolt.
6. Put 7mn wood brad point drill in battery holder bolt holes, very lightly tap the drill bit, remove battery holder and mark drill marks with pen / pencil. A hinge drill bit will do the same job, you are marking the centre of the holes.
7. Use drill angle attachment to drill 3mn and then 7mn holes, if you are using a bike stand then stand on steps, putting your hand and weight on top of the angle attachment keeps the drill bit centred and more accurate.
8. Install rivet using right angled rivet nut tool or M5 bolt / nut .
9. Repeat above for all nuts and attach battery holder

Flush frame bottle cage threads
1. Cover top of downtube in in masking tape
3. Attach battery holder to frame using one bolt
4. Put a spirit level against the side / top of the battery holder and move until level, tighten bolt
5. Put 7mn wood brad point drill in battery holder bolt holes, very lightly tap the drill bit, remove battery holder and mark holes with pen / pencil. A hinge drill bit will do the same job, you are marking the centre of the holes.
6. Use drill angle attachment to drill 3mn and then 7mn holes, if you are using a bike stand then stand on steps, putting your hand and weight on top of the angle attachment keeps the drill bit centred and more accurate.
8. Install rivet using right angled rivet nut tool or M5 bolt / nut .
9. Repeat above for all nuts and attach battery holder

I hope this helps and provides some ideas
 
  • Like
Reactions: DodgyTicker

DodgyTicker

Pedelecer
Dec 29, 2020
27
12
Battery fitting;

This had me scratching my head quite a bit. I'm sure those that fit these all the time are well attuned to doing this. I though I'd have no problems with this considering that my frame was a standard open triangle type and large to boot.

Nope. The water bottle fixings were too far down the downtube and close to the bottom bracket which meant only one fixing could be used!

Some head scratching.

Some more head scratching.

Then it was decided that I'd have to fit a rivnut.

More headscratching.

It was then decided that two rivnuts would be needed.

Thankfully I had a rivnut tool and a variety of rivnuts where many years prior I had to use them to fix an under shield to a car.

But for those that don't have a rivnut tool or the nuts, you need some M5 sized rivnuts.

I measured, I marked, I remeasured, I checked, I checked again and re-measured and checked yet again, it was time to get the drill out. Drilling holes in my frame was the last thing I had in mind prior to having to fit this battery but it had to be done. I started with a small pilot hole (2mm drillbit) for each of the two new rivnuts and then moved up to the 7mm drillbit which was the required diameter hole for my M5 rivnuts.

Some words of caution though, having a large frame meant I was able to easily drill the first hole inside the 'triangle' but the second one, further up towards the handlebars was tight as there was barely enough room to get the drill inside the 'triangle'. I had to drill the second 7mm hole at an ever so slight angle. If you have a small(er) frame or a frame with 'stuff' in the way drilling the hole(s) would be impossible without a right angled drill or some sort of flexi adaptor.

Anyway, the holes were drilled and the two new rivnuts fitted. If you have never done 'rivnuts' I can say they are easy to do but it would be a good idea to do a few practice runs on some scrap sheet metal.

I then offered the battery baseplate up onto the frame and everything lined up, two new rivnuts and one existing water bottle fixing hole, all good.

Some more head scratching...

It was then decided that I'd try and use the second existing waterbottle fixing hole. This meant taking the battery holder apart, there is a box section lower down that holds a fuse on mine (Hailong) and under that a solid and thich aluminium base plate.

Some more measuring and a hole was drilled in the battery baseplate.

Next up was fitting, as the battery holder was in two pieces, I had to fit the lowest (new hole in baseplate) fixing first as once the top half of the battery holder was on this was no longer accessable. I also had to experiment with packing washers to make sure this new additional fixing lined up horizontally with the others.

I got it all fitted up and perfectly aligned and am very pleased that the battery is very secure having used the two existing water bottle fixing holes AND the two new rivnuts.

As it is custom to say just like tying a load down onto the roof bars of a car etc, once the battery was fitted, I gave it a quick pat and said "That ain't going anywhere".

[edit] a big thanks to @Raboa who got in before this post, how did I miss it]
 
Last edited:

jimriley

Esteemed Pedelecer
Jun 17, 2020
561
384
A little tip I picked up, youtube aussy woman fitting a Bbs01b, a wad of innertube rubber between motor and downtube, stops the motor from touching/hitting/chafing or whatever on the downtube. It would protect your hydraulic pipe.
 
  • Like
Reactions: DodgyTicker

Fordulike

Esteemed Pedelecer
Feb 26, 2010
3,802
1,537
A little tip I picked up, youtube aussy woman fitting a Bbs01b, a wad of innertube rubber between motor and downtube, stops the motor from touching/hitting/chafing or whatever on the downtube. It would protect your hydraulic pipe.
My BBS02 has a little rubber strip fitted from factory. It's a few years old now, have they stopped putting that strip on?
 
  • Like
Reactions: DodgyTicker

DodgyTicker

Pedelecer
Dec 29, 2020
27
12
A little tip I picked up, youtube aussy woman fitting a Bbs01b, a wad of innertube rubber between motor and downtube, stops the motor from touching/hitting/chafing or whatever on the downtube. It would protect your hydraulic pipe.
RevBecca, she is called, I've watched her videos and have to say I quite fancy her as well ;)

My BBS02 has a little rubber strip fitted from factory. It's a few years old now, have they stopped putting that strip on?
I might go back and wedge something in the gap. I've been out and thoroughly tested things, it hasn't moved, yet though.

Need to sort out the wiring next, I've currently only got the speed sensor set up along with the power. I'm just back from a ride and plan to get another one in, in a few minutes then i'll tackle the wiring, gear sensor and brake sensors.

Thank you for everyone who has added to this so far, keep the hints and tips coming!
 

jimriley

Esteemed Pedelecer
Jun 17, 2020
561
384
RevBecca, she is called, I've watched her videos and have to say I quite fancy her as well ;)


I might go back and wedge something in the gap. I've been out and thoroughly tested things, it hasn't moved, yet though.

Need to sort out the wiring next, I've currently only got the speed sensor set up along with the power. I'm just back from a ride and plan to get another one in, in a few minutes then i'll tackle the wiring, gear sensor and brake sensors.

Thank you for everyone who has added to this so far, keep the hints and tips coming!
Maybe Revbecca would come and fit a rubber for you.
 
D

Deleted member 33385

Guest
Need to sort out the wiring next
I used sleeving for the wiring, like this guy:


It's a good guide and all I used to install my kit. The only iffy part is where he's unscrewing the bottom bracket and the video is too fast to see which direction he is turning... The sleeving keeps it neat and maybe reduces wear and tear through small movements over time by ziptie nylon directly on wire sheathing, but I'm endlessly taking zipties off and putting new ones on again whenever I install new bits - such as the rear and front lights, and very soon (I hope - ordered it over a week ago) the gear sensor. On the other hand, sleeving can increase drag and accumulate dirt.

The sleeving makes a sort of DIY wiring loom, here's mine:

40026
 
Last edited:
  • Like
Reactions: DodgyTicker

DodgyTicker

Pedelecer
Dec 29, 2020
27
12
Wiring then, Part One - Getting the motor running and the bike rideable.

This is where I am now, I've had the bike rideable for a few days now and have done about 30 (as hilly as I could find) miles on it.

The loom is plug and play, really easy to do, BUT difficult to make it look nice.

I chose to run the cables back out of the motor and then up behind the bottom bracket and then back over it on the non drive side.

From there I was able to cable tie the main single display and brake sensor cable up the downtube onto the hydraulic brake line. Nice and neat.

The speed sensor itself was also neatly clipped along the hydraulic pipe with the sensor itself cable tied to the inside of the (non drive side) chainstay.

The power cable from the battery in combination with the power cable out of the motor had lots of spare and would have been impossible to make it look tidy. I decided to shorten it and then make the new new joints with solder rather than use connectors.

A top tip here when cutting the cables is to stagger the joints so there is less chance of short circuiting the battery. You will also need a beefy soldering iron, my 30w wouldn't cut it so the 100w one came out to play.

The display (in my case an 850c) is massive but was easy to mount as was the throttle and power / on-off switch on the bars. I obviously fitted them on the left hand side in the space that was occupied by the gear shifter. From the grip to the center I fitted the power switch then the throttle and still had room for my Garmin 520 as well.

I think i'll swap the position of the throttle and the power switches or maybe even place the throttle on the right hand side of the bars.

At this point the bike was rideable and off I went!

There is currently an untidy mess of unfinished cables up by the handlebars and the gear sensor isn't connected and neither are the brake cut-offs.


To recap so far on fitting this kit;

If you have ever changed a bottom bracket or taken an old one out to grease up the bearings then fitting the motor will be a doddle.

Wiring, I've yet to conclude this so will pass comment for now.

The battery mounting along with the two rivnuts I had to fit was quite tricky and could catch you out. I'd advise carefully measuring your 'triangle' (or frame) paying particular attention to where the water bottle fixings are. Plan to buy a rivnut tool and some M5 rivnuts if any doubt and make sure you have a means of drilling the holes.

First thoughts on riding with the kit; I love it but will most definitely be buying a programming cable to up the 'keep current' amongst other things.

And I've got some questions coming up...
 
  • Like
Reactions: egroover

DodgyTicker

Pedelecer
Dec 29, 2020
27
12
Traps and pitfalls (so far)

Gear change sensor


The gearchange sensor is going to have to go right up at the front near the shifter as on my bike the gear cable is 'naked' from the top of the downtube right back cable stop, which at the rear only leaves that small arc of outer cable which loops into the derailleur.

Brake cut-off sensors.

I've fiddled about with these and have come to the conclusion that it is going to be extremely difficult to fit these to the Shimano hydraulic levers without it looking like a pile of cack.

Temporary workround(s)

Until I can be bothered to fit the gear change sensor at the front and come up with a more elegant solution for the brake switches I've ordered a simple handlebar mounted on/off switch which will act as both a gear change sensor and a kill switch. No ideal and I'm not happy with the idea but at least i'll have a rudimentry safety system on the bike.

If anyone else has gone through this and has come up with a solution to the brake sensors, I'd be very interested to learn about it.

I know you can buy a full new set of hydraulic brakes with sensors built in but they are £80 and probably on a three month delivery period. Whereas a 50p reed switch in the right place would do the job perfectly. I'll have a further fiddle about...
 
  • Like
Reactions: pentiumofborg

egroover

Esteemed Pedelecer
Aug 12, 2016
970
575
56
UK
I bought both the brake cutoffs and the gear sensor, ending up not using either. The gear sensor killed the power for too long resulting in stop start motion, and the brake sensors seemed too much faffing about for a problem that I found didn't exist
 
  • Like
Reactions: jarob10
D

Deleted member 33385

Guest
The gearchange sensor is going to have to go right up at the front near the shifter
My gear sensor still hasn't been delivered, but from what I've read - installing them up front near the handlebars may or may not be problematic, because small changes in tension as it waves around (if it's left to wave around) can set it off, causing it to cut power to the motor. The seller advised locating the gear sensor near the rear shifter, but if that isn't possible on your bike... There may be a way, I don't know.
 

DodgyTicker

Pedelecer
Dec 29, 2020
27
12
I'd rather have some sort of safety device on the bike rather than none, saying that, there is always the power switch on the battery but I wouldn't fancy fumbling around for that in an emergency.

The gear sensor is a must have for my bike with it having a fragile 10 speed chain, it really clonks when changing gear under load.

That temporary kill-switch might end up as a permenant fixture though.
 
  • Like
Reactions: pentiumofborg