CST - it's all working

103Alex1

Esteemed Pedelecer
Sep 29, 2012
2,228
67
Thx Richard.

I may end up doing something like that - it's proving extremely hard to get the wood box solution to work with this battery and controller in the space available and I may need to start the whole thing over having gone to test it.

Or just get a frame bag and have done with it for £60. I've probably forked out 3 times that by the time I've finished with these materials, extra tools and kit ... and I might be better off using the materials on other things and flogging off the superfluous tools. I did have the finishing kit on a 14-day approval .... before my motor cable cut, the whole project got set back and I wound up out of time to return over £100 of stuff. It was a bad day when that happened in many ways lol !

If the end solution using wood is going to wind up having to be sealed in, may as well pull the plug now unless I can work out a sensible way of doing it.

Would be a doddle with a 15Ah battery and a small controller (or even 2) that could just slot in and out easily. These high capacity kits do cause endless issues if you're trying to get a really neat finish in a small space - probably more trouble than it's worth - and certainly more £ !
 
D

Deleted member 4366

Guest
As a designer, you have to be able to balance the characteristics that you want against the obstacles working against them compared with some notion of ideality that you have in your head. You can never get it how you want, so then come the compromises and creative solutions.

The 15aH battery wouldn't be powerful enough for your motor.

You can make more room by making your box out of wood, and then taking a fibreglass mould from it. It's a lot of messing about, makes a mess and is a bit more expensive but can give a more professional result with more space inside because of the thinner wall thickness.
 

trex

Esteemed Pedelecer
May 15, 2011
7,703
2,671
Fibreglass is a solution but what happens if the bike falls over? The soft pouch cells are made of very thin sheets, a dent in a corner of the pack or a puncture in the casing can be risky.
 
D

Deleted member 4366

Guest
You can make the fibreglass as thick or thin as you want to protect the battery. The chance of it being puncture in a crash is pretty small anyway except in the case of a major smash, in which case you'll have a lot more to worry about other than your battery.
 

103Alex1

Esteemed Pedelecer
Sep 29, 2012
2,228
67
As a designer, you have to be able to balance the characteristics that you want against the obstacles working against them compared with some notion of ideality that you have in your head. You can never get it how you want, so then come the compromises and creative solutions.

The 15aH battery wouldn't be powerful enough for your motor.

You can make more room by making your box out of wood, and then taking a fibreglass mould from it. It's a lot of messing about, makes a mess and is a bit more expensive but can give a more professional result with more space inside because of the thinner wall thickness.
Indeed. There have been a fair few more compromises and a great deal more obstacles than I'd bargained on already lol. Not least of which being my own unfamiliarity with most of it and the sheer time it takes to get one's head around it.

I don't think the bike warrants a fibreglass box - there have been too many compromises, delays/setbacks and outlays on experimentation to warrant it at this stage. I don't really have the skills to build the wooden box well enough to take a mould from it to be perfectly honest.... and another exercise with unpredicatable outcome in terms of end result.

One's own limitations are often the ultimate limiting factor. Also I can't get my head around the internal partitioning and supports on a fibreglass construction. So I will have to try to do my best with something but the end result is likely to be a way away far from the one I was looking for in context of time and money on the finishing. You live and learn !

Think I may just go for sealing in battery and trying to leave the controller accessible as a compromise and try to get it looking half decent with what I've already bought. At some point the box will have to be broken up to change the battery. At that stage I might well be ready to strip the kit and sell the bike as a cracking MTB - after all, I'd only need to change one brake housing to remove the brake switch and it's back to how it was. Thinking this is the most sensible compromise all things considered :)
 
D

Deleted member 4366

Guest
One's own limitations are often the ultimate limiting factor.
True; however, you don't know what they are until you test them. The limits are often not as close as you think when it comes to what you can do.

Why don't you just shove the battery and controller in your rack-bag and enjoy the bike as it is?
 

103Alex1

Esteemed Pedelecer
Sep 29, 2012
2,228
67
True; however, you don't know what they are until you test them. The limits are often not as close as you think when it comes to what you can do.

Why don't you just shove the battery and controller in your rack-bag and enjoy the bike as it is?
Perhaps on the limits - I guess it's a combo of time, will and other commitments also. I don't have other bikes down SW to ride whilst I'm playing about sorting this one, or any tool kit / place to work there (let alone time), so it can't go down until it's completely finished - and I really want it sorted now. Have put my money and effort on the table big time and has been 3 months pretty much continual focus. That's about enough for one bike - any more and it's verging on the obsessive lol !

OK I'll be completely honest, I'm reluctant to ride the bike with the battery and controller on the rack again after the accident unless there is no additional load on panniers (especially unbalanced) - this wasn't the initial trigger cause but I'm pretty sure contributed to the instability which made it go over like that. Those constraints are too limiting for what I decided to build the bike to accommodate as a whole package.

I ride my Agattu with very heavy single-sided panniers and never have any serious problems with stability. The Trek is different and less suited to this, but even scaling down it's not handling right as it is with the kg I want to be able to load it with on the back. Want to see how it handles set up the way I'm trying for. If it makes no difference then may decide bike is better as a lightweight MTB and convert it back.

One hopes a custom bike will work around the way you ride and how you want to load it within reason. Otherwise I am likely better off getting a different bike that accommodates what I want it to do. Money and performance aside - that's half the whole point of converting and spending all the time getting things how you want them. The speed and power are great - no issues there - but the rest of the bike kit out, handling and suiting what you like matter just as much.

I've tried repeatedly to adjust to rucksacks or bags - it's good for some people but just not for me so no point going back there. Or trailers - likelihood is I won't use one if I got it. Might work with the sturdy Agattu but that's quite capable of carrying everything I want it to already. Using a triangle bag to carry stuff instead of retaining battery and controller is also an option - but again to be perfectly honest good as useless for bulky stuff so not really the way to go for me - half a solution at best.

If the bike's going to be ridden again as an eBike the battery and controller need building in to the triangle in line with original plan right back to the time I first decided to order the motor.

Some temporary in-triangle solution will likely work even if it's not pretty - at least I'd get some use out of the bike after all the work it's involved and have it set up the way I'd want it for doing what I want to do and going where I want to go, carrying with me what I want to carry. So that's what I'm going to try to achieve. Otherwise, I'll still be experimenting in Summer :rolleyes: :) It's pretty close now and I've thrown a shed load of effort trying to sort it - there will be a way.
 
Last edited:

103Alex1

Esteemed Pedelecer
Sep 29, 2012
2,228
67
Cycle Analyst seems to be here. Got a demand for over £20 to pay Royal Mail this morning including an £8 processing fee so they must have done a full value customs invoice or something.

Almost decided to let them return it to sender but will probably go collect it - the bottomless pit of cash outlays continues lol. I've spent around £2,000 on this bike now trying to get it how I want it and there will be more costs to come. I'm putting about £600 towards the monetary costs of learning and experimentation as someone with no previous experience and without a workshop full of DIY tools and bits & bobs to raid to discount when doing the sums. The number of hours of work and research is immeasurable - running into hundreds when you count the bike accessories.

If I had the funds to build bikes as a hobby and get benefit from all the tools I've bought I'd likely get more out of my tools etc. However, I don't and with hindsight I think on balance paying the extra £500-£700 for an easy fit Xipi kit with proper triangle cube all done for you is worth the money. Couldn;t foresee having the cash to pay that back in January but if I'd waited I might have been able to stump it. Just. At the expense of not having all the accessories I've acquired - quite a few of which I now won't have space to accommodate - so won't get the benefit anyway.

I've learned lots of skills but likely won't have the funds or time to really get the benefit I could. Not in the short term anyway. Trial and error is the only way to find these things out so it's been an interesting and educational process so far. However, my initial suspicion right from the outset that despite the apparent cheap headline cost, I'd end up forking out just as much money on tools and experimentation as I'd pay for a ready to fit broadly equivalent kit, and risk it taking as long as waiting for one to come available this month, has in the end proven to be right.

Played around with the box a lot - may be a way to do something by remaking both sides in softwood. The rounding idea is all well and good but balsa cannot support screw inserts in thin profile, has strength disadvantages in useable volume-saving lateral supports and is f***ing expensive to buy in small quantities.

I can sand sharp edges off a millimetre or two but that's it. Will likely need to run a bunch of wires in the 1/4 inch between the battery and the plywood sides so would be some thin foam over the top. Will also have to re-do a load of wiring and possibly try to axe some of those plastic connectors which just take up far too much space. May also have to disassemble the switch, cut it down and put it in a smaller box. Days more work fiddling around and trying to get wood etc. basically. Ho humm.

Thought about the ally solution - I don't have rivets or any real understanding of how to make door etc. so at the moment reluctant to go down that route - just running out of steam with embarking on yet more skill acquisition adventures.

The chainguard arrived today. In order to fit this I'll have to shorten the box else it'll interfere since guard comes above the chainring. This means I'll lose one of my fixing screws which are far down the seat tube too. At least I can make provision for this. But it further reduces the useable box volume considerably losing just an extra half inch at the bottom in a critical area. So that will mean more brackets to compensate. I'll have to try to find some metal for them and buy more bits for my multitool too - ground down everything I had getting the controller fixing brackets cut down. So into another week by the looks of it !
 
Last edited:
D

Deleted member 4366

Guest
It never rains, but it pours. Maybe you need to help a few more old ladies across the road, or build up your karma account by redecorating their houses for them. I just sent some more money to the Bali orphans. Maybe that's why my CA and Thun sensor went straight through with no charges. Anyway keep up the good work. We're all learning from your problems.
 

103Alex1

Esteemed Pedelecer
Sep 29, 2012
2,228
67
It never rains, but it pours. Maybe you need to help a few more old ladies across the road, or build up your karma account by redecorating their houses for them. I just sent some more money to the Bali orphans. Maybe that's why my CA and Thun sensor went straight through with no charges. Anyway keep up the good work. We're all learning from your problems.
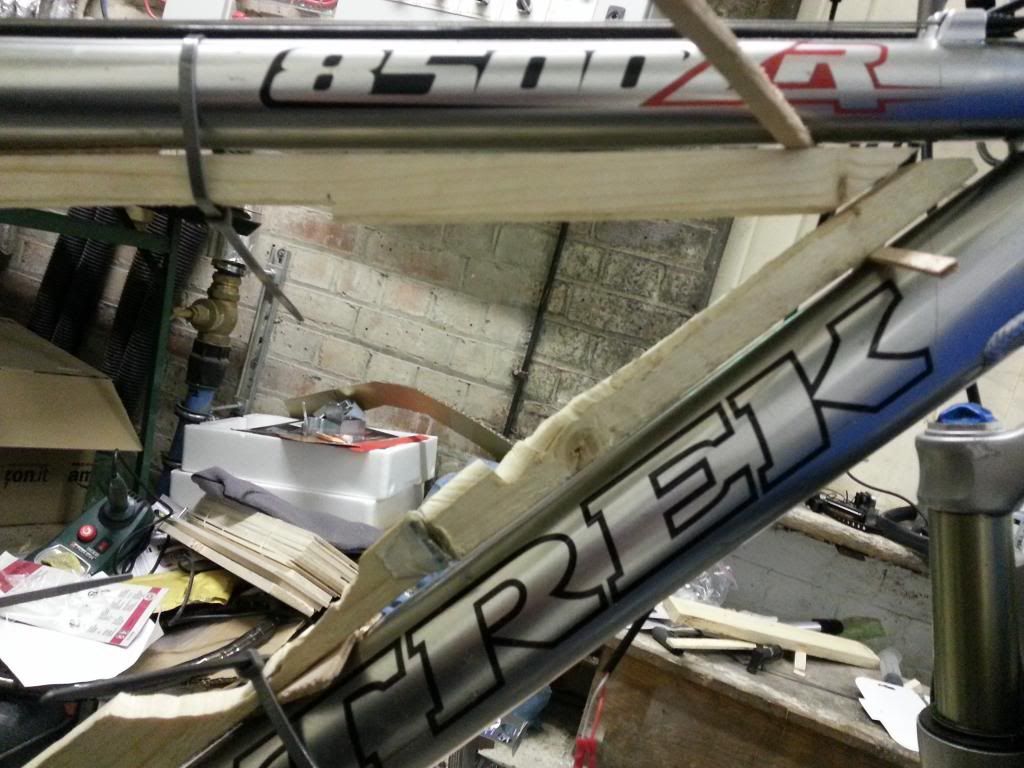
Lol. It's been a catalogue of challenges and set-backs at every step with this one, d8veh, hasn't it. I could not get battery dimensions from BMS without importing and "sucking and seeing" what turned up I had not choice but to take a punt, hope for the best and see what came. That's a risky path to follow, one that I was unhappy with but saw no alternative, and I'm certainly paying a high price for taking those risks.

Have to say after experiences of recent weeks I do like dealing with Germanic-type suppliers who give meticulous info on every dimension on datasheets from the beginning rather than the talking things up as you go approach. In the end with the latter, unless you are very flexible and skilled (which I'm not - and have never pretended to be), you wind up with big headaches and solutions which do not sit comfortably against your key specifications.

One thing I've confirmed is that for me, a big battery and controller tucked away in the triangle is the only option I'd consider and the only inflexible criterion in a bike build - given behind-seatpost options don't work on converting regular frames. If I want to go riding with no panniers/rack bag,no kit, no security stuff and just a Camelbak on my back I'd still likely be better off with a road bike than an eBike. So without being able to properly accommodate all that stuff and leave me free to ride unencumbered, the end game doesn't really deliver as a means of transporting me to go do the things I want/need to do and back again, which is what the bike is for.

I'd start from there with the dimensions of what was compatible, my own new knowledge of how big things are (like voltage converters, connectors, etc) and then select a battery and controller option that fitted. Preferably a smaller more efficient one. That would determine which motor I could then look at.

Also I'd build the box first before fitting the kit to make sure it worked, and limit choices to products you can check specs for before buying them. For my nature, this is the logical way of going about a project. The other way is way out of my comfort zone and leaps of faith at every turn. Some find that half the fun - maybe I would too (a bit) with lots of disposable cash not really caring how much I threw at it, but I find it more worrying and stressful than enjoyable especially with weeks on end waiting for stuff to come before you can see what you're dealing with.

Someone somewhere is giving me a very hard time over this DIY bike malarky. Part of me thinks maybe this bike is not meant to be for me, for some reason. There are times when you keep pushing uphill and it comes crashing down about your head that you are not meant to be going down certain paths at all, and perhaps ought not to have embarked on them - or need to learn from them and move on.

I've been willing to walk away many times and haven't held on to a fixation on keeping the bike at any stage. I do like it as a MTB well enough, though - so if all else fails, worst comes to worst, may put it back how it was and ride it as and when I can get a lift somewhere I want to go.

Life will not be so good until I get a car again - but in the end that's probably what I need to focus on saving up for a few months to finance and stick with maybe a regular bike that I can drive to where I want to ride once I do. Trying my very best with what I have in all the circumstances, but if the limits fall short of the minimum targets then as the months drag on it may be easier just to live without. I don't regret exploring this route - would never know whether it was worth the outcome without doing it.

Have not given up on it yet - will give it one last push to see what I can achieve, but am quite willing to accept the experience and insight as what I've effectively got for the financial outlay, and treat it like having done an unplanned mini-course. Plus skills I may as some point be able to transfer into other things I do. Will just mean I'll have to save harder for motoring down the line - I don't think eBikes can be a permanent substitute without a great deal of limitations.

Karma-wise, I've helped enough old ladies across the road and given freely to those less fortunate than myself to last most peoples' lifetimes over the years. I've also learned that what you give out you most certainly cannot expect to get back - so what I do give goes with no expectations. Very often in fact the more you do for others the worse you get in return.

Good news - got my CA. I'll take a look a bit later. It's a lovely evening still, so out again for a ride on the Kalkhoff... on the same routes as usual with no excessively long steep hills ;) ... onwards and upwards !
 

103Alex1

Esteemed Pedelecer
Sep 29, 2012
2,228
67
Well, put in 3 1/2 hours tonight and getting things closer to what I can fit. Think I'm finally bottoming out every millimetre I can squeeze out of the triangle space. The panel side the battery and controller need to slot into is the real b*gger - other side is very easy in comparison, especially as I'll have one side to use as a template for the other.

After notching out all that wood, should hopefully leave sufficient frame for enough zinc bolt/screw inserts (on order still waiting for 'em) to house the fixings that will clamp a removeable plywood side to the box. The other sides will be glued down with Gorilla glue (great stuff !).

The clearances are so tight I've had to get M4 knock in ones (about 20) with extra narrow heads. Brought the cost down to £20 from nearly £45 for the brass ones :)rolleyes:) with no heads and extra 'gripping teeth' that were 'ideal' in design.

They work on paper even with just 1.5cm profile in places. I hope they work in practice or will be sending them back ! If they do work I may pop some araldite on them before knocking in to make sure they don't lose grip. Long as my holes are drilled straight and are the right diameter they should be fine without though - and shouldn't split the wood.

The bike's got one of those oval downtubes which starts deeper than it is wide by the headset and ends up wider than it is deep by the same proportion near the cranks. It does throw the clearances out of true on the longest side so only real way has been trial & error - and use of some G-clamps purchased from Wickes today on my "workbench step" (behind in the pics) - being the only fixed place I have that I can clamp onto.

1st fit of removeable frame side 'near as' - just need to notch some more wood out up the triangle end to enable controller to be inserted and notch out for 2 support struts between the 2 frame sides at either end to underpin the battery weight (the wood is very strong in relatively short lengths, even in narrow profile), before glueing it up. The plywood bits inserted between box and frame help get the clearances right - very hard to do it by measuring, and even using a cardboard template wasn't accurate enough.


Last edited:

103Alex1

Esteemed Pedelecer
Sep 29, 2012
2,228
67
Well, I'm still at it. Sides re-cut more accurately, total width between the pedals now fixed at 12.8-13cm including plywood sides and gradually getting to grips with what needs to go where - and also where I can add supports between the 2 face sides without losing too much useable space on account of pushing items too far up into the box.


The wiring and most of the fuses / connectors will need to be run across the side of the battery - this will save a lot of space elsewhere.

May yet need to axe yet more stuff, but at the moment there is a glimmer of hope I can get most of it in with a lot of creativity as to where supporting bracing is placed in order not to push the controller back up into the void too far. Battery will need removing if the controller is to be actually removed, but that's an acceptable compromise as hopefully that'll not be a regular occurrence.

Going to have to rewire most things to shorten and lengthen wires - because as with the law of sod most of the short ones are where I want long ones and most of the long ones need shortening. Been suspecting for months this was going to be tricky :eek:. Lol.
 

103Alex1

Esteemed Pedelecer
Sep 29, 2012
2,228
67
... and there are those moments when you wonder whether you've just got your priorities all wrong ....


103Alex1

Esteemed Pedelecer
Sep 29, 2012
2,228
67
Few detours last couple of days. Bottom bracket bearing cup removal to attempt fitting chainguard went fine till last 3 threads of drive side. Some of the bearing cup metal decided to dislodge itself onto the bottom bracket threads in the frame and stuck solid as Shimano external bearing BB cups are Ally just like the frame sleeve. The BB itself was of course a gonner so ordered a new one.

I managed to dremel some of the metal lodged in the frame threads out with extremely careful use of a steel bit, but the threads were in no state to accept a new BB cup. Despite reforming the threads with a flat-ended awl there was way too much damage - but you could at least find the original grooves again. Decided to go look for a steel bearing cup to use to reform the threads at a different LBS to usual and managed to get bike up there for them to look at it.

After all the usual heavy sucking in of air and scaremongering by the sales guys on the front shop desk in an attempt to induce fear and dependence, I got hold of the technician himself out the back, chatted through what d8veh had suggested. He used to have exactly the same bike, took one look at it and sorted it for me in 20 minutes for a tenner with a professional BB threading tool they just happened to have (quite rare round these parts as those tools are hundreds of quid). Steel prevails over aluminium so new thread / clean up existing one is easy to cut with the right tool properly square. Basically it's now good as new.

I was lucky though, not least to get a lift to get it up to the shop and back, and if my hand had slipped with that dremel tool or I'd taken too much metal out, would likely have been in to special BBs like they use when they get stripped - and a whole load of expense (or a b*ggered frame). Few nail-biting moments it has to be said !!!!!!!!!!!!

So my cranks and new BB are in, along with chainguard mounting arm. It's 50:50 whether it'll work - a bit big basically, and trimming it to be able to attach to the chainstay without obstructing motor cable pulls it into interference areas with front derailleur and rear chain and/or cranks.

I have to fit new gear cable housing to the front brakes anyway (got fraying there up by the shifters unfortunately and I'm not happy with it so am replacing both front gear cable and housing). Taken the front derailleur off, cleaned it out and will see what I can do about positioning it to accommodate the guard or else there'll be more cutting bits off the guard or give up on it if it still doesn't work. As they say, the minute you touch one thing .... :rolleyes:

This bike's putting up one heck of a fight about being converted and dressed up with anything ! Special mudguards, special BB mounted chainguard, special kickstand with extra mods, special hydraulic brake switch..... I think it really wanted to to be left raw with all its original glory out on show :p.

Still, I really want it to be safe, multi-use and in good working order whether as an eBike or a MTB. In the context of what it's already set me back, a few quid on new brake pads, gear cables & BB to give me more confidence in it through the rest of the year is no big deal.
 
Last edited:

103Alex1

Esteemed Pedelecer
Sep 29, 2012
2,228
67

103Alex1

Esteemed Pedelecer
Sep 29, 2012
2,228
67
Refitting front derailleur ... what a faff !!!! Still not got the hang of it :rolleyes: Tell you what, people can say what they like about hub gears but I've yet to see many things quite so fiddly as fitting and adjusting a triple chainring derailleur around a BB-mounted chainguard with a new gear cable and housing. Blooming 'eck - it makes fitting that hydraulic switch look like child's play :p All this to try to stop my trousers fraying and ending up covered in muck - be easier to cut the bottoms off the blooming things !
 

Scimitar

Esteemed Pedelecer
Jul 31, 2010
1,772
40
Ireland
Refitting front derailleur ... what a faff !!!! Still not got the hang of it :rolleyes: Tell you what, people can say what they like about hub gears but I've yet to see many things quite so fiddly as fitting and adjusting a triple chainring derailleur around a BB-mounted chainguard with a new gear cable and housing. Blooming 'eck - it makes fitting that hydraulic switch look like child's play :p All this to try to stop my trousers fraying and ending up covered in muck - be easier to cut the bottoms off the blooming things !
Easier to tuck your trousers into your socks - told you so. :)
Ironically, you'll find you won't need all those gears anyway.
 

103Alex1

Esteemed Pedelecer
Sep 29, 2012
2,228
67
Easier to tuck your trousers into your socks - told you so. :)
Ironically, you'll find you won't need all those gears anyway.
... except I don't wear any kind of socks you can tuck trousers :p ! It's chainguard on or shorts on the bike whatever the weather from now on - only 2 options that'll work for me. Derailleur with no chainguard is a daft arrangement for riding in trousers. Think I may have sorted the guard - have removed the BB spacer from the drive side. The smallest cog sits over the BB cup but I think it's OK and it helps the non-drive side crank sit more snugly against the BB bearing. It was out by about the width of the chainguard before and although the nuts held pedals on tight to the axle something didn't ring quite right about it. Hope that's OK :confused: BB goes in like a dream now after being in and out a few times. The cable housing replacement was a doddle too.

However, I'm completely defeated by the front derailleur remounting. Can't get it to move the chain onto the outer chainring (which is the one I use most with the motor) whatever I do. It's very hard to get the shifter to move the derailleur twice and click in place let alone push out far enough to shift the chain. I've watched a bunch of YouTube vids and done it every which way I can, done all the limit stop stuff, set it 2mm above the big chainring, parallel with big chainring etc etc. Just the basic operation won't work. The chainguard mounting arm isn't to blame - if I replace the spacer it would be even worse. Just won't push out far enough even with limit screw adjusted as far as it'll go.

It's definitely harder to deal with than my hub gear bike. I can't see why people defend them so much and make out they're straightforward - if the front gear was continuously adjustable travel using a lever it would make sense but the 3-setting shifting is very fiddly - unnecessarily so on such a basic bike component with only "trial and error" as the setup guidance - no yellow dots to line up and the like. Must be a mechanic's nightmare these things. At this rate I think it's going to be back to the bike shop for YET ANOTHER bill and YET ANOTHER delay to set up the flipping front gears after many hours of work.

Grrr :(
 

Advertisers