Dawes Discovery 201 + YOSE 350w 700c Kit + Samsung 25R 10s4p

Moecycle

Pedelecer
Nov 22, 2020
27
9
Hi Folks,

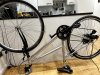
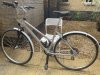
I'm working on a conversion for my partner. She wanted a very light bike that could maintain speed so we could bike together (she has a smaller pedelec now with 20" wheels)

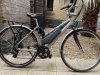
I'm going to be working off of a Dawes Discovery 201 donor I've picked up for 90GBP. From what I can tell, an easy/affordable conversion kit I can go with is the YOSE 700c 350w which is available on Amazon/Ebay for 240GBP: https://www.amazon.co.uk/gp/product/B07MX3C9XM/

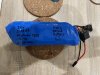
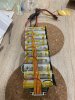
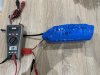
I'm hoping to be pairing this with a 36V battery I built out of Samsung 25R cells (10s4p).

This is the first time I'll be converting from a donor bike - so if any of you happen to have some thoughts/suggestions, I would love feedback before I buy the YOSE kit.

Things I'm not sure about:
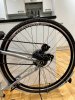
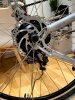
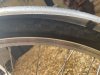
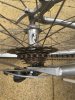
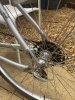
  • Will my 7 gear cassette fit on the YOSE wheel?
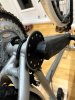
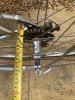
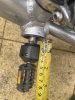
  • Will I need to worry about a 350w motor on the frame? Do I need any special mounting brackets?
  • Will the PAS sensor fit on easily?
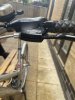
  • What type of brake sensors should I buy? Current levers are integrated with shifters.
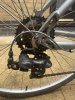
  • What type of disk brake should I purchase for the new wheel? (Currently it has a V brake on the rear)
  • Is this the wrong conversion kit, and should I be looking at an entirely different model?
I've attached some photos. Looking forward to this build, its a lovely bike and incredibly light. Hope this will go smoothly!

42502
 

Attachments

sjpt

Esteemed Pedelecer
Jun 8, 2018
3,642
2,652
Winchester
You've probably got a 7 speed freewheel (screw on kind), not cassette (more modern slide on kind). That should be compatible with that wheel, a cassette won't be.

The 350w motor is technically illegal if you want the bike to count as a pedalec; the max nominal power is 250w. You are very unlikely to be caught, and even less likely to be prosecuted. It shouldn't be a problem for the frame though. The kit should come with appropriate anti-rotation washers (others will advise better on this).

The PAS sensor should fit fairly easily, as long as you know how to take off the crank.

You can buy adaptors; often called hydraulic brake adaptors but also applicable to integrated levers (I have them). If you are a bit handier than me you can take apart the supplied brake levers and make up you own adaptors.

I think you may have problems using disk brakes with that frame. The V-brake will still be fine unless you are a very strenuous rider.

Not a bad kit (apart from being illegal). A lot to be said for buying a complete kit (including battery) from a really good supplier such as Woosh, but not so good if you've already got the battery.
 

vfr400

Esteemed Pedelecer
Jun 12, 2011
9,822
3,985
Basildon
1. Yes if it's a freewhel, not a freehub.
2. No
3. Yes. don't forget to test direction before fixing everything.
4. One Hiden wire brake sensor
5. Depends how much you want to spend. Get whatever used one you can find on Ebay that looks good. make sure that the adaptor is side mount if it cones with one, otherwise you need an adaptor too.
6. Kit looks OK to me, though i'd prefer one with a KT controller.
 

Moecycle

Pedelecer
Nov 22, 2020
27
9
Thanks! I’ve ordered the kit.

I also ordered some magnetic brake sensors (seemed they will do the trick).

For the disk brake, I’ll go with a mechanical disk caliper. I’m pretty sure it will fit on the frame (photo attached). I’ll sort this part out after the kit arrives.

B22C0048-3478-4FB0-858D-1FEBB683D96F.jpeg
 

Nealh

Esteemed Pedelecer
Aug 7, 2014
19,990
8,173
60
West Sx RH
Yes rear brake fixing is for standard IS calliper mount,
 

Moecycle

Pedelecer
Nov 22, 2020
27
9
Hi Folks,

First off, thanks to everyone who provided feedback! Build is going pretty well so far. Rear wheel went on like a charm. Disk brake as well.

If I'm lucky I'll be able to wrap up the electronics and brake cables this weekend.

42612
 

Attachments

Moecycle

Pedelecer
Nov 22, 2020
27
9
New battery built. Ended up going with Molicel p26a since Samsung 25R was sold out everywhere,

Took the bike for a spin and it was great. Hit close to 40 km/h with the throttle only. It’s nice that the controller lets you easily set a max speed. I think I’ll keep it to 30 since my partner isn’t that confident on roads.

Only complaints about this kit is the cables are too long, and the brake sensor connectors are male instead of female. I had to splice the connectors to get my magnetic sensors to fit.

Last step is to bundle everything in a frame bag nicely.
 

Attachments

  • Like
Reactions: wheeliepete

Nealh

Esteemed Pedelecer
Aug 7, 2014
19,990
8,173
60
West Sx RH
What current are you drawing from the Moli's ?
I see the BMS is 30a continuous.
Looking at the series Buss more then 15a and they might be getting pretty warm, if more then 15a you may want to double up on the series Buss for more current transfer.
Buss thickness and width size 8mm X 0.15mm ?
 
Last edited:

Moecycle

Pedelecer
Nov 22, 2020
27
9
What current are you drawing form the Moli's ?
I see the BMS is 30a continuous.
Looking at the series Buss more then 15a and they might be getting pretty warm, if more then 15a you may want to double up on the series Buss for more current transfer.
Buss thickness and width size 8mm X 0.15mm ?
Thanks for asking. The controller is rated at 9a cont., 18 peak. Nickel strips are 8mm x 0.15mm. I installed a 20A fuse.

I had a look at this chart at by the looks of it. Even a single nickel strip would be sufficient for the continuous current, no?
 

Attachments

vfr400

Esteemed Pedelecer
Jun 12, 2011
9,822
3,985
Basildon
What current are you drawing form the Moli's ?
I see the BMS is 30a continuous.
Looking at the series Buss more then 15a and they might be getting pretty warm, if more then 15a you may want to double up on the series Buss for more current transfer.
Buss thickness and width size 8mm X 0.15mm ?
He has 3 series strips for every cell, so no problem at all.

I do have one comment on that battery build:
You've welded the bus strips over the edge of the battery where the negative case is. The heat from the weld could have easily melted the heatshrink sleeve, which would cause a dead short and instant fire. I would say that it's very bad practice to weld in that position rather than directly over the caps.

On any second layer, cut slits in the bus strips that go between the electrodes to get good welds. It forces the current through the thickness rather than allowing the path directly between one electrode and the other. It doesn't matter so much on the parallel strips that are welded directly to the cells, but makes a massive difference on the second layer.

Also very important, you should have used paper insulators on the tops to stop the sharp edges of the strips rubbing through the thin plastic, which might already be compromised by the welding. Look at the right hand end of the 8th row down in the photo. That sharp edge would be just waiting to cut through the plastic. Your cap insulators look quite thick compared with most. Hopefully, they will save you, and it looks like somebody up above was looking after you because the cap insulator on that cell is actually displaced in the direction to protect that area. I would have trimmed ends like that back so that they can't reach the outer case. Looking at the other end of that row where the parallel strip is crushed sown, only the heatshrink is saving you from fire. That position isn't as vulnerable as the ends, so you'll probably be OK, but with insulator rings, there would be no worry. The insulators cost very little and give a massive benefit in terms of safety:
 
Last edited:

Nealh

Esteemed Pedelecer
Aug 7, 2014
19,990
8,173
60
West Sx RH
I only asked because I saw the BMS rating and no controller rating.
The acceptable rating means the series Buss may get warm but not dangerously so, some of the power from the battery will be lost as heat via the strips as they warm up if above optimal current is used.

Did you test the nickel strip to be genuine rather then cheap plate steel, test a piece in saline for 24 - 48hrs. Grind an area of the surface well then see if it rusts/oxidises.

The cell + end ideally needs an insulator ring placed on top of the shrink to prevent melting & rub which can lead to shorting, something to bare in mind for the next build.
 

Nealh

Esteemed Pedelecer
Aug 7, 2014
19,990
8,173
60
West Sx RH
For safety I have stopped gluing cells together as eventually the glue joint cracks thus movement can occur, cell holders do make packs a little larger but with safety in mind.

Its all a learning curve self building batteries but with each build one will increase/add safety as ones knowledge field grows.
 
Last edited:

Nealh

Esteemed Pedelecer
Aug 7, 2014
19,990
8,173
60
West Sx RH
Something to be wary of and which Vfr referred to.
See the pic of your #8 cell group.
Inkedmoli_LI.jpg
 

Moecycle

Pedelecer
Nov 22, 2020
27
9
Bike is all built! we took it for a ride across London Yesterday and it was lovely. 30km ride and battery still had some life in it.


Very happy with this kit, my partner said she felt she always had power available when she needed it. Likely too fast for her, but she can finally keep up with me and not have to put in any effort.

42726

Thanks for the wise words on my battery build. I agree I need to do better on the positive terminal insulation, and will buy those Rings you suggested for my next build @vfr400

For anyone wondering what you should budget for a build like this, here is the final Bill:

ItemPrice (GBP)
Donor bike (Ebay)92
YOSE kit239
BMS11.69
Molicel 40x137
Power switch3.74
brake sensor10.24
Nickel8
foam4
Anderson connectors 5
battery bag17.49
Battery foam, heat tape, shrink wrap5
disk brakes14.94
cable wrap and holders7.5
Brake cable7
Fuse2.5
kick stand9
Panier rack12
TOTAL 586.1
 

Attachments