eBrompton Build

StuartsProjects

Esteemed Pedelecer
May 9, 2021
1,730
974
Why build an eBrompton ?

The Brompton is a good bike for shopping or commuting and short range leisure trips. The neatness and compactness of the fold is a compelling advantage, you wont have trouble taking it on public transport or storing it in a corner etc. Fitted with a decent set of ‘easy’ wheels and a rear rack you can take it into shops and push it around folded like a small shopping trolley.

I bought a standard 3 speed Brompton some 20 years ago which I used to get to the train station to commute into work in Bristol and Swansea. About 3 years back after retiring and being bored, I added a Swytch electric kit to the Brompton. The now eBike was just fine, great for shopping trips to avoid taking the car or meeting in town for a tea.

Recently I had been noticing how heavy my current swytchified Brompton was, its a little over 18Kg. I had wanted a lighter bike for some time and of course the new T-Line Titanium\Carbon Brompton at 7.45Kg looked appealing, even with the hefty price tag.

However, the T-Line Brompton has carbon forks so unlikely to be suitable for an electric front hub motor. There are no titanium front forks, maybe there will be sometime soon. I did ask, but the standard steel forks would not fit in a T-line.

I picked up a 3 year old 3 speed (Sturmey type hub gear) Brompton, in good condition, that had most all of the steel bolts replaced with titanium ones and other lightweight parts fitted too. It came with all the original replaced parts too, so a handy source of spares. After a bit of work, I had this Brompton down to 8.5Kg, not bad considering the all titanium framed T-Line is 7.45Kg.

One maybe not obvious feature of the Brompton is its popularity, particularly in the far East. As a result of this popularity there are lots of people out there making and supplying replica parts from the most basic to all the way up to replacement titanium frames and all compatible with the classic Brompton. Want carbon wheels ? Well there is a wide range to choose from. Multiple choices for gearing setups etc. Its a modders paradise.

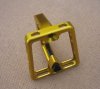
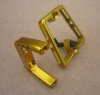
For instance, whilst the Brompton folding pedal is good, its heavy. You can get a set of titanium axle pedals, right fixed, left removable for around £40 and a weight saving of around 200g. Want to replace all those steel bolts used in the brakes with non-corroding lightweight titanium ones, you can, several manufacturers makes sets of them.

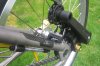
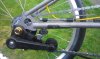
One of the significant weight savings, over a standard 3 speed Brompton, is to fit the 2 speed derailleur rear wheel, this is some 600g lighter than the normal 3 speed Sturmey setup.

The ultimate aim of lightening up a Brompton was to convert it to an eBrompton. My experiences over 2-3 years using the swytchified Brompton were that 2 speeds was enough. Recently I realised I had been out on several Brompton trips with the rear hub key puller chain disconnected and I never noticed. So I figured a two speed would be enough. One of the almost standard mods you can do is to replace the standard rear wheel 2 speed cogs with a 3 speed setup, they use narrower cogs and an 11 speed chain. So more gears if you needed them. You can also by kits that replace the rear wheel with a 6\7 speed derailleur setup, so there are plenty of gear options out there.

So I have a 2 speed, possibly 3 speed Brompton, that is only 1Kg heavier that the single speed T-Line, and it cost less than half what a T-Line would be.

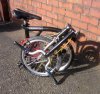
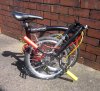
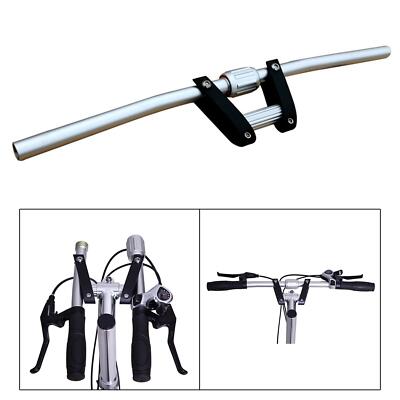
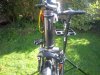
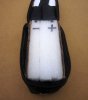
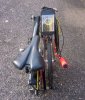
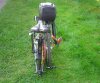
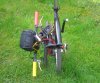
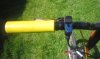
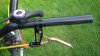
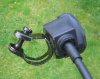
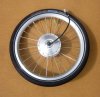
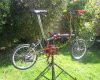
Here is the picture of the road ready Brompton ready for conversion. Most bolts and the bottom bracket are titanium, as is the front wheel axle. Titanium rear frame triangle and forks. Tanus puncture free tyre on the rear, Schwalbe Kojak tyre and Tubolito inner tube on the front. Carbon bars and lightweight brake levers.


51142


How heavy would eBrompton be ?

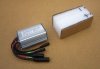
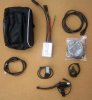
I have the swytchified Brompton so I know how much weight a front wheel hub motor will add. I have spares of Julet cables, motor cables, KT controller etc to weigh so I estimate that an eBrompton conversion would add around 2.3Kg weight plus that of the battery. A 10S2P 7Ahr battery would be plenty for my needs and adds around 1150g in weight, so the potential conversion would add in total around 3.45Kg. The would take the weight of eBrompton up to just under 12Kg.

Next: Problems with handlebars
 

StuartsProjects

Esteemed Pedelecer
May 9, 2021
1,730
974
Handle bars

If you look a the picture of the folded Brompton below, you can see a problem;

51143


When folded the handlebars are very close to the ground. I have worked around this on my previous Brompton by shortening the bars and moving them off centre a bit.

There is for the Brompton (those manufacturers out in the far east again) a range of options for the bars, standard is aluminium, there is titanium of course and carbon. The standard alloy bars in the picture above weigh 240g and a carbon low rise set weigh a mere 128g, so saving weight and look a the folder layout now;

51144


Well clear of the ground, which is good for shopping trolley mode (coming later).


Next: Where to put it all.
 

guerney

Esteemed Pedelecer
Sep 7, 2021
10,767
3,098
Last edited:

StuartsProjects

Esteemed Pedelecer
May 9, 2021
1,730
974
These are probably not compatible (or desirable);
Dunno.

But the low rise carbon bars do help with the trolley mode issue.

How long they will last I do not know. Carbon stuff is brittle, so if there is a collision\fall the carbon bars might fail wheras as the heavier alloy bars would probably survive. They were not expensive, around 50% more than the standard alloy ones, so worth a try for the weight saving.
 

AndyBike

Esteemed Pedelecer
Nov 8, 2020
1,248
532
Dunno.

But the low rise carbon bars do help with the trolley mode issue.

How long they will last I do not know. Carbon stuff is brittle, so if there is a collision\fall the carbon bars might fail wheras as the heavier alloy bars would probably survive. They were not expensive, around 50% more than the standard alloy ones, so worth a try for the weight saving.
Keep in mind that carbon bars are pretty much the standard now in MTBing, DH etc. And those in falls will take a fair battering compared to you having a tumble in the street.

That said - this is worst case scenario, as to how often is you you fall off ?. I'll hazard a guess there that its very rare.
 

StuartsProjects

Esteemed Pedelecer
May 9, 2021
1,730
974
That said - this is worst case scenario, as to how often is you you fall off ?. I'll hazard a guess there that its very rare.
Oh, falling off is rare, but banging or hitting the bars might happen more often.

However, not a problem really, at a cost of £20 delivered, I have a spare set.
 

StuartsProjects

Esteemed Pedelecer
May 9, 2021
1,730
974
Where to put it all

So where does the battery, controller and all those spare wires go ?

Some Brompton conversion kits put the battery\controller in a bag or case on the front of the handlebars, for example the standard Swytch setup. But using this location means the battery\controller must be removed before folding so you need to have special connectors for all the wires.

Removing the Swytch battery\controller I did find to be a bit of a pain and this eBrompton is as much about convenience as it is about weight. I want the battery\controller to stay in place when the Brompton is folded and used in shopping trolley mode.

One of the key features of a Brompton is a small rectangle of metal with two bolt holes located on the front of the steering tube;

51188

Its the bag mounting block.

It can take a fair bit of weight and its where Brompton locate the battery bag for their own electric Brompton. This location is a good place for the battery, controller and spare wires. Its close to the motor with and the battery and controller can be right next to each other. Wires to the brake lever sensors and display will be short too.

My initial idea was simple, find a suitable small bag, line the inside back with a bit of ply reinforced with glass fibre maybe to stiffen it up and secure it to the bag block. If the bag is small it wont interfere with the fold much and can be left in place, removing the major hassle with the Swytch setup.

Battery

Before I can plan any further there needs to be consideration of the battery size. My current Swytchified Brompton has a 8Ahr battery and that has certainly been enough for the average shopping trip and some longer 2 hour leisure trips too. So I decided that for average use circa 4Ahr would be plenty but also have the option for a larger battery of say circa 8Ahr for longer trips. Having two batteries is good, if you forget to charge after a ride there is always the other one ready and waiting.

A 36V 10S2P of good 18650s would give me around 7Ahr for a weight of 1100g or so. Using high current capability cells I could have a 10S1P of 21700 at 4.5Ahr for around 750g. I realise that the normal view on eBike batteries is that bigger is better, but for example the 36V 10Ahr battery for my eMountain bike weighs in at 2.65Kg which is a major weight for an eBike that you want to be able to pick up and carry.

The latest Swytch kit has a 2.5Ahr battery for the ‘Air’ version and 5Ahr for the ‘Max’ so smaller batteries are not that unusual.

So assuming the bag needed to take the larger 10S2P battery, I worked out the size at around 135mm x 55mm x 70mm and made a model out of foam and card.

51189

I found a suitable looking bag, £5.70 delivered and 103g;

51190

But would the cheap bag be big enough ?

With the controller in the bag, it looks like this;

51191

And with the battery added it looks like this;

51192

With the battery on top the bag closes up OK. So I have a bag that will probably work, although a slightly bigger wider one might be good, store a few tools maybe. And the wires supplied with a standard conversion kit, especially the Motor extension and 1 to 4 extension might need to be shortened to fit in this ‘compact’ bag.

It could be useful if the controller could be put long side across the width of the bag as it would then be possible to attach heat sink fins to the rear of the controller and have them poke out the back of the bag into the open air for cooling, if heat build up is a problem that is. So a larger bag might be a better starting point so I ordered one, more about it later.

There is a range of mounting brackets designed to screw into the bag mounting block and provide a frame for attaching and releasing a bag. I found a bracket that was in two parts, because I might just need the U shaped bracket to attach my own bag battery;

51193


51194

With the bike folded the bag mounted on the block would be in this position, so not in the way much;

51195

Another bag

The other, wider, bag arrived and this does look a bit more useful, its a bit wider, this is it in the position it would be when the bike is folded and the bag is fixed to the bag mounting block;

51196

That location would be OK, so its useful to know that I can use a bigger bag if needed.

That bigger bag is designed for handlebar mounting and you could use that mount if the bag faces backwards, but then see what happens when the bike is folded;

51197

The bag pokes out quite a bit to the side, maybe OK, and easier to setup than using the bag block.

Next: Conversion kit.
 

Bikes4two

Esteemed Pedelecer
Feb 21, 2020
952
424
Havant
Hi @StuartsProjects - I'm enjoying your write-ups - thank you - I'm not in the market for a Brompton although I've toyed with the idea more than once but it is interesting to see how you develop your conversion none the less.
 

guerney

Esteemed Pedelecer
Sep 7, 2021
10,767
3,098
I'm very much enjoying the episodic with cliffhanger format of this thread :)
 

StuartsProjects

Esteemed Pedelecer
May 9, 2021
1,730
974
I'm very much enjoying the episodic with cliffhanger format of this thread :)
What, you mean will it work or will it not ?

There is quite a lot to work out. Its not so bad if your not worried about the weight side or having a neat setup without piles of cables everywhere.
 
  • Like
Reactions: Bikes4two

Woosh

Trade Member
May 19, 2012
19,841
16,614
Southend on Sea
wooshbikes.co.uk
If you want to avoid cables everywhere, avoid the throttle and the 1-4 Julet, avoid the 9-pin motor cable too.
 
  • Like
Reactions: Bikes4two

StuartsProjects

Esteemed Pedelecer
May 9, 2021
1,730
974
Conversion kit

There is a base conversion kit out there, without battery, from TOPBIKEKIT, that comes with a KT controller, LCD4 display (small and light!), brake levers with switches, motor cable, 1to4 cable and optional battery. Its based on Julet connectors and costs about £300. It would likely fit in the smaller bag I found.

Julet cables are OK, but for where I want to end up with this eBrompton they are not ideal. First off there can be quite a bit of spare cable, in particular the 1 to 4 cable. Your meant to run the 1 to 4 cable from the controller up to near the handlebars where it splits into the brake, display and throttle connectors. This, together with the short lengths of cable the Julet equipped brake sensors, display and throttle seem to come with, means you probably have a bunch of cables and connectors to fold up and store somewhere between the battery\controller bag and handlebars.

A KT controller that comes with JST-SM connectors could provide a neater and slightly lighter layout. The brake sensors, display and throttle that have the JST-SM connectors on them normally have long cables, typically 150cm, so they can be run direct to the battery\controller bag, cut to length and re-crimped. There would be no joints or spare cable outside of the bag.

Whilst I might prefer the JST-SM approach, I cannot find a non-battery conversion kit that uses this setup. There are a number of basic Brompton conversion kits out there that I could use, but they all seem to use Julet style connectors. One could just buy a KT JST-SM controller and start from scratch, but there could be issues with differences in wiring of the connectors. Ebike wiring a standard it is not.

So I will probably buy a kit where all the stuff is known to work together and when that is working if necessary improve or tidy it up in stages after. With this approach I will likely get the eBrompton into a working state quicker too.

Brake levers

The brake levers with switches supplied with the TOPBIKEKIT kit do look a bit naff and would be a last resort. I much prefer the inline brake sensors that fit on the brake cable itself as on the Swytch. So I found one online with a 2 pin JST-SM plug. I would initially need to build an adapter from 2 pin JST-SM to 2 pin Julet, if using the TOPEBIKEKIT, but I have all the parts for that already.

51212

To fit the sensor you just pull back the brake outer at the lever and slip the sensor over the inner, so easy to fit (If they work). The similar 3 pin ones work well on my Swytchified Brompton.

Next: Problems with gears
 
Last edited:
  • Like
Reactions: Bikes4two

StuartsProjects

Esteemed Pedelecer
May 9, 2021
1,730
974
If you want to avoid cables everywhere, avoid the throttle and the 1-4 Julet, avoid the 9-pin motor cable too.
I concur about the 1-4 Julet, the use of JST-SM equiped brake sensors, display etc (that normally have with long cables) would be better, and likley something I will work around to doing.

The Motor cable is not so obvious, you can get 60cm extensions and that is close to what I might need.
 
  • Like
Reactions: Bikes4two

Woosh

Trade Member
May 19, 2012
19,841
16,614
Southend on Sea
wooshbikes.co.uk
use of JST-SM equiped brake sensors
You can make your own cables. Cut the yellow connectors from the 1-4 cable and solder the brake sensor wires to them. Use heat shrink tube to seal the soldered connections.
 
  • Like
Reactions: Bikes4two

StuartsProjects

Esteemed Pedelecer
May 9, 2021
1,730
974
You can make your own cables. Cut the yellow connectors from the 1-4 cable and solder the brake sensor wires to them. Use heat shrink tube to seal the soldered connections.
What I might do is shorten the 1 to 4 by cutting off most of the 8 pin cable and re-joining it.

Not sure I would solder the brake, display etc direct in that way, if you get a fault its not so easy to replace the defective bit.
 

Woosh

Trade Member
May 19, 2012
19,841
16,614
Southend on Sea
wooshbikes.co.uk
What I might do is shorten the 1 to 4 by cutting off most of the 8 pin cable and re-joining it.

Not sure I would solder the brake, display etc direct in that way, if you get a fault its not so easy to replace the defective bit.
I did not suggest you join the brake wires directly to the controller. Sorry if I gave that impression. What I mean is you use the connectors from the loom, they are waterproof. JST SM are not waterproof.
 

StuartsProjects

Esteemed Pedelecer
May 9, 2021
1,730
974
Problems with gears

As mentioned earlier, I had switched the rear wheel from a 3 speed Sturmey Archer hub gear setup to a 2 speed rear Brompton wheel. This 2 speed wheel is around 600g lighter over a 3 speed hub gear setup and ought to be good enough, with electric assist, for eBrompton on most of the rides I do.

The two cogs on the rear are switched with a derailleur type arrangement with a slotted pusher that sits under one of the chain stays and pushes the cogs of the chain tensioner (needed to allow the fold to work OK).

51459

51460

There is a shift lever that attaches to the underneath of the standard Brompton right brake lever, but I had changed to the much lighter Aceoffix levers. I bought a push button 2 speed shifter and fitted it to the left handlebar, see below.

51461

However after a test ride, I realised that this shifter does not really have enough range to shift from one gear to the other. You can adjust the gear inner so that you can be in one gear or the other but you cannot shift. A shift lever with a bit more range is needed, I found a Sun Race friction shifter on eBay that came complete with cable for £9 delivered.

Now perhaps I should have tested the gears before fitting the 34g a pair foam grips, but I did not and to try out the new shifter I had to cut the grip off. Never mind they only cost around £2.40 a pair.

The Sun Race friction shifter had a range of 27mm versus 7mm for the push button shifter. It shifts fine, but the bar clamp has sharp corners and edges, maybe OK on aluminium bars, but not so good on carbon. Perhaps a bit of inner tube as a liner will help. There also really ought to be a ferule where the gear outer exits the shifter body.

51462


51463

The Sun Race shifter is fine for now, but its not exactly small and a more bar friendly clamp would be good. I will keep my eye out for a decent friction shifter.

Conversion kit

There is a base conversion kit out there that can be bought without battery, from TopBikeKit. It comes with a KT controller, LCD4 display (small and light!), brake levers with switches, motor cable, 1 to 4 cable. Its based on Julet connectors and costs about £300 delivered. It would likely fit in the smaller bag I found. There are optional batteries for the kit, a 10Ahr 10S2P based on Samsung 21700 50E or a 15Ahr 10S3P also using Samsung 21700 50E cells. The 10Ahr battery weighs in at 1.8Kg.

The kits use of Julet cables is fine, but for where I want to end up with this eBrompton they are not ideal. First off there can be quite a bit of spare cable, in particular the 1 to 4 cable. Your meant to run the 1 to 4 cable from the controller up to near the handlebars where it splits into the brake, display and throttle connectors. This, together with the short lengths of cable the Julet equipped brake sensors, display and throttle tend to come with, means you probably have a bunch of cables and connectors to fold up and store somewhere between the battery\controller bag and handlebars.

A KT controller that comes with JST-SM connectors could provide a neater and slightly lighter layout. The brake sensors, display and throttle that have the JST-SM connectors on them normally have long cables, typically 150cm, so they can be run direct to the battery\controller bag, cut to length and re-crimped. There would be no joints or spare cable outside of the bag. But JST-SM connectors are not waterproof.

So I ordered the TopBikeKit conversion kit and will initially build it as standard, with the battery and connectors in a handlebar bag sold as a low cost option with the kit. When the conversion is working I can then look at tidying up the setup by moving it all into a hopefully smaller bag on the luggage block on the steering tube. With this approach I will likely get the eBrompton into a working state quicker too.

Conversion kit arrives !

It was ordered on the 23rd April and arrived on the 2nd May, not bad delivery from the far East.

I put a Marathon racer tyre on the wheel (260g) and this is the kit parts, which look OK;


51464

51465

I weighed all the bits (minus battery and motor wheel), bag, controller, PAS, motor cable, display, brake lever and 1 to 4 cable I would need it came to 787g.

I weighed a standard front Brompton wheel (no tyre tube or rim tape) and it was 615g. The kit motor wheel weighed in at 1906g, so adding the motor wheel adds 1291g to the weight of the bike. Thus the total added weight (minus battery) of Brompton to eBrompton will be 2078g, plus a few zip ties.


Next: Fitting the PAS.