
I recently put a bike rack on my motorhome. While this is not exactly pushing the frontiers of science, I thought I'd write it up and post some pictures, because there seems to be very little on the web about this. I did a little research before starting and could not find any hard information.
The typical motorhome wall is a sandwich of aluminium on the outside, plywood on the inside and a foam core. Its usually not even hard foam - mine turns out to be expanded polystyrene. The point is that you can't just put four bolts through this and hang a bike rack off it - especially a rack for electric bikes.
The bike rack instructions make it clear that you have to find the hard parts of the wall structure and make sure you bolt through them. Some camper vans have mounting points already built in; with others you have to pick up the wooden framework inside the wall and hope the battens are the same spacing as the bike rack.
You would think this information would be all over the net, with diagrams for each model. But I couldn't find it. Instead I found a discussion on another forum where people were wondering whether to fit sleeves over the bolts to prevent the wall crushing as they tightened them up. The thread went on to relate a horror story of a bike rack falling off.
I spoke to the dealers. They said my particular model - Compass Avantgarde 300 - does not have the standard battens inside the wall. I contacted the manufacturers and they sent me a diagram of the wall construction showing that there was some hard structure in there, but it was not where it was needed. To be fair, the dealers - South West Motorhomes - did point me to the solution.
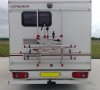
Here is the installation.

The answer is to fit a pair of aluminium extrusions across the rear of the van. These ones are available from Fiamma, the manufacturers of the rack; they are called fixing bars, but they don't seem to be widely publicised. The idea is that they pick up on the structure at the corners of the van and also have a series of bolts through the wall with spreader plates on the inside. It's not quite as simple as it looks, nor as good as it sounds. After an engineering review and failure modes analysis, I put extra screws in the corners, doubled up the number of through bolts and modified the way the end caps were fitted. I had to take the fridge out to do this, but I managed to work around the toilet.
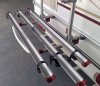
I also had to modify the rack itself.

Many e-bikes have extended wheelbases. The centre rail in the photo has been extended so that it will take my Torq.
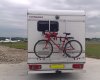
Finally, here's a picture of it in action.

Two final thoughts. The bike rack instructions and everyone I spoke to stressed the need to use sealant. I think this a good idea - in fact in many installations I expect the sealant becomes the dominant structural part. Secondly, I think I'll be leaving some extra space when following another van with bikes on the back.
Nick
The typical motorhome wall is a sandwich of aluminium on the outside, plywood on the inside and a foam core. Its usually not even hard foam - mine turns out to be expanded polystyrene. The point is that you can't just put four bolts through this and hang a bike rack off it - especially a rack for electric bikes.
The bike rack instructions make it clear that you have to find the hard parts of the wall structure and make sure you bolt through them. Some camper vans have mounting points already built in; with others you have to pick up the wooden framework inside the wall and hope the battens are the same spacing as the bike rack.
You would think this information would be all over the net, with diagrams for each model. But I couldn't find it. Instead I found a discussion on another forum where people were wondering whether to fit sleeves over the bolts to prevent the wall crushing as they tightened them up. The thread went on to relate a horror story of a bike rack falling off.
I spoke to the dealers. They said my particular model - Compass Avantgarde 300 - does not have the standard battens inside the wall. I contacted the manufacturers and they sent me a diagram of the wall construction showing that there was some hard structure in there, but it was not where it was needed. To be fair, the dealers - South West Motorhomes - did point me to the solution.
Here is the installation.
The answer is to fit a pair of aluminium extrusions across the rear of the van. These ones are available from Fiamma, the manufacturers of the rack; they are called fixing bars, but they don't seem to be widely publicised. The idea is that they pick up on the structure at the corners of the van and also have a series of bolts through the wall with spreader plates on the inside. It's not quite as simple as it looks, nor as good as it sounds. After an engineering review and failure modes analysis, I put extra screws in the corners, doubled up the number of through bolts and modified the way the end caps were fitted. I had to take the fridge out to do this, but I managed to work around the toilet.
I also had to modify the rack itself.
Many e-bikes have extended wheelbases. The centre rail in the photo has been extended so that it will take my Torq.
Finally, here's a picture of it in action.
Two final thoughts. The bike rack instructions and everyone I spoke to stressed the need to use sealant. I think this a good idea - in fact in many installations I expect the sealant becomes the dominant structural part. Secondly, I think I'll be leaving some extra space when following another van with bikes on the back.
Nick
Attachments
-
 88.6 KB Views: 142
 -
 74.4 KB Views: 128
 -
 89.3 KB Views: 130
Last edited:
")


