Here's another build after AWOL's using another of Dave's MXUS 350w rear hubs with a cassette spline.
I'd asked a question on here about electrifying my recumbent with a 20" front wheel hub motor. Among the replies and tips, Dave suggested using a hub motor in the 26" rear wheel for better drive.
It sounded very attractive but got me thinking about the conversion I'd tried on my Giant Trance full suspension bike. I wanted a little more power than the 250w front hub I'd tried in other bikes. I therefore put in a 1000w 48v direct drive rear hub motor, and ran it at 36v, which I'd standardised my Lithium batteries at.
It gave a good cruising speed, about 22mph, but didn't suit my purpose, that of a true dual purpose bike. I wanted motor assistance without increasing the unassisted pedaling effort. The 1000w motor was so heavy, and coupled with the permanent drag, pedaling alone wasn't a comfortable option.
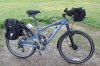
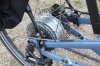
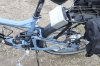
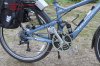
This geared MXUS motor is much lighter and has no drag when pedaling unassisted. It can also take the original 9 speed cassette cluster, so the gearing is unaffected.
Dave boosted the current in the controller slightly for me, so to help dissipate the heat, I mounted it in a Maplin die cast alloy box rather than a bag. I bolted the controller through the side with longer heat sink bolts and coated the joining sufaces with thermal paste, so the whole alloy box is now heat sink as well. The uncut excess wires fold up neatly inside. I put a row of drain holes underneath at the lowest point in case any moisture gets in.
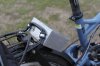
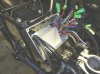
It's rubber mounted to the rack. It's also easy to feel while pedaling, to see if it's ever getting hot. (stone cold so far !)
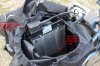
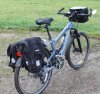
The 36 volt 10ah lithium batteries were already in proprietary cases from another of my bikes, so I mount them in the small panniers. A velcro strap inside stops them flopping about, as they're standing vertically.
I don't know what range is yet, but on my first 10 mile test run it appeared to use less than half of one battery. The beauty of a true dual purpose bike that can be easily pedalled is that running out of battery on a long run isn't such a dire prospect.
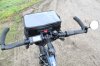
The bike has Magura hydraulic disc brakes, with an 8" rotor on the front, so stopping power is excellent.
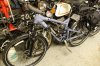
These photos were taken on my first test run this afternoon, through some very muddy lanes. I use a pump up garden sprayer when I get back home to rinse the mud off while it's still wet. It gets it off easily without blasting too much water into the bearings etc..

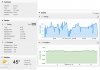
The graphs are from the Garmin website after uploading the track from my GPS watch. As you can see, it's very flat here, but then I am quite heavy, around 95kg. It was only a 10 mile run, and I didn't hammer the throttle, and only used a maximum assist of 4 (out of 5). The top speed was just short of 20mph, but I think it would do about 22 on the flat, as was predicted.
The motor is very quiet, about the same as the 1000w direct hub.
I'm very pleased with the conversion, the electrification has hardly detracted the bikes unassisted pedaling at all, and the whole thing, with all my bags etc., but without the batteries, weighs 24 kg, only about 3kg more than before.
I'd asked a question on here about electrifying my recumbent with a 20" front wheel hub motor. Among the replies and tips, Dave suggested using a hub motor in the 26" rear wheel for better drive.
It sounded very attractive but got me thinking about the conversion I'd tried on my Giant Trance full suspension bike. I wanted a little more power than the 250w front hub I'd tried in other bikes. I therefore put in a 1000w 48v direct drive rear hub motor, and ran it at 36v, which I'd standardised my Lithium batteries at.
It gave a good cruising speed, about 22mph, but didn't suit my purpose, that of a true dual purpose bike. I wanted motor assistance without increasing the unassisted pedaling effort. The 1000w motor was so heavy, and coupled with the permanent drag, pedaling alone wasn't a comfortable option.
This geared MXUS motor is much lighter and has no drag when pedaling unassisted. It can also take the original 9 speed cassette cluster, so the gearing is unaffected.
Dave boosted the current in the controller slightly for me, so to help dissipate the heat, I mounted it in a Maplin die cast alloy box rather than a bag. I bolted the controller through the side with longer heat sink bolts and coated the joining sufaces with thermal paste, so the whole alloy box is now heat sink as well. The uncut excess wires fold up neatly inside. I put a row of drain holes underneath at the lowest point in case any moisture gets in.
It's rubber mounted to the rack. It's also easy to feel while pedaling, to see if it's ever getting hot. (stone cold so far !)
The 36 volt 10ah lithium batteries were already in proprietary cases from another of my bikes, so I mount them in the small panniers. A velcro strap inside stops them flopping about, as they're standing vertically.
I don't know what range is yet, but on my first 10 mile test run it appeared to use less than half of one battery. The beauty of a true dual purpose bike that can be easily pedalled is that running out of battery on a long run isn't such a dire prospect.
The bike has Magura hydraulic disc brakes, with an 8" rotor on the front, so stopping power is excellent.
These photos were taken on my first test run this afternoon, through some very muddy lanes. I use a pump up garden sprayer when I get back home to rinse the mud off while it's still wet. It gets it off easily without blasting too much water into the bearings etc..
The graphs are from the Garmin website after uploading the track from my GPS watch. As you can see, it's very flat here, but then I am quite heavy, around 95kg. It was only a 10 mile run, and I didn't hammer the throttle, and only used a maximum assist of 4 (out of 5). The top speed was just short of 20mph, but I think it would do about 22 on the flat, as was predicted.
The motor is very quiet, about the same as the 1000w direct hub.
I'm very pleased with the conversion, the electrification has hardly detracted the bikes unassisted pedaling at all, and the whole thing, with all my bags etc., but without the batteries, weighs 24 kg, only about 3kg more than before.