My First Electric Bike

jerrysimon

Esteemed Pedelecer
Aug 27, 2009
3,292
112
Cambridge, UK
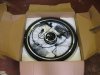
First e-bike - MTB front wheel conversion

Well after recently trying to get a little fitter and riding my bike in the evenings I wanted to ride to work every day but its a good 30-40 min ride for me being pretty unfit. I needed soemthing to give me assistance on the short 4-5 mile journey mostly flat (I live in Cambrdige).

I was browesing ebay and came across a Petrol Motor assisted cycle but resisted it knowing they are illegal.

I have seen electric bikes for a while now and a few years ago my father had one of the first ones that was really heavy.

Well battery technology seems better now so I thought why not. Anyway I decided to buy a kit to fit on my Raleigh Datona Mountain/Road hybrid (over 10 yeras old barely done a few hundred miles) and after a few very helpful email exchanges with Bob from AlienOcean I have a Alien Electric Bicycle Bike e-bike 36v 10Ah 26" Kit on the way.

I will post some pics and feedback once I fit it.

Regards

Jerry
 
Last edited:

eddieo

Banned
Jul 7, 2008
5,070
6
welcome! :)
 

Footie

Esteemed Pedelecer
Jun 16, 2007
549
10
Cornwall. PL27
Hope all goes well with your conversion.
I've had an MTB ebike for two years.
Just this month I have taken my first steps into doing a kit conversion of my old (20 years) 18 gear mountain bike (still in bits).
Had the hub motor in the shed for 12 months :eek:
The one thing that's struck me the most is how flimsy ordinary bikes (frame, racks, etc) are when compaired to manufactured ebikes.

-----------------------------------------------
Cougar Mountain Electric Bike 36v 200w rear wheel Hub motor (Jul07)
fitted with 10 Ah LiFePo4 battery (Apr08)
Maximum range (road/hills - Cornwall) 18 miles
Maximum range (on flat) 25 miles
.
 

jerrysimon

Esteemed Pedelecer
Aug 27, 2009
3,292
112
Cambridge, UK
Its done

Just to let you know it all turned up today and is now fitted and working perfectly :)

The new front wheel really was a close fit with the center motorised wheel hub almost touching the bottom of the forks before they go into the lugs for the center spindle. Using the washers supplied, I managed to get it all good with no binding or touching on the bottom of the forks before lugs. Only about 2-3mm to spare though :eek:

Overall I am really pleased with the kit. I had to go slow and methodically but everything fitted well in the end after a couple of hours. The back tray is genius and fitted well. Being able to slide the battery in and out is great.

The real treat was after I charged it all up and went out. Its perfect and everything I expected it to be :p

I took it on a good 8-10 mile run to my work and back. I need to get one of those meters to measure milage etc. Its mostly flat in cambridge where I live but there are few slight inclines. I hit the throttle on the inclines and just pedaled a little and I never broke a sweat. Also its great to assist when you starting off from a junction or after stopping. Just give the throttle a tweak and turn the pedals and your away without much efftort to start. When I got very lazy I just gave it some throttle and pedaled lightly/free wheeled. I think I could throttle all the way to work and back on the battery, but its nice to pedal a little and get some exercise. In a while who knows maybe I can pedal all the way. For now its nice to have assistance when I need it and this will get me cycling to work without being all sticky and knackered when I arrive. A couple of times I sat behind someone who was pedaling away, whilst I gently pedaled and assisted with the throttle that was really cool.

The whole kit is very discrete. The hub in the front wheel is not that big either. Apart from the slight whir when you put on power or when people wonder how you can move so easily or freewheel so long, no one would really know its an electric bike :p

Looking at the power indicator lights I reckon on the 10 mile trip I used about a 1/3 of the battery i.e. two of the power indicator lights went out by the time I got home.

I have taken lots of pics and will post them tomorrow with a break down of how I fitted it all. Battery technology certainly has come a long way in the last 5 years or so.

Overall Bob's kit seems great. He answered all my initial emails promptly. I ordered it yesterday before 12 noon and it arrived today at 10:00am. So great service so far.

Regards

Jerry
 
Last edited:

Barnowl

Esteemed Pedelecer
Sep 18, 2008
954
1
A couple of times I sat behind someone who was pedaling away, whilst I gently pedaled and assisted with the throttle that was really cool.
I love doing that. Even better if they keep looking back to see if you're still there. :D

Look forward to seeing the pics. Good luck
 

jerrysimon

Esteemed Pedelecer
Aug 27, 2009
3,292
112
Cambridge, UK
I love doing that. Even better if they keep looking back to see if you're still there.
Barnowl, that did happen a couple of times as well :p

I will post the pics tomorrow once I get them off the camera and figure out how to display them on here.

Regards

Jerry
 

Barnowl

Esteemed Pedelecer
Sep 18, 2008
954
1
Here's a usefull quote from Flecc regarding picture posting:

"Two ways to post photos:

First way: Click the paper clip button above the reply box and have a look at the photo size rules there for different file types. Then make sure the picture conforms to those rules, and preferably is sized to 800 x 600 pixels or less to avoid the huge oversize things that some post.

If all's well, browse to your image from that paperclip button box, then upload it and close that box. Then click the paperclip button again and you'll see the image name, click on that and it will be attached at the point of your cursor in the text box, shown as "Attach etc Attach". Then complete your reply.

Second way: If you have somewhere to post pictures online like flickr.com or similar, you can display those here in this way. Just go to your web image, right click it and select Copy Image Location from the context menu, or if that doesn't show, click Properties on the context menu that appears and highlight and copy the URL there on the Properties page. Then return to the Reply box here, position the cursor below the text where you want the photo to appear and click the yellow mountain scene icon above. You'll get a box to paste in the link and ok it.

Then submit the reply and your photo will appear."

I would have linked it but I never worked that out either.:confused:
 

flecc

Member
Oct 25, 2006
53,528
30,828
I would have linked it but I never worked that out either.:confused:
Right click the word "permalink" that appears with each post at the top right, ans select "Copy link location" from the context menu that appears.

Then make your reply post, highlight a word or phrase that you wamt to be the hyperlink and then click the blue globe icon above the reply box. Paste the link location into the box that appears and OK it. Your link will then appear and when clicked will show the post you permalinked to.
.
 

jerrysimon

Esteemed Pedelecer
Aug 27, 2009
3,292
112
Cambridge, UK
Pictures!

Sorry I have been so busy riding and tinkering with my new ebike I haven't managed to get round to posting up pics and a run through of my conversion as promised.

Anyway to wet your appetite here are a few before and after pictures. I have loads of other pictures of the conversion and will post these with a written run through later.

Before (A Raleigh Daytona MTB which originally had a large black rear rack for my panier bag that I removed before I took the pic)


Add one large box sent by Bob at AlienOcean


About 3 hours later


Overall I am very pleased with the conversion as its pretty discrete. I need to change a couple of the cable ties to black as the white ones stand out too much.

Anyway more pictures later :p

Regards

Jerry
 
Last edited:

tillson

Esteemed Pedelecer
May 29, 2008
5,253
3,197
Your bike looks good Jerry. I hope that it continues to please and that you get plenty of enjoyment from using it.

Thanks for taking the trouble to post some pictures.

Regards

Tom
 

jerrysimon

Esteemed Pedelecer
Aug 27, 2009
3,292
112
Cambridge, UK
Assembly

Thanks Tom.

The kit


Comes well packaged.

Jerry
 

Attachments

Last edited:

jerrysimon

Esteemed Pedelecer
Aug 27, 2009
3,292
112
Cambridge, UK
Kit Contents


Everything you need - wheel, controller & bag, power indicator meter, brake handles with power cut, thumb throttle, battery, charger, rear carrier etc.

The instructions to fit it all can be downloaded fromt he AlienOcean web site.

Front wheel removed


Forks


As you can see the fork lugs were painted on the inside and intially I found it difficult to fit the new wheel centre spindle into the lug. I had to scrape/file the paint off to get the new wheel to fit properly. I think lug gap/spacing specified in the kit instructions is 10mm min.
 
Last edited:

jerrysimon

Esteemed Pedelecer
Aug 27, 2009
3,292
112
Cambridge, UK
Close Fit :eek:


This is where I struggled a little mainly because my forks don't taper down to lugs. The lug spacing is correct for the kit which specifies a min of 100mm between the lugs and 85mm above between the forks, but as you can see they are fat right up against the lugs. The wheel comes with spacer washers so by using these I was able to fit it eventually. Its close though about 2mm clearance from the centre motor hub housing touching the forks.

Make sure you fit the wheel with the wire coming out of the left side as you sit on the bike. Its all in the instructions that you download from the AlienOcean web site.

Wheel Fitted


Finally its done. This bit slowed me down a little. A good point though was that there was still clearance between the centre hub and the bolts that come through the other lugs to secure the mud guard stays :p
 
Last edited:

jerrysimon

Esteemed Pedelecer
Aug 27, 2009
3,292
112
Cambridge, UK
Rear Carrier & Battery


This is a really neat bit of the kit with the carrier holding the battery that slides in. The carrier is robost but light. This part of the fitting went well as I had spare lugs on the back frame to secure the bottom of the carrier and the quick release bolt on the saddle made fitting the top supports really easy.

The Bag For The Controller


This bag really stumped me mainly because the downloaded instructions show a rectangular bag fitted to the top bar of the frame. It took quite a while to figure out which way round the bag went. I kept trying to fit the diagonal bit shown to the top frame. This is curved and obviously just would not sit flush against the top frame bar :eek:

I should of guessed I had it the wrong way, as on the inside of the bag there are two hard plastic shaped/profiled inserts that sit flush against the top and back down bar of the frame. I guess this what happens when you try to follow instructions to the letter and not use your common sense. My excuse as as I said is that the instructions show a different bag. Anyway once fitted its sits very neatly against the frame. Its secured using two velcro straps but I decided to add a cable tie to secure it further.

I kinda stopped taking pics just before this point, so this pic and all the others will be photos taken after it was finished.

More tomorrow after I take some final pics.
 
Last edited:

flecc

Member
Oct 25, 2006
53,528
30,828
Thanks for all the illustrated details Jerry. This will give those thinking of this kit more confidence to go ahead, and
also let them see any possible pitfalls with the bike they are intending to use.
.
 

Barnowl

Esteemed Pedelecer
Sep 18, 2008
954
1
I love looking at pictures of bike conversions. I'm quite keen to try one myself at some point. This one looks very good. For your 10 mile round trips, on the flat, it looks like it's really going to really deliver and be great fun. Should surprise a few road bike riders especially it being an MTB and all :D .
I think Footie makes a fair point about the purpose built bikes. Given electric assistance we tend to do far more miles pa than a normal bike and what with the added weight and extra speed we put much greater demands on the components. Never the less for the cost and your requirement this bike looks like great value. Should knock the stuffing out of those 30-40mins trips and keep the sweat factor down to a tolerable and manageable level. I'm not sure what tyres you're sporting but I definately think about getting some Schwalbe Marathon Plus if you haven't already.
 

jerrysimon

Esteemed Pedelecer
Aug 27, 2009
3,292
112
Cambridge, UK
This will give those thinking of this kit more confidence to go ahead, and also let them see any possible pitfalls with the bike they are intending to use.
.
No problem and I totally agree re the original bike. I admit my fat forks were of concern before I ordered it. This is kinda why I have taken the trouble to post all the pics. However if you check the measurements in the instructions carefully before ordering then you should be ok. I also took the view that in the worst case I could just change out my forks.

In fact I quite fancy a set of suspension ones now as the cycle paths round here are pretty bumby :rolleyes:

Regards

Jerry
 
Last edited:

jerrysimon

Esteemed Pedelecer
Aug 27, 2009
3,292
112
Cambridge, UK
I'm not sure what tyres you're sporting but I definately think about getting some Schwalbe Marathon Plus if you haven't already.
The front wheel comes fitted with a new trye already not sure what it is. Also I just purchased a Halfords special today for the back, I did think about getting a pucture resistant ones :mad:

I also purchased some of that quirt in gel for emergencies.

Regards

Jerry
 
Last edited:

flecc

Member
Oct 25, 2006
53,528
30,828
If you want to avoid the possible complications of fitting suspension forks Jerry, it looks as though your bike has
plenty of room for the Schwalbe Big Apple tyres, "Suspension for Bikes".

They are remarkably effective at ironing out poor road surfaces:

Schwalbe Big Apple
.