The importance of good connections!

Charliefox

Esteemed Pedelecer
Feb 11, 2015
322
87
79
Culloden Moor Inverness
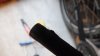
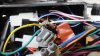
The first sign of something amiss was an odd bulge on the 9 pin connector that wasn't there before! Pulled it apart and found yellow power pin blackened.The one in line with the bulge! On to the connector box behind the controller and minor mayhem.A melted connection! I had trouble last June with the kit bullet connectors..they got too hot at one point. So snipped off the bullet part and used screw terminals. OK, only 10 amp jobs, but the ones connecting the battery had never given trouble. However, I did not snip off enough so a bit of bare metal protuded from the screw connection. Normally that would be no problem, but an unconnected wire from the controller, not needed, may have rubbed enough to contact the yellow power lead which may have caused a momentary overload. Or perhaps it was caught up by chance in the melting moment! I will never know.Weirdly though, the bike still went fine!! Cleaned up the black pin and tested all the wires for continuity and shorts. All OK.Used Dielectric Silicone Grease on reassembly as the scraped pin has lost it's gold coating Replaced melted screw terminal...no bare metal showing now! Everything works fine...for the present. I must consider Anderson power poles now, even if I must buy an expensive crimper as I,m not too good at crimping. Why do Ebike kits come with soft plastic covered bullet connectors when they appear to get too hot? 07 Sign of overheating on hub lead connector.JPG 09 truly melted yellow connector.JPG
 
  • Agree
Reactions: LeighPing
D

Deleted member 4366

Guest
The other phase wires are sticking out too. You need to insulate them. use heat-shrink tube or insulating tape. You should never allow exposed wires. They can start a serious fire.
 

Fordulike

Esteemed Pedelecer
Feb 26, 2010
3,802
1,537
30 Amp Andersons in the post!
Andersons can be troublesome if not assembled correctly. I had bother until I learnt how to do it right.

Be sure to read up about it and watch YouTube videos, before you attempt it.
 
D

Deleted member 4366

Guest
If you're thinking of soldering connectors, why don't you just solder the wires directly. It's not as if you need to keep taking the controller off. if you ever did need to remove it, just cut the wires. It's a lot easier and it takes a lot less time to solder the wires than it does to solder connectors and it gives a much more reliable connection!
 
  • Agree
Reactions: flecc and Fordulike

Charliefox

Esteemed Pedelecer
Feb 11, 2015
322
87
79
Culloden Moor Inverness
I guess I'm not so hot at soldering as I often get to melt the adjacent insulation. I planned to crimp the wire then a dab of solder before assembling the Andersons. Probably a question of shaky hands and lots of other wires in the area!
 
D

Deleted member 4366

Guest
If you don't do it properly, you can soon wipe out your contrller. It's very important that there's a good connection on the phase wires. Soldering is dead simple if you do it right. I used to teach it to 11yr old girls, and they didn't have any trouble.

For the Andersons, you'll need an iron of at least 60w. You can probably do wire to wire with a 30w one, though 50w would be better.

  • Strip a couple of mm of insulation off the wire
  • Hold the iron's tip against the bare wire for a few secs, then add the solder. At no time should you remove the tip from the wire during the whole process. You don't wave it around like a magic wand.
  • Wait until the solder has soaked into the wire, then add a bit more so that it's a small blob.
  • Do the same to the wire on the other side.
  • Slide on your heatshrink
  • Hold the two ends together, then hold on the soldering iron's tip until they've both re-melted. Hold on for a bit longer while they fuse together.
  • Remove the iron and hold the wires together until the solder solidifies.
  • Check for any spikes. If there are any, crimp them down with pliers.
  • Slide over the heatshrink and shrink it. You can use the iron's stem to shrink it if you don't have a hot air gun.
The common mistakes are:
  • Removing the iron before the soldering is finished
  • Not allowing enough time for things to heat up before and after the solder is added
  • Using an under-rated soldering iron
  • Using the crappy lead-free solder that needs higher temperature. The 60/40 tin/lead is the easiest.
You use exactly the same method to solder Andersons or anything else, except you don't add extra solder to make a blob.
 
  • Informative
Reactions: D C

anotherkiwi

Esteemed Pedelecer
Jan 26, 2015
7,845
5,785
The European Union
Method for XT90 and XT60 (using d8veh's steps for preparing the wire):
  • Strip a couple of mm of insulation off the wire
  • Hold the iron's tip against the bare wire for a few secs, then add the solder. At no time should you remove the tip from the wire during the whole process. You don't wave it around like a magic wand.
  • Wait until the solder has soaked into the wire, then add a bit more so that it's a small blob.
  • Slide heat shrink onto wire
  • Heat the cup on the XT plug and add solder which will fill the cup
  • Without removing the iron present the wire into the pool of melted solder then remove the iron holding the wire until the solder solidifies
  • Insulate with heat shrink then repeat on the other side
A third hand soldering aid is a great investment for older, shakier, less steady hands. One with a LED lit magnifying glass is the cats pyjamas! :)
 

Fordulike

Esteemed Pedelecer
Feb 26, 2010
3,802
1,537
If you've got shaky hands, I find a clamping jig helps. I use one of these.
images.jpg
 
  • Agree
Reactions: D C

anotherkiwi

Esteemed Pedelecer
Jan 26, 2015
7,845
5,785
The European Union
  • Informative
Reactions: Fordulike

Charliefox

Esteemed Pedelecer
Feb 11, 2015
322
87
79
Culloden Moor Inverness
If you don't do it properly, you can soon wipe out your contrller. It's very important that there's a good connection on the phase wires. Soldering is dead simple if you do it right. I used to teach it to 11yr old girls, and they didn't have any trouble.

For the Andersons, you'll need an iron of at least 60w. You can probably do wire to wire with a 30w one, though 50w would be better.

  • Strip a couple of mm of insulation off the wire
  • Hold the iron's tip against the bare wire for a few secs, then add the solder. At no time should you remove the tip from the wire during the whole process. You don't wave it around like a magic wand.
  • Wait until the solder has soaked into the wire, then add a bit more so that it's a small blob.
  • Do the same to the wire on the other side.
  • Slide on your heatshrink
  • Hold the two ends together, then hold on the soldering iron's tip until they've both re-melted. Hold on for a bit longer while they fuse together.
  • Remove the iron and hold the wires together until the solder solidifies.
  • Check for any spikes. If there are any, crimp them down with pliers.
  • Slide over the heatshrink and shrink it. You can use the iron's stem to shrink it if you don't have a hot air gun.
The common mistakes are:
  • Removing the iron before the soldering is finished
  • Not allowing enough time for things to heat up before and after the solder is added
  • Using an under-rated soldering iron
  • Using the crappy lead-free solder that needs higher temperature. The 60/40 tin/lead is the easiest.
You use exactly the same method to solder Andersons or anything else, except you don't add extra solder to make a blob.
How high is the insulation on heatshrink? 1 layer enough?
So butt ended soldered connection rather than twisted together before soldering which would mean a thicker joint but no chance of coming apart?
Probably not using the right soldering iron! After the demise of a mid sized one, I have a small Antex used on electonic circuits and a huge Parkside 160W with a max uncontrolled temperature of 540 degree centigrade. The German solder I am using says 15-48W. just Noticed. If I did enough soldering to justify it I guess a proper Solder station is what I need.
 

EmSeeDee

Pedelecer
Oct 13, 2015
69
27
73
Coventry, UK
The size of the soldering iron bit is also important. I use a napkin 50w soldering station, with interchangeable bits. For meaty jobs I use a meaty bit (ooh err missus), and turn the temperature up. That way I get a quicker job, with less chance of overheating adjacent items.

Sent from my MI 5 using Tapatalk
 
  • :D
Reactions: chris_n

Charliefox

Esteemed Pedelecer
Feb 11, 2015
322
87
79
Culloden Moor Inverness
If you've got shaky hands, I find a clamping jig helps. I use one of these.
View attachment 21255
Ah! But there is no room to balance it on the small connection box. I realize NOW that it is better to get all the soldering, crimping etc. done before assembling on the bike.Which means in practice, trying it all out on the bike for size, cutting the cables to required length then taking it all off again and to a nice flat bench! Actually I used all the connectors that came with the kit for a while. Only after the power lead bullet connection covers ( a soft green plastic) started to look very blackened, did I decide to alter them. Not sure why those joints got so hot. I am using the correct controller for the motor and at the right voltage. The little Maplin box I use to conceal all the connections may need some air holes for ventilation!