Following my first mid motor bike conversion I thought I would give some feedback, via a number of posts, which hopefully will be useful to those thinking of doing something similar.
Some down tube battery installation advice as follows:
1. Maximum patience is required for this step so avoid doing this under any time pressure to get it finished. I spent the best part of 5 days doing it (although I did choose to fabricate an aluminium bracket and its prototype). You will likely be making some irreversible interventions (drilling some holes) in your bike frame so getting them right is rather important. Measure twice, go to bed and in the morning measure them twice again before drilling.
2. Do not skimp on ensuring the battery is as securely mounted as you are able to get it. Good enough, isn’t.
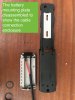
3. Create more options for fixing positions. The Hailong battery has a mounting plate that has an aluminium enclosure for the electrical connections which can be removed and drilled to allow fixings through it that will be as, or more, robust than the slotted holes further up the mounting plate. As an aside, from the photo below of the aluminium enclosure you will see that although there are threaded mounting holes for a cable clamp no such clamp is provided nor a cable entry gland to provide at least some ingress protection.
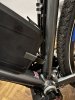
4. Check the shape of the battery mounting plate when it is engaged on the battery (see photo below) . The manufacturer’s drawings show the base as perfectly horizontal and detached from the battery the mounting plate will sit flat on a table so I assumed it needed to be mounted flat. This was driving me crazy as I was able to get the mounting plate “flat” on the down tube but then the battery would not engage properly. The light finally dawned and I put the straight edge against the mounting plate installed on the battery to discover it was out of true by about 5mm at the mounting point I required. I have no idea if this was a “one off” or a routine manufacturing issue. Certainly never rely on any of the manufacturer’s drawings for any accurate information on either the motor or the battery.
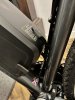
5. Provide additional support around the fixing points into the frame to stop the battery from rocking. This should be in the form of additional packing in the form of rubber, timber or plastic sculpted as closely as possible to the shape of the down tube. I realise this is not easy and was very time consuming with a lot of trial and error. As with the motor I had to fix it test it and then take it apart time and again. My motor kit came supplied with a pair of rubber inserts to go behind the slotted holes in the mounting plate to spread the load on to the frame. In the end I was only able to use one of these as the mounting plate and frame at the top fixing ended up so far apart that it was inadequate.
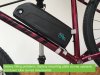
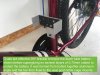
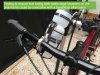
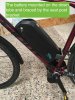
6. Some points particular to fixing a heavy battery such as the Hailong 48V 22.5Ah. Having chosen this battery, with what I was told was the maximum number of cells it is possible to get in the largest Hailong enclosure, I was faced with the problem of how to secure this 6.2kg weight to a thin aluminium tube. The battery is also 110mm high which I think would be sufficient to give even a mildly motivated thief enough leverage to rip it out of the frame mountings in a matter of seconds. It is at this point that I lucked-out on my donor bike selection because I realised that I could use the bottle cage mounts on the seat tube to attach a bracket that would brace the bottom end of the battery mounted on the down tube (I debated for some time the wisdom of losing both bottle cage mounts on the frame and only went ahead after testing a handlebar bottle cage mount which I had never used before, see photo). After making a prototype that only fixed to one of the bottle cage mounts and proved unstable I made the final version from aluminium angle and flat bar that fixed to both bottle cage mounts (see photo). I then lined the bracket with layers of rubber (left over 0.75mm pond liner since you ask) superglued together until the battery slid snugly into it. Fixing this bracket on the seat tube then gave me the position for the battery of the down tube. I was able to make one fixing through a hole drilled in the aluminium electrical enclosure (see note 2) into the lowest bottle cage mount. A second hole was drilled through the plastic of the mounting plate to get a fixing into the second bottle cage mount. Two new fixing points then had to be formed in the frame one for each of the slotted holes in the aluminium mounting plate. To give maximum support I located the fixings at the opposite ends of the slotted holes but not tight to the ends in order to leave some wriggle room.
7. For my chosen battery/ frame combination the rivet nut location and installation process went like this:
7.1 Put a strip of masking tape on the top of down tube in the region the fixings are required.
7.2 Mount the baseplate on the other fixings that go into the bottle cage mounts, lightly tighten the fixings.
7.3 Use a Tee square to check that the mounting plate is centred on the down tube then tighten the fixings firmly.
7.4 Run a sharp pencil around the slotted holes to draw their shape on to masking tape
7.5 Remove the battery mounting plate and draw a line along the centre of the length of the slotted holes.
7.6 Measure in from the opposite ends of the slots you have drawn 5mm plus half the diameter of the fixing you are using (e.g. 5mm plus 2.5mm for an M5 bolt) and place a mark on the centre line.
7.7 Use a centre punch to mark these two positions.
7.8 Without removing the masking tape drill a small (1.5 or 2mm dia.) pilot hole in each location. At this point you will probably find that the top tube prevents you from getting your drill square on to the down tube. You will need either an angled drill or a gear box attachment that allows you to drill at 90 degrees. Even with one of these you may have to cut down the pilot bit to get it to fit. You did read part 1 of this series didn’t you.
7.9 Remove the masking tape and enlarge the holes with the bit recommended for the rivet nut you are using. Double check that you haven’t picked up the wrong bit by mistake when putting it in the drill. Use cutting oil to lubricate the tip of the bit and use a drill speed that is not so fast that the bit overheats and is difficult to control or too slow that the bit digs into the perimeter of the unfinished hole raising a burr that you will have to very carefully remove with a countersink bit before continuing. If you have not done this before either get in a lot of practice on some scrap bits of aluminium sheet or enlist the help of someone who has. I refer you once more to point 1 of part 1.
7.10 Insert the rivet nuts. If you managed to drill the holes there should be space to get in the appropriate tool. If not you will need to google “DIY rivnut tool” for some more fun and games making a low profile version.
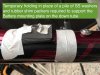
8. Supporting and packing the battery mounting plate off the down tube. My installation required a pile of four 1.5mm stainless steel washers and a similar number of thin rubber strips to the top fixing (see photo). The swearing got pretty intense at this point as two separate piles of washers/ packers had to be held in place during multiple tests of the the fit before the the final fixing. It’s also rarely the final fixing as something will always not quite go to plan meaning you have to take it all apart again. You get reasonably competent at doing this at the point you will never ever need to do it again.
9. Choice of fixing bolts for the battery baseplate. I used M5 stainless steel flanged button head hex socket bolts. These have a lower and wider head profile compared to “normal” bike socket head bolts
Part 5 will cover cabling/ electrics.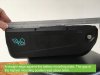
Some down tube battery installation advice as follows:
1. Maximum patience is required for this step so avoid doing this under any time pressure to get it finished. I spent the best part of 5 days doing it (although I did choose to fabricate an aluminium bracket and its prototype). You will likely be making some irreversible interventions (drilling some holes) in your bike frame so getting them right is rather important. Measure twice, go to bed and in the morning measure them twice again before drilling.
2. Do not skimp on ensuring the battery is as securely mounted as you are able to get it. Good enough, isn’t.
3. Create more options for fixing positions. The Hailong battery has a mounting plate that has an aluminium enclosure for the electrical connections which can be removed and drilled to allow fixings through it that will be as, or more, robust than the slotted holes further up the mounting plate. As an aside, from the photo below of the aluminium enclosure you will see that although there are threaded mounting holes for a cable clamp no such clamp is provided nor a cable entry gland to provide at least some ingress protection.
4. Check the shape of the battery mounting plate when it is engaged on the battery (see photo below) . The manufacturer’s drawings show the base as perfectly horizontal and detached from the battery the mounting plate will sit flat on a table so I assumed it needed to be mounted flat. This was driving me crazy as I was able to get the mounting plate “flat” on the down tube but then the battery would not engage properly. The light finally dawned and I put the straight edge against the mounting plate installed on the battery to discover it was out of true by about 5mm at the mounting point I required. I have no idea if this was a “one off” or a routine manufacturing issue. Certainly never rely on any of the manufacturer’s drawings for any accurate information on either the motor or the battery.
5. Provide additional support around the fixing points into the frame to stop the battery from rocking. This should be in the form of additional packing in the form of rubber, timber or plastic sculpted as closely as possible to the shape of the down tube. I realise this is not easy and was very time consuming with a lot of trial and error. As with the motor I had to fix it test it and then take it apart time and again. My motor kit came supplied with a pair of rubber inserts to go behind the slotted holes in the mounting plate to spread the load on to the frame. In the end I was only able to use one of these as the mounting plate and frame at the top fixing ended up so far apart that it was inadequate.
6. Some points particular to fixing a heavy battery such as the Hailong 48V 22.5Ah. Having chosen this battery, with what I was told was the maximum number of cells it is possible to get in the largest Hailong enclosure, I was faced with the problem of how to secure this 6.2kg weight to a thin aluminium tube. The battery is also 110mm high which I think would be sufficient to give even a mildly motivated thief enough leverage to rip it out of the frame mountings in a matter of seconds. It is at this point that I lucked-out on my donor bike selection because I realised that I could use the bottle cage mounts on the seat tube to attach a bracket that would brace the bottom end of the battery mounted on the down tube (I debated for some time the wisdom of losing both bottle cage mounts on the frame and only went ahead after testing a handlebar bottle cage mount which I had never used before, see photo). After making a prototype that only fixed to one of the bottle cage mounts and proved unstable I made the final version from aluminium angle and flat bar that fixed to both bottle cage mounts (see photo). I then lined the bracket with layers of rubber (left over 0.75mm pond liner since you ask) superglued together until the battery slid snugly into it. Fixing this bracket on the seat tube then gave me the position for the battery of the down tube. I was able to make one fixing through a hole drilled in the aluminium electrical enclosure (see note 2) into the lowest bottle cage mount. A second hole was drilled through the plastic of the mounting plate to get a fixing into the second bottle cage mount. Two new fixing points then had to be formed in the frame one for each of the slotted holes in the aluminium mounting plate. To give maximum support I located the fixings at the opposite ends of the slotted holes but not tight to the ends in order to leave some wriggle room.
7. For my chosen battery/ frame combination the rivet nut location and installation process went like this:
7.1 Put a strip of masking tape on the top of down tube in the region the fixings are required.
7.2 Mount the baseplate on the other fixings that go into the bottle cage mounts, lightly tighten the fixings.
7.3 Use a Tee square to check that the mounting plate is centred on the down tube then tighten the fixings firmly.
7.4 Run a sharp pencil around the slotted holes to draw their shape on to masking tape
7.5 Remove the battery mounting plate and draw a line along the centre of the length of the slotted holes.
7.6 Measure in from the opposite ends of the slots you have drawn 5mm plus half the diameter of the fixing you are using (e.g. 5mm plus 2.5mm for an M5 bolt) and place a mark on the centre line.
7.7 Use a centre punch to mark these two positions.
7.8 Without removing the masking tape drill a small (1.5 or 2mm dia.) pilot hole in each location. At this point you will probably find that the top tube prevents you from getting your drill square on to the down tube. You will need either an angled drill or a gear box attachment that allows you to drill at 90 degrees. Even with one of these you may have to cut down the pilot bit to get it to fit. You did read part 1 of this series didn’t you.
7.9 Remove the masking tape and enlarge the holes with the bit recommended for the rivet nut you are using. Double check that you haven’t picked up the wrong bit by mistake when putting it in the drill. Use cutting oil to lubricate the tip of the bit and use a drill speed that is not so fast that the bit overheats and is difficult to control or too slow that the bit digs into the perimeter of the unfinished hole raising a burr that you will have to very carefully remove with a countersink bit before continuing. If you have not done this before either get in a lot of practice on some scrap bits of aluminium sheet or enlist the help of someone who has. I refer you once more to point 1 of part 1.
7.10 Insert the rivet nuts. If you managed to drill the holes there should be space to get in the appropriate tool. If not you will need to google “DIY rivnut tool” for some more fun and games making a low profile version.
8. Supporting and packing the battery mounting plate off the down tube. My installation required a pile of four 1.5mm stainless steel washers and a similar number of thin rubber strips to the top fixing (see photo). The swearing got pretty intense at this point as two separate piles of washers/ packers had to be held in place during multiple tests of the the fit before the the final fixing. It’s also rarely the final fixing as something will always not quite go to plan meaning you have to take it all apart again. You get reasonably competent at doing this at the point you will never ever need to do it again.
9. Choice of fixing bolts for the battery baseplate. I used M5 stainless steel flanged button head hex socket bolts. These have a lower and wider head profile compared to “normal” bike socket head bolts
Part 5 will cover cabling/ electrics.