
The other day I was on my bike and there was a terrible smell of burning, then the bike cut out completely.
After peddling the last 5 miles home without assist (phew, hard work for me these days!) I found the Yose Power battery pack had died. The main 20 A fuse was ok, so I opened up the pack and looked inside. I suspected the BMS had failed. I had some similar looking BMS units I'd bought a while back and the original plan was to swap one in. These were 20A cont, 30A peak units. Then I tested the MOSFETS on the Yose Power BMS and they seemed fine and they were better spec than the ones on the other BMS units I had. I connected the original BMS back up using crock leads and connected the pack to a charger and it charged up fine, but still no output.
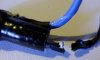
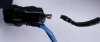
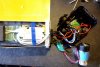
I then completely stripped down the pack and disassembled all the parts in the moulded plastic top and found the cause of the problem. The soldered joint to the fuse was poor and it must have got very hot, melted the insulation on the wire attached to it (creating the smell) and then failed completely (see pics). I decided to put the original BMS back in and put it all back together. But then I messed up the BMS trying to solder the thick wires back onto it - it got so hot, the pads fell off.
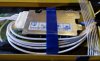
I wasn't keen on using the other BMS units I had. I didn't have great experiences with them in the past with early battery pack builds I'd made, they were shutting down before the cells were properly balanced. Also, I was not happy with a lot of the internals of the Yose power pack. The output wires were unnecessarily long (probably around 50 cm more than needed) and were not of a decent gauge and went from thick to thin to thick again in several places. Then the keylock switch really did not look man enough for a current draw up to 30 A.
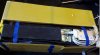
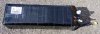
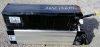
So I decided to buy a decent BMS for the pack and not bother with the Yose Power set up. I got a 40A, combined charge/discharge two wire unit, where the 10 AWG wires were presoldered to it. I had to rewire the sense wires, as unfortunately, they ran in the opposite order on the connector. I hot glue mounted the BMS on the end of the pack. I kept the original yellow internal heat resistant housing, then used some adhesive foam strip on top of that on all sides for impact protection and then gaffer tape on top to hold it all together. I wired in a resettable 30A trip unit and a toggle switch for on/off. Finally I put an XT60 connector on the end.
The result as you can see from the pics was not something of great beauty, but it was shorter and, significantly lighter than the original pack. The metal case and all the extras came to about 1kg! What a waste.
Then I tested it on the bike, and wow, what a difference! Far less voltage sag on acceleration and the top speed increased by at least 0.5 mph. Goes to show what difference a decent BMS and proper gauge wire can make.
After peddling the last 5 miles home without assist (phew, hard work for me these days!) I found the Yose Power battery pack had died. The main 20 A fuse was ok, so I opened up the pack and looked inside. I suspected the BMS had failed. I had some similar looking BMS units I'd bought a while back and the original plan was to swap one in. These were 20A cont, 30A peak units. Then I tested the MOSFETS on the Yose Power BMS and they seemed fine and they were better spec than the ones on the other BMS units I had. I connected the original BMS back up using crock leads and connected the pack to a charger and it charged up fine, but still no output.
I then completely stripped down the pack and disassembled all the parts in the moulded plastic top and found the cause of the problem. The soldered joint to the fuse was poor and it must have got very hot, melted the insulation on the wire attached to it (creating the smell) and then failed completely (see pics). I decided to put the original BMS back in and put it all back together. But then I messed up the BMS trying to solder the thick wires back onto it - it got so hot, the pads fell off.
I wasn't keen on using the other BMS units I had. I didn't have great experiences with them in the past with early battery pack builds I'd made, they were shutting down before the cells were properly balanced. Also, I was not happy with a lot of the internals of the Yose power pack. The output wires were unnecessarily long (probably around 50 cm more than needed) and were not of a decent gauge and went from thick to thin to thick again in several places. Then the keylock switch really did not look man enough for a current draw up to 30 A.
So I decided to buy a decent BMS for the pack and not bother with the Yose Power set up. I got a 40A, combined charge/discharge two wire unit, where the 10 AWG wires were presoldered to it. I had to rewire the sense wires, as unfortunately, they ran in the opposite order on the connector. I hot glue mounted the BMS on the end of the pack. I kept the original yellow internal heat resistant housing, then used some adhesive foam strip on top of that on all sides for impact protection and then gaffer tape on top to hold it all together. I wired in a resettable 30A trip unit and a toggle switch for on/off. Finally I put an XT60 connector on the end.
The result as you can see from the pics was not something of great beauty, but it was shorter and, significantly lighter than the original pack. The metal case and all the extras came to about 1kg! What a waste.
Then I tested it on the bike, and wow, what a difference! Far less voltage sag on acceleration and the top speed increased by at least 0.5 mph. Goes to show what difference a decent BMS and proper gauge wire can make.
Attachments
-
 38.8 KB Views: 34
 -
 21.4 KB Views: 34
 -
 55.2 KB Views: 35
 -
 64.5 KB Views: 34
 -
 82.3 KB Views: 33
 -
 62.8 KB Views: 32
 -
 71.1 KB Views: 31


