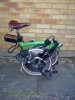
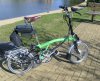
Cheap Brompton Conversion Kit?

shemozzle999

Esteemed Pedelecer
Sep 28, 2009
2,826
686
Update.

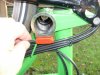
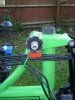
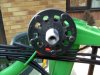
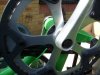
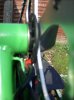
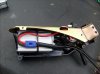
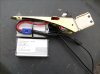
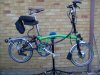
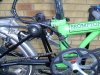
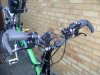
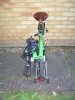
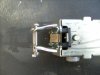
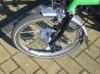
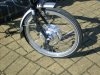
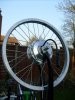
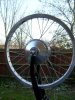
I have been delayed in completing the SWXU build because of a incompatibility problem with the Wuxing brake levers. They have an open clevis arrangement and require the older style Brompton wide barrel ended inner cables which are now obsolete ( QBRCABFA-M/P and QBRCABRA-M/P ).

I hope I have found a supplier who appears to be selling them off cheap - I will report back here if they are the right ones for the job:

Bikefix - the bike shop on your desktop

They also appear to have stock of the obsolete yellow walled tyres @ £5 each:

Bikefix - the bike shop on your desktop

And finally they also have a passenger chair for the Brompton:

Bikefix - the bike shop on your desktop

review here:

A Child Seat for a Brompton Folding Bike (Review)

Unfortunately, it appears Bikefix website has not been upgraded to meet the new trading standard rules.

It allowed me to place an order for parts they do not have and even took my card details and auto- replied with an order number.

To be fair, they do not take payment until goods are dispatched but it is worrying that my personal details are now held by a third party dealing with secure payment. I have requested that they confirm this data is removed from the system.

Fingers now crossed that SJS Cycles can supply them as they are the only other UK supplier I can find.
 

shemozzle999

Esteemed Pedelecer
Sep 28, 2009
2,826
686
Hi Johan,

Even with the small Goldant motor I think you would have to set a secondary bend in the forks to accommodate the parallel walls of the motor to give you a clearance.

This would mean you would have to initially use the expander bar method Jerry detailed to give the desired drop out width then use another spreader further up the forks to bring them parallel, while still holding the drop outs in position with the expander bar.

I did look into this for my conversions and I found this device which may be suitable but I didn't buy one so I am unsure whether it could do the job:

Lisle Exhaust Manifold Spreader #13000 | eBay
Update:

I have just received one from the USA and it is made using imperial dimensions.

Overall length fully compressed is 3 inches (75mm) and it has 1 inch long threaded screw bolts either end, so maximum safe expansion would be around 4 to 4 1/2 inches (100mm to 110mm).

I feel it could be used to spring the forks straight if applied further up fork, but you would have to do this entirely at your own risk.
 

shemozzle999

Esteemed Pedelecer
Sep 28, 2009
2,826
686
Unfortunately, it appears Bikefix website has not been upgraded to meet the new trading standard rules.

It allowed me to place an order for parts they do not have and even took my card details and auto- replied with an order number.

To be fair, they do not take payment until goods are dispatched but it is worrying that my personal details are now held by a third party dealing with secure payment. I have requested that they confirm this data is removed from the system.

Fingers now crossed that SJS Cycles can supply them as they are the only other UK supplier I can find.
The brake cables have arrived from SJS and I am pleased to say they are the correct fitting for the wuxing brake levers.
 

shemozzle999

Esteemed Pedelecer
Sep 28, 2009
2,826
686
Managed to take advantage of the warmer weather today.

Finished off the fork spreading by using the secondary jack to keep the forks apart while drawing in the fork ends with the other above to make them parallel and then mounted up the SWXU motor.

The rim will require dishing on the non drive side as it can not be done with washers due to the awkward set up of the torque fittings on the motor but there is sufficient clearance of the motor to both sides of the forks.

S7300722.jpg

S7300725.jpg

S7300723.jpg

S7300724.jpg
 

jerrysimon

Esteemed Pedelecer
Aug 27, 2009
3,292
112
Cambridge, UK
Good job and at least with that method you can keep the dropouts square :)

Did you make those dropout strengtheners ?

Looks like you were out in the sunshine. Yesterday was truly wonderful after all the cold weather!

Jerry
 
Last edited:

shemozzle999

Esteemed Pedelecer
Sep 28, 2009
2,826
686
Good job and at least with that method you can keep the dropouts square :)

Did you make those dropout strengtheners ?

Looks like you were out in the sunshine. Yesterday was truly wonderful after all the cold weather!

Jerry
They are some old TET ones Jerry, waiting for some new ones to replace them, if not available, I will make them myself.
 

shemozzle999

Esteemed Pedelecer
Sep 28, 2009
2,826
686
How you getting on shemozzle999?

Did you get the torque washers?
Hi superDove,

Nope, still waiting for them to machine a new batch but will be getting back onto the build now the weather has finally improved as I do most of the work outdoors.
 

shemozzle999

Esteemed Pedelecer
Sep 28, 2009
2,826
686
Now back on the build.

Using an old set of washers - had to file them out square to fit the torque tab on one side of the SWXU the other side also had to be similarly filed to miss the motor cable.

S7300735.jpg

S7300736.jpg

Standard Brompton rim tape fits the new rim a treat.

S7300734.jpg

PAS Sensor fitting.

Remove BB using Parktool.

S7300700.jpg

Position bracket so sensor fixing screw available from other side of the bike.

S7300699.jpg

You need to temporarily remove the sensor when fitting the BB as the Parktool needs to be flush with the BB.

S7300702.jpg

S7300703.jpg

Only grind the Crankwheel side of the PAS magnet wheel - grind flush then recess down about 1.5mm below the surface with a slightly larger diameter of the peened over joint between the crank/wheel.

S7300739.jpg

Twist onto the shaft in an anticlockwise direction to compress the plastic tangs on the wheel then refit the crank and check to make sure it all rotates freely.

S7300740.jpg

S7300741.jpg

Finally check for the correct sensor gap.

S7300742.jpg

https://www.youtube.com/watch?feature=player_detailpage&v=zJWz2ciLG0M
 
Last edited:

shemozzle999

Esteemed Pedelecer
Sep 28, 2009
2,826
686
Rewiring MW Motors controller.

Noted all the existing connections before removing all the cabling - solder wicked out all the pads to make is easier to rewire later - its is almost the same dimensions as a KU65 but 10mm shorter.


S7300705.jpg

S7300710.jpg

S7300708.jpg

Will be replacing with only 4 cables, PAS, power lead, motor cable (phased) and the combined control cable.

I am fitting a 250mA in-line fuse to the DS (direct supply) line (in my case 24v) to protect the control cabling as it only needs to supply power to the led displays otherwise it would be able to draw the full battery fuse current.

S7300743.jpg

Other cables fitted.

S7300744.jpg

Drilled and countersunk 2 holes in the battery holder so that the controller can be directly screwed to it using 2 of the 3 heatsink mounting screws.

S7300748.jpg

Tie off battery lead - controller size comparision.

S7300749.jpg

S7300747.jpg

Added new cable exit hole to battery case using a 3/4" diameter Q Max hole cutter.

S7300750.jpg
 
Last edited:

103Alex1

Esteemed Pedelecer
Sep 29, 2012
2,228
67
Interesting :) .. and wow - that controller looks tiny. Really neat ! I've been fixating on wishing for minaturization all afternoon as I file everything down to within a mm of clearance tolerances ... would pay a decent whack for some Alice in Wonderland shrinking potion at the moment !
 

shemozzle999

Esteemed Pedelecer
Sep 28, 2009
2,826
686
Cable routing using spiral wrap, tie wraps and rubber cable protectors.

S7300753.jpg

S7300751.jpg

Fitted new solid PU transit wheels 50mm diameter/18mm wide - gives 2.5mm extra ground clearance without making the bike topple to the side (Brompton rattlers 45mm diameter).

S7300752.jpg

Re-arranged handlebar layout to ensure good folding and unhindered operation of all controls.

S7300755.jpg

Final wheel assembly with new Panracer Crosstown tyres.

S7300754.jpg

Finished bike folded.

S7300758.jpg

S7300757.jpg

Shaky video of walk, throttle and PAS control.

https://www.youtube.com/watch?feature=player_detailpage&v=MifhrwszOp8

Did a quick circuit of the lake and like Jerry said the PAS system takes some getting use to, although the throttle can override it
 
Last edited:

103Alex1

Esteemed Pedelecer
Sep 29, 2012
2,228
67
Cable routing using spiral wrap, tie wraps and rubber cable protectors.
Do you have any links for cable protectors / spiral wrap you can share ? Interested in possibly using some short runs of these.
 
D

Deleted member 4366

Guest
A question regarding the battery clamp on the seat-pin:
When I had my OEM Sunlova with frog battery, there were two plastic half-blocks that were held inside the clamp. They fitted round the seat-tube to spread the load. i would describe them as a 40mm block cut in half with a seat-tube sized hole through it. Did you get these blocks with your kit, because I didn't get them with any kits, batteries or cases that I bought? I found it difficult to clamp without them, with a real danger of damaging the frame.
 

shemozzle999

Esteemed Pedelecer
Sep 28, 2009
2,826
686
A question regarding the battery clamp on the seat-pin:
When I had my OEM Sunlova with frog battery, there were two plastic half-blocks that were held inside the clamp. They fitted round the seat-tube to spread the load. i would describe them as a 40mm block cut in half with a seat-tube sized hole through it. Did you get these blocks with your kit, because I didn't get them with any kits, batteries or cases that I bought? I found it difficult to clamp without them, with a real danger of damaging the frame.

Hi d8veh,

No mine did not come with any spacers.

I agree the clamping arrangement is quite crude, the the bracket has a top an bottom curved flange and the seat post pin is pushed back against it when the side walls are compressed.

I fit a wooden plug on the back surface with a radius to match the curve thus spreading the load.
My Bromptons have steel and titanium posts so not a big problem but I can see it might raise a bigger issue with aluminum posts (like the Brompton light weight aluminum replacement post for the older titanium one)

S7300759.jpg

S7300760.jpg


p.s. Your question prompted me to think again and remembered that Brompton sell a plastic seat post sleeve for the frame. I might buy one and modify it and see how I get on.

http://brilliantbikes.co.uk/brompton-handlebars-and-seat-posts/503-brompton-seat-pillar-sleve-5053099040247.html
 
Last edited:
D

Deleted member 4366

Guest
I managed to get a pair of the blocks from Sunlova before they disappeared, so i Have them on my Dahon. They're a perfect fit in the clamp and hold the sides parallel. they have two lateral bored holes for the clamp-bolts. I tried copying them by making wooden blocks, on another installation, but nowhere near as good as the plastic ones.

I reckon someone somewhere has a big box of those plastic pieces because I'm sure that they're part of the clamping arrangement, which is wafty without them.
 

shemozzle999

Esteemed Pedelecer
Sep 28, 2009
2,826
686
I also managed to get out this afternoon and take advantage of a beautiful day.

I took both Bromptons out, one after another, around my usual ride from Caldlecotte Lake to Willen Lake on the Ouzel valley park circuit.

It did mean I had to stop twice at the one4six cafe but it filled up my loyalty card so have 2 free coffees available next time out. Nice view from there to watch the wire-towed water skiers doing their thing.

Ouzel Valley Park - Parks Trust

Comparing the two motors was not difficult the only difference I could find was the slightly higher pitch of the SWXU due to the higher internal gearing.

Both give out respectable torque - the advantage of 16" wheels.

I still prefer the throttle option as a simpler method of power delivery as apposed to the multiple button pressing of the PAS system which detracted my attention from the ride.

Views of bikes at Caldecotte.

S7300762.jpg

S7300766.jpg

S7300767.jpg

S7300769.jpg

Willen would make a great venue for a meeting, apart from a small car parking fee, entrance is free.
 
Last edited: