OK i have finally got going with this build, following arrival of BMS batteries q100c 36v 201rpm plus 11.6 ah 48v battery with integrated 20a controller and lcd3 controls.
I have ordered rim and spokes to match the existing front one.
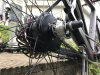
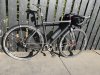
Wheel is laced with 2 cross using dt swiss alpine 3 spokes which are butted 2.3/1.8/2mm thicker at the hub j bend as i was nervous about the diameter of the spoke hole and thickness of flange. Wheel built up ok, i’m not a pro but have built a dozen or so wheels, these laced up at around 120newtons, the rim i used was a dt swiss asymettric with the spoke bed offset by 3mm so the dishing is a bit less than a regular rear cassette wheel. One thing i did notice in building the wheel was my usual technique of spinning wheel back and forth to locate wobble points was hampered by the wheel only really wanting to spin in the forward direction because of the clutch i assume.
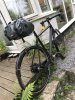
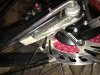
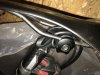
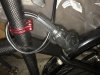
Dropouts needed a little filing, but i wanted to keep this to minimum required. But have opted for a custom torque arm on both sides...overkill for a q100 but the tabbed washer wouldnt fit so the two torque arms are doing all the work. The arms are made from a piece of stainless angle massively ground down with just a flat plate arm running down the inside of the chainstay (instead of a washer) with a flat sided hole to lock the axle filed in one end and a small section of the steel angle remaining along the bottom that sits below the chainstay and resists the upward motion. Due to the inaccuracy of my hole filing the tab on the bottom is a few mm below the chainstay somi will pack out with thin nylon pad so it can directly bear on chainstay. I dont see why i need to bolt or clamp or clip the arm to anything, it will just push up against it....or have i misunderstood how torque arm works, i have to admit the kits available seem to take a simple rotational force and convert it into a pushing motion along the chainstay. Whith my version its just a simple rotational force....i think! I had to spring the carbon stays about 5mm to get all this in, it seemed very happy to spring that much without getting too forceful.
I really did not want to mess up the simple look of the bike, so i wanted cables hidden where possible, and battery hidden, my plan was to sit battery in the base of the saddlebag that i use for commuting to work and run cables out under saddle and down seat tube out of the bottom bracket to the pas and along the chainstay to the motor. The controller would be in the bag as would the lcd3, controversially my intention is to feed the up/down switch just outside the bag so i just have to reach back next to my thigh to operate it, but i am hoping that i will generally be able to find a happyish power level that deals with most terrain, if you recall my earlier enquiry threads i am a fit cyclist that commutes daily, i just want to double my mileage without wiping myself out, so very happy to input a fair amount when required. But we will see if this is acceptable in practice not being an experienced ebiker.
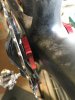
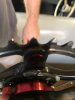
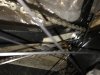
The crank is a carbon sram gxp style, i wanted the magnetic ring hidden and it looked neater on the back of the spider, i have cut out the centre and glued it on with hot glue gun, it seems to be stuck pretty well but if required i could do it with something more serious. I removed the pas sensor and after figuring directions glued it adjacent to the bottom bracket....which is eccentric to deal with the bike being single speed on a modern frame, there was a neat flat on the side of the bb so i stuck it there, it got knocked off the other day so i need another go maybe with something more stickiy, but my first attemp was a bit bodgy. Cable enters at bottom of bb where there is entry point for internal routing cables. Also ran the cable from the motor up around the bb too. They both emerge at the top of the seatpost, i drilled two holes in the top and threaded....with great difficulty, the wire up and out the top.
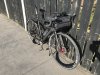
So how do i connect the battery in a removable bag. Although it will mostly remain on the bike as i will charge in place and my ‘work stuff’ will be in a light bag inside the saddlebag to remove when i get to work plus there is secure storage there so no need to remove saddlebag daily but when required i need a connector that could deal with the 9 wires from motor and 3 from pas. The best i could come up with was a 13 pin towbar socket! A bit big and crude but designed to be readily disconnected/connected so i wired it in with the socket end in the bag, the connection will be made in the bag and the bulky connector can slip uner the battery.
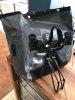
Inside the bag i didnt want the battery flopping about so i bolted the bottle-09 mount to the saddle bag frame with small stainless u bolts, whenthe battery is mounted it holds it neatly in the base of then bag. The connector, lcd3 and controller (it was a bit to long for the bag so is remote from the mounting frame) all sit below the battery leaving some space above for my stuff.
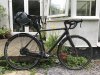
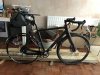
So almost there, mocked up a test and crank turning spins motor so i assume i have done everything right, stumped by not having rim tape for new wheel so i cant fit rear tyre plus a few other bits to do, but i think you get the idea from pics attached.

I have ordered rim and spokes to match the existing front one.
Wheel is laced with 2 cross using dt swiss alpine 3 spokes which are butted 2.3/1.8/2mm thicker at the hub j bend as i was nervous about the diameter of the spoke hole and thickness of flange. Wheel built up ok, i’m not a pro but have built a dozen or so wheels, these laced up at around 120newtons, the rim i used was a dt swiss asymettric with the spoke bed offset by 3mm so the dishing is a bit less than a regular rear cassette wheel. One thing i did notice in building the wheel was my usual technique of spinning wheel back and forth to locate wobble points was hampered by the wheel only really wanting to spin in the forward direction because of the clutch i assume.
Dropouts needed a little filing, but i wanted to keep this to minimum required. But have opted for a custom torque arm on both sides...overkill for a q100 but the tabbed washer wouldnt fit so the two torque arms are doing all the work. The arms are made from a piece of stainless angle massively ground down with just a flat plate arm running down the inside of the chainstay (instead of a washer) with a flat sided hole to lock the axle filed in one end and a small section of the steel angle remaining along the bottom that sits below the chainstay and resists the upward motion. Due to the inaccuracy of my hole filing the tab on the bottom is a few mm below the chainstay somi will pack out with thin nylon pad so it can directly bear on chainstay. I dont see why i need to bolt or clamp or clip the arm to anything, it will just push up against it....or have i misunderstood how torque arm works, i have to admit the kits available seem to take a simple rotational force and convert it into a pushing motion along the chainstay. Whith my version its just a simple rotational force....i think! I had to spring the carbon stays about 5mm to get all this in, it seemed very happy to spring that much without getting too forceful.
I really did not want to mess up the simple look of the bike, so i wanted cables hidden where possible, and battery hidden, my plan was to sit battery in the base of the saddlebag that i use for commuting to work and run cables out under saddle and down seat tube out of the bottom bracket to the pas and along the chainstay to the motor. The controller would be in the bag as would the lcd3, controversially my intention is to feed the up/down switch just outside the bag so i just have to reach back next to my thigh to operate it, but i am hoping that i will generally be able to find a happyish power level that deals with most terrain, if you recall my earlier enquiry threads i am a fit cyclist that commutes daily, i just want to double my mileage without wiping myself out, so very happy to input a fair amount when required. But we will see if this is acceptable in practice not being an experienced ebiker.
The crank is a carbon sram gxp style, i wanted the magnetic ring hidden and it looked neater on the back of the spider, i have cut out the centre and glued it on with hot glue gun, it seems to be stuck pretty well but if required i could do it with something more serious. I removed the pas sensor and after figuring directions glued it adjacent to the bottom bracket....which is eccentric to deal with the bike being single speed on a modern frame, there was a neat flat on the side of the bb so i stuck it there, it got knocked off the other day so i need another go maybe with something more stickiy, but my first attemp was a bit bodgy. Cable enters at bottom of bb where there is entry point for internal routing cables. Also ran the cable from the motor up around the bb too. They both emerge at the top of the seatpost, i drilled two holes in the top and threaded....with great difficulty, the wire up and out the top.
So how do i connect the battery in a removable bag. Although it will mostly remain on the bike as i will charge in place and my ‘work stuff’ will be in a light bag inside the saddlebag to remove when i get to work plus there is secure storage there so no need to remove saddlebag daily but when required i need a connector that could deal with the 9 wires from motor and 3 from pas. The best i could come up with was a 13 pin towbar socket! A bit big and crude but designed to be readily disconnected/connected so i wired it in with the socket end in the bag, the connection will be made in the bag and the bulky connector can slip uner the battery.
Inside the bag i didnt want the battery flopping about so i bolted the bottle-09 mount to the saddle bag frame with small stainless u bolts, whenthe battery is mounted it holds it neatly in the base of then bag. The connector, lcd3 and controller (it was a bit to long for the bag so is remote from the mounting frame) all sit below the battery leaving some space above for my stuff.
So almost there, mocked up a test and crank turning spins motor so i assume i have done everything right, stumped by not having rim tape for new wheel so i cant fit rear tyre plus a few other bits to do, but i think you get the idea from pics attached.