
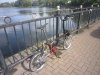
I normally push it stem down and saddle up. Looks less obvious that way.but you wouldn't have to fold the stem when pushing your Brompton though?
eBrompton Build
- Thread starter StuartsProjects
- Start date
Sadly I can't do this with my Dahon Helios, because I have to stoop too much to roll it around folded: An inflatable Stephen Hawking in a wheelchair, monotonously commenting on overinflated prices in supermarkets? Custom formed to fit over your Brompton, people in supermarkets would make room for you.I normally push it stem down and saddle up. Looks less obvious that way.

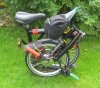
eBrompton is real easy to push around with the saddle up around hip height, because of the omni wheels it spins around very easily.Sadly I can't do this with my Dahon Helios, because I have to stoop too much to roll it around folded:
The plain alluminium wheels with grommets on are quite poor, they roll OK but the tyres can come off on not smooth ground. I have some better in-line skate type wheels on the way to replace them.
I could leave the seatpost up and push it ahead of me, but then when I stop there's only the chainwheel against the ground, unless I push the seatpost back down - I simply chuck it into a shopping trolley.eBrompton is real easy to push around with the saddle up around hip height, because of the omni wheels it spins around very easily.

Motor Drag
I have ridden eBrompton with the electrics off and it fells not much different to having a non-motor front wheel. I though it would be good to know just how much drag there is from the motor when its not powered. Electrics can fail and you can forget to charge a battery, can you then still use the eBike without dying from exhaustion ?
I found a bit of road that was a hill followed by a long flat stretch at the bottom. The idea was to freewheel down the hill with the electrics on and off then repeat the test with a non-motor front wheel and compare how far eBrompton would roll before it stopped. For sure this is not measuring the exact amount of motor drag at a constant speed of 15.5mph, but it does provide an indication of the whether the motor drag in unpowered mode is significant.
I marked the kerb edge with a bit of chalk at the start point on the hill and first did the test with the motor wheel, first with the electrics on, but no power to the motor, then with the power switched off. I swapped the motor wheel for a standard no motor Brompton front wheel, and did a further two runs down the hill. The tyre type on the motor wheel was the same type as that on the non-motor wheel.
The nearest stopping distance was 55M, and the runs in sequence were;
Motor wheel, electrics on, 55M
Standard wheel, 57M
Motor Wheel, electrics off, 58M
Motor Wheel, electrics on, 60M
Standard wheel, 61M
Motor Wheel, electrics off, 66M
There is no indication that there is significant amount of motor drag, some of the runs with the motor wheel fitted are longer than those with a standard non-motor wheel.
Note: There was no wheel changing involved when out and about, I cycled back home so I could use my substantial and heavy torque wrench when swapping wheels and fitting the wheel nuts.
Measuring battery voltage sag
The amount of voltage sag the battery has under load is useful. Too much voltage sag under load means the available power is reduced due to overcoming the internal resistance of the battery that causes some of the sag.
The LCD4 display used on eBrompton will show the battery voltage. What would be useful is a simple standard test that I can repeat for various batteries (or bikes) and at different states of charge. So I identified a flat and quiet bit of local cycle track. The test run would be a short track of 250m only from standing with a few pedal strokes to start and then using max throttle up to the 25kmph limit. The voltage on the display would be noted as the end of the 250m run was passed. If I was testing multiple batteries in one session then I would wait a bit between tests to allow the motor and controller to cool down.
I first did some tests with fully charged batteries. The voltages recorded at the end of the 250m run were;
4Ahr Hoverboard battery, 10S2P of 18650 cells, 38.7V
4.4Ahr Hoverboard battery, 10S2P of 18650 cells, 38.0V
5Ahr Custom battery, 10S1P of 21700 cells, 39.4V
The next batch of tests will be over the same track but with an almost flat battery.
Monitoring battery and power usage
Its useful to be able to see what's happening with the battery, how much power and current is being used. I could fit an LCD3 display to eBrompton and that will show the power usage, but I would prefer to see the current being used.
I had earlier tried a power meter I had had some time, I used to use it to measure power\current used by electric radio controlled model planes.
But the display was not visible outdoors, especially in sunlight.
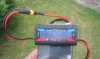
For good outdoor visibility you need a transflective type LCD display. I could have replaced the LCD in the power meter above, but the display was around £9 to buy. So I had a hunt on eBay and the power meter below was only £8.61. The display did look like it was the transflective type.
The new power meter arrived it tested out OK, so I took it to bits to replace the power in and out leads with longer ones. No additional flux was used or needed soldering the thick wires and XT60 connectors.
I cut two holes in the eBrompton battery bag and fitted the display in place.
As you can see its very clear and easy to read even in direct sunlight, nice big letters too. The amp hour used display option is useful.
I had been in the habit putting a bit of effort in and in assist mode 2 would often be doing max speed, 15.5mph. I noticed in that mode that the current used was around 12A, so I would only have about 25 minutes run time. If I held back a bit on the peddling speed I was travelling at around 11 – 12 mph, but the current used dropped to around 2A. So just small increase in speed of around 4mph would cut the distance I would get out of a charge from about 28 miles to 6.5 miles, on flat cycle tracks. I was surprised how much potential range increased by going just a bit slower.
Its useful to be able to see what's happening with the battery, how much power and current is being used. I could fit an LCD3 display to eBrompton and that will show the power usage, but I would prefer to see the current being used.
I had earlier tried a power meter I had had some time, I used to use it to measure power\current used by electric radio controlled model planes.
But the display was not visible outdoors, especially in sunlight.
For good outdoor visibility you need a transflective type LCD display. I could have replaced the LCD in the power meter above, but the display was around £9 to buy. So I had a hunt on eBay and the power meter below was only £8.61. The display did look like it was the transflective type.
The new power meter arrived it tested out OK, so I took it to bits to replace the power in and out leads with longer ones. No additional flux was used or needed soldering the thick wires and XT60 connectors.
I cut two holes in the eBrompton battery bag and fitted the display in place.
As you can see its very clear and easy to read even in direct sunlight, nice big letters too. The amp hour used display option is useful.
I had been in the habit putting a bit of effort in and in assist mode 2 would often be doing max speed, 15.5mph. I noticed in that mode that the current used was around 12A, so I would only have about 25 minutes run time. If I held back a bit on the peddling speed I was travelling at around 11 – 12 mph, but the current used dropped to around 2A. So just small increase in speed of around 4mph would cut the distance I would get out of a charge from about 28 miles to 6.5 miles, on flat cycle tracks. I was surprised how much potential range increased by going just a bit slower.
Last edited:
Moving the battery and controller bag
To get the electrics working and test that the choice of batteries performed as required, I had used a temporary housing for the battery, controller and miscellaneous cables. This bag was handlebar mounted facing rearward. Unfortunately this position means that when eBrompton is folded the bag is poking out to one side. This increases the folded width quite a bit and the folded bike will tip over towards the bag.
The extendable easy wheels fitted to the hinged rear frame do mostly stop it falling over however.
If you ride the Brompton with the wheel extended, then your right heel will strike them when pedalling, that why you need to be able to pull the wheel in and out. Even with the extendable wheels in use the folded Brompton still tips over onto the right side wheel on the rear rack lifting the left wheel off the ground.
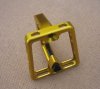
One solution to these rolling issues is to fit a front carrier adapter to the steel threaded block on the front of the Brompton steering tube and then mount the battery\controller bag on that. The Brompton carrier block is designed such that bags with a matching carrier plate can be easily attached and removed. The front carrier adapter I decided to use is below, its in two parts, the rear u shaped bracket is attached to the front part, that has the quick release catch, with a couple of M5 countersunk screws.
Using the carrier block for the battery\controller bag is the approach used by the standard electric Brompton, but then the battery controller is not left on the bike when its folded, its too big.
This is not the approach I wanted to take, I would much prefer that the battery\controller bag would be permanently fixed to the block and stays in place when eBrompton is folded, less to carry around and lose that way.
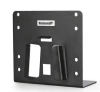
To hold the battery and take its weight I first thought to use the bracket below which weighed in at 102g.
I planned to cut a hole in the back of the bag to take the carrier block shown earlier and add a stiffener or liner if needed to the inside rear of the bag and screw the angled bracket and bag liner together with nylon screws and bolts. Some velcro straps would be fitted behind the angled bracket to allow the battery to be held in place. With the battery resting on the angled bracket all the bag itself would be supporting is the controller and the surplus cables.
However when I test fitted the bracket, it looked fine in cycling mode, but when folded the battery was rather high up, making it difficult to push the folded Brompton into a tight space such as under a desk.

The battery really needed to be lower down towards the mudguard.
So I made my own bracket out of 2mm aluminium and used some button head screws to secure the bracket to the front carrier adapter shown earlier.
I then melted two holes in the back of the chosen bag so the bottom of the aluminium bracket was at the very bottom of the bag and secured it to the front carrier adapter to check the fit;
Next, checking cable routing.
To get the electrics working and test that the choice of batteries performed as required, I had used a temporary housing for the battery, controller and miscellaneous cables. This bag was handlebar mounted facing rearward. Unfortunately this position means that when eBrompton is folded the bag is poking out to one side. This increases the folded width quite a bit and the folded bike will tip over towards the bag.
The extendable easy wheels fitted to the hinged rear frame do mostly stop it falling over however.
If you ride the Brompton with the wheel extended, then your right heel will strike them when pedalling, that why you need to be able to pull the wheel in and out. Even with the extendable wheels in use the folded Brompton still tips over onto the right side wheel on the rear rack lifting the left wheel off the ground.
One solution to these rolling issues is to fit a front carrier adapter to the steel threaded block on the front of the Brompton steering tube and then mount the battery\controller bag on that. The Brompton carrier block is designed such that bags with a matching carrier plate can be easily attached and removed. The front carrier adapter I decided to use is below, its in two parts, the rear u shaped bracket is attached to the front part, that has the quick release catch, with a couple of M5 countersunk screws.
Using the carrier block for the battery\controller bag is the approach used by the standard electric Brompton, but then the battery controller is not left on the bike when its folded, its too big.
This is not the approach I wanted to take, I would much prefer that the battery\controller bag would be permanently fixed to the block and stays in place when eBrompton is folded, less to carry around and lose that way.
To hold the battery and take its weight I first thought to use the bracket below which weighed in at 102g.
I planned to cut a hole in the back of the bag to take the carrier block shown earlier and add a stiffener or liner if needed to the inside rear of the bag and screw the angled bracket and bag liner together with nylon screws and bolts. Some velcro straps would be fitted behind the angled bracket to allow the battery to be held in place. With the battery resting on the angled bracket all the bag itself would be supporting is the controller and the surplus cables.
However when I test fitted the bracket, it looked fine in cycling mode, but when folded the battery was rather high up, making it difficult to push the folded Brompton into a tight space such as under a desk.
The battery really needed to be lower down towards the mudguard.
So I made my own bracket out of 2mm aluminium and used some button head screws to secure the bracket to the front carrier adapter shown earlier.
I then melted two holes in the back of the chosen bag so the bottom of the aluminium bracket was at the very bottom of the bag and secured it to the front carrier adapter to check the fit;
Next, checking cable routing.
Might those holes cause problems in very wet weather?I then melted two holes in the back of the chosen bag so the bottom of the aluminium bracket was at the very bottom of the bag and secured it to the front carrier adapter to check the fit;
Unliklely;Might those holes cause problems in very wet weather?
I dont often go out when its very wet.
The holes are tightened up quite a bit.
I have one of those elasticated covers if needed as well.
Another option: There are flexible glues available, often used for shoe and leather jacket repairs, which you could use to stick a piece of wateproof plastic, inside the bag, over the holes and whatever you're using to secure that bag to the bracket.Unliklely;
I dont often go out when its very wet.
The holes are tightened up quite a bit.
I have one of those elasticated covers if needed as well.
Checking cable routing
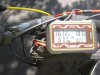
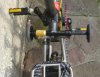
I needed to be sure the cables for display, brake and motor can be routed to the bag. On a non-folding bike this is not normally an issue, but on the Brompton the cables need to be routed in such a way that the rear wheel can fold underneath and the steering tube can fold backwards whilst being twisted forwards without damaging the brake, gear or electrical cables. Fortunately the front brake cable is fairly stiff and can keep the more flexible electric cables from flopping about.
If you look at this photograph you can see the smooth line that the yellow rear brake cable takes along the converted Brompton. The PAS wire from the bottom bracket can follow the yellow rear brake cable up to the handlebars and battery\controller bag. The cables for brake sensor, display and throttle are easy to route along the handlebars and are quite short. The motor cable can follow the route of the red front brake cable up to the handlebars.
However with the battery\controller bag lower down on the steering tube, just above the front mudguard the PAS cable has to jump across to the steering tube and there are now three cables for brake sensor, display and throttle to come down from the handlebars to the bag.
To test the layout I put the aluminium bracket in place on the block and removed the motor and PAS cables from the current handlebar bag and ran a test of the possible cable runs, including running the brake sensor, display and throttle cables from the handlebars.
It looks a bit of a mess, since some of the old cables are still in place. But nothing un-toward happened when the front wheel was turned either way and the fold looked OK with no cables catching so it was time to build up the battery\controller bag.
Next: Building the bag
If there's problematic flopping about, I find this stuff is really useful when you want permanently kinky cables. Want a different kink? Simply heat the self-adhesive heatshrink again and let it cool into whatever kinky shape floats your boat. I use it to control cable kinks, enabling snag free folding of my Dahon Helios. Also comes in handy to keep things tidy and waterproof elsewhere.Fortunately the front brake cable is fairly stiff and can keep the more flexible electric cables from flopping about.
4:1 Black Adhesive Heat shrink Waterproof HeatShrink Glue Lined Tubing Sleeving | eBay
Its high shrink ratio makes it ideal for sealing large components and irregular shapes. NOT the lay flat width of the heat shrink. As a guide, the lay-flat width of our heat shrink is below Shrink Temperature: 90 °c.
www.ebay.co.uk
Last edited:
I was just using have something similar, its a flexible glue used for sealing wires and the like. A dab of that under the nylon penny washers securing the bag of the bag to the bracket should seal the surface nicely.There are flexible glues available
Next: Building the bag
The back of the bag consisted of a thick nylon fabric outer, a stiff-ish PVC liner plate, a thin layer of white polythene foam and a very thin nylon fabric liner on the inside. I used the aluminium plate to make the positions of the needed mount holes in the back of the bag;
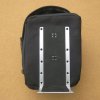
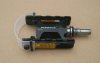
I fitted a plastic grommet in the back of the bag to thread to cables through. I then secured the aluminium plate to back of the inside of the bag back with 6 M5 Nylon screws (very light!). The bag was adequately secure and it would only be carrying the weight of the controller (276g) and a bit of spare cable. The cables on the handlebar, display and brake sensor were not long enough to reach the bag so I used Julet extension cables and fed all cables through the bag grommet. The controller went in the pocket at the front of the bag. At some point I will tidy up the cable install so the julet extension cable joins are not visible.
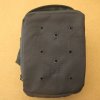
Assembled onto the block the inside of the bag looks looks like this;
So plenty of room for cables or a bigger battery. With the bag done up and the eBrompton ready to go, it looks like this;
The folded eBrompton now looks a lot better and is more compact, it hardly looks like an eBike at all, its Stealth eBrompton now.
Next: Getting rid of the spare cables and visible cable joins.
The back of the bag consisted of a thick nylon fabric outer, a stiff-ish PVC liner plate, a thin layer of white polythene foam and a very thin nylon fabric liner on the inside. I used the aluminium plate to make the positions of the needed mount holes in the back of the bag;
I fitted a plastic grommet in the back of the bag to thread to cables through. I then secured the aluminium plate to back of the inside of the bag back with 6 M5 Nylon screws (very light!). The bag was adequately secure and it would only be carrying the weight of the controller (276g) and a bit of spare cable. The cables on the handlebar, display and brake sensor were not long enough to reach the bag so I used Julet extension cables and fed all cables through the bag grommet. The controller went in the pocket at the front of the bag. At some point I will tidy up the cable install so the julet extension cable joins are not visible.
Assembled onto the block the inside of the bag looks looks like this;
So plenty of room for cables or a bigger battery. With the bag done up and the eBrompton ready to go, it looks like this;
The folded eBrompton now looks a lot better and is more compact, it hardly looks like an eBike at all, its Stealth eBrompton now.
Next: Getting rid of the spare cables and visible cable joins.
Getting rid of the spare cables and visible cable joins
I had originally bought low rise carbon bars, but decided that leaning forward Manx Missile racing mode was not my riding style so bought some higher rise carbon bars (£30) which would provide a more upright riding position. The riser bars would need the brake and gear cables to be longer so I fitted the riser bars before starting to tidy up the cables. I did the brake and gear cables first and then checked the fold was OK.

With cables initially in place there was quite a bit of spare cable in the bag, the PAS, display, brake and throttle all had standard Julet style extension leads added to reach the battery\controller bag. I cut the these extension cables short and rejoined them with solder and heat shrink. I then covered most of the cable runs with nylon spiral wrap so the joins were not obvious.
I swapped the 120cm motor cable for a much shorter 60cm one which saved a fair bit of weight and cut down the 1-4 cable too, that saved quite a bit of cable as well.
This is what the cable layout looks like;
Rear Gears
I had fitted a 2 speed rear wheel to eBrompton and this saved a fair bit of weight over the 3 speed Sturmey Archer hub gear. The 2 speed cogs were 12 and 16 teeth and with 47 teeth on the front crank this was fine with the electrical assistance and the bike could just be used in get home mode if the electrics failed.
The 12/47 combination was perhaps a little high for normal non powered pedalling on the flat and 16/27 was a bit low. A simple modification to improve non electric mode is to replace the 2 rear cogs with 3 cogs. A couple of firms sell these cog sets which are thinner to fit in the gap and need an 11 speed chain. The standard 2 speed cog set weighs 42.3g and the 3 speed cog set weighs 50.01g for the 10, 14 and 17 set. That’s a better spread than the 2 speed and the actual gearing can be fine tuned if needed by changing the front chain ring.

The crank set uses the 130BCD chain rings which are easy to find and low cost, around £12. I had already fitted a Sunrace M90 friction shifter (remember them from the 70s\80s ?) so there would be no index issues.
Pedals
The Aceoffix titanium shaft pedals, with a removable one on the left for neat folding, were OK and nice and light. I had bought the ones with two stick out bars in the pedal frame since this type could be fitted with reflectors. However I was constantly scarring my legs when walking with eBrompton and my leg hitting the pedal. So I devised a plan to fit a bendy bit of plastic to protect my legs from the pedal sticky out bits. Much money saved on plasters.
When all was done, eBrompton was eventually finished and the change to riser bars made it quite a bit more relaxing to ride.
I had originally bought low rise carbon bars, but decided that leaning forward Manx Missile racing mode was not my riding style so bought some higher rise carbon bars (£30) which would provide a more upright riding position. The riser bars would need the brake and gear cables to be longer so I fitted the riser bars before starting to tidy up the cables. I did the brake and gear cables first and then checked the fold was OK.
With cables initially in place there was quite a bit of spare cable in the bag, the PAS, display, brake and throttle all had standard Julet style extension leads added to reach the battery\controller bag. I cut the these extension cables short and rejoined them with solder and heat shrink. I then covered most of the cable runs with nylon spiral wrap so the joins were not obvious.
I swapped the 120cm motor cable for a much shorter 60cm one which saved a fair bit of weight and cut down the 1-4 cable too, that saved quite a bit of cable as well.
This is what the cable layout looks like;
Rear Gears
I had fitted a 2 speed rear wheel to eBrompton and this saved a fair bit of weight over the 3 speed Sturmey Archer hub gear. The 2 speed cogs were 12 and 16 teeth and with 47 teeth on the front crank this was fine with the electrical assistance and the bike could just be used in get home mode if the electrics failed.
The 12/47 combination was perhaps a little high for normal non powered pedalling on the flat and 16/27 was a bit low. A simple modification to improve non electric mode is to replace the 2 rear cogs with 3 cogs. A couple of firms sell these cog sets which are thinner to fit in the gap and need an 11 speed chain. The standard 2 speed cog set weighs 42.3g and the 3 speed cog set weighs 50.01g for the 10, 14 and 17 set. That’s a better spread than the 2 speed and the actual gearing can be fine tuned if needed by changing the front chain ring.
The crank set uses the 130BCD chain rings which are easy to find and low cost, around £12. I had already fitted a Sunrace M90 friction shifter (remember them from the 70s\80s ?) so there would be no index issues.
Pedals
The Aceoffix titanium shaft pedals, with a removable one on the left for neat folding, were OK and nice and light. I had bought the ones with two stick out bars in the pedal frame since this type could be fitted with reflectors. However I was constantly scarring my legs when walking with eBrompton and my leg hitting the pedal. So I devised a plan to fit a bendy bit of plastic to protect my legs from the pedal sticky out bits. Much money saved on plasters.
When all was done, eBrompton was eventually finished and the change to riser bars made it quite a bit more relaxing to ride.
Horrible when that sort of thing happens - nice solution to the problem!The Aceoffix titanium shaft pedals, with a removable one on the left for neat folding, were OK and nice and light. I had bought the ones with two stick out bars in the pedal frame since this type could be fitted with reflectors. However I was constantly scarring my legs when walking with eBrompton and my leg hitting the pedal. So I devised a plan to fit a bendy bit of plastic to protect my legs from the pedal sticky out bits. Much money saved on plasters.
You wouldn't like what these weigh, but when I remember to fold the rhs or lhs pedal down before walking the bike, I don't get leg scrapes (although no skin breaks to the point of leakage have occurred, yet). Their price is almost half what my entire bike cost to buy, but they're great pedals. Grippier on soles than Dahon's originals, which also fold both sides.
https://www.amazon.co.uk/Unisexs-FD-7-Folding-Pedals-Metallic/dp/B004ALNICM/


Last edited:
FYI - of course this may never happen:Aceoffix titanium shaft pedals
https://www.reddit.com/r/Brompton/comments/118qdn5
I did buy those versions origionally, but realised I could not fit reflectors to them. I think the chances of me doing 'high speed' pedaling are remote however.FYI - of course this may never happen:
As for the metal folding pedals, the Aceoffix removeable is circa 100g, the original Brompton folding metal one is 243g so quite a bit heavier. There are cheap plastic versions of the folding metal pedals you posted, they should be quite a bit lighter.
I have Promeno removeable pedals on my eMTB, a useful security feature I think, take them off when you lock the bike up, at least it cannot be cycled away.
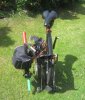
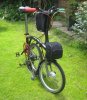
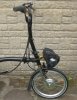
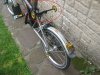
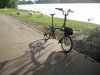
With eBrompton done and working and with the battery bag in the final position, I stripped eBrompton back to the basics. I wanted to know just how light the eBrompton could be with no mudguards or rear rack for good rolling when folded.
The result for a 3 speed electric Brompton was 11.6kg. Without the rack and rolling wheels you cannot unfortunately push it around a supermarket. But you can definitely ride it, carry it and easily lift it into a car or stuff it under a desk. Here are some pictures;

Now I am definitely a mudguard person, so I wanted to see if the weight could be kept under 12kg, with the mudguards fitted. The rear mudguard on a Brompton (without rear rack) has a rolling wheel on it so it would be interesting to see if the folded eBrompton would be stable, as in not falling over, in this minimalist setup, so I set to work.
The result for a 3 speed electric Brompton was 11.6kg. Without the rack and rolling wheels you cannot unfortunately push it around a supermarket. But you can definitely ride it, carry it and easily lift it into a car or stuff it under a desk. Here are some pictures;
Now I am definitely a mudguard person, so I wanted to see if the weight could be kept under 12kg, with the mudguards fitted. The rear mudguard on a Brompton (without rear rack) has a rolling wheel on it so it would be interesting to see if the folded eBrompton would be stable, as in not falling over, in this minimalist setup, so I set to work.
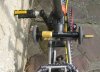
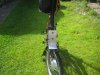
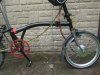
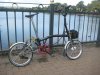
I attached a roller wheel to the rear mudguard on the Brompton and fitted the mudguard in place with the titanium stays. It looks like this;
The LitePro easy wheel extension bar (£11) which is the black aluminium bar just behind the seat post in the picture above, was needed to space the folded Brompton off the ground a bit. Without the easy wheel extension in place the front wheel of the folded Brompton touches the ground and you cannot roll it or easily push it under a desk. The other advantage of fitting the easy wheel extension bar is that when you pull the right wheel out the folded eBrompton does not fall over, which is good. See the pictures below;
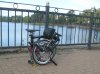
You can now push the folded Brompton around on the floor on the easy and mudguard wheels. The rolling is not as good as having a rear rack with wheels on which is really needed for pushing the Brompton around a shop fully folded with the handlebars down. With the mudguard wheel setup you can however fold the handlebars up and push or pull the Brompton around like a cart whilst holding the handlebars.
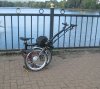
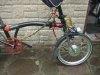
Some more pictures;

This eBrompton conversion when setup for every day use, which inludes having the mudguards, weighs in at 11.95Kg complete. Replacing the steel main tube and steering tube with titanium versions would cut the weight to around 11Kg, maybe one day.
The Electric Brompton that Brompton sell is advertised as base 13.7Kg, plus 2.9Kg for the battery.
Conclusion:
The main advantage of this DIY conversion has been the significantly reduced weight, which for us older human types definitely makes handling the folded Brompton a lot lot easier. My previous Swytchified Brompton was about 6Kg heavier than this conversion, too heavy for me these days. The other main advantage is that the battery\controller remains attached to the eBrompton when folded and rolled.
The LitePro easy wheel extension bar (£11) which is the black aluminium bar just behind the seat post in the picture above, was needed to space the folded Brompton off the ground a bit. Without the easy wheel extension in place the front wheel of the folded Brompton touches the ground and you cannot roll it or easily push it under a desk. The other advantage of fitting the easy wheel extension bar is that when you pull the right wheel out the folded eBrompton does not fall over, which is good. See the pictures below;
You can now push the folded Brompton around on the floor on the easy and mudguard wheels. The rolling is not as good as having a rear rack with wheels on which is really needed for pushing the Brompton around a shop fully folded with the handlebars down. With the mudguard wheel setup you can however fold the handlebars up and push or pull the Brompton around like a cart whilst holding the handlebars.
Some more pictures;
This eBrompton conversion when setup for every day use, which inludes having the mudguards, weighs in at 11.95Kg complete. Replacing the steel main tube and steering tube with titanium versions would cut the weight to around 11Kg, maybe one day.
The Electric Brompton that Brompton sell is advertised as base 13.7Kg, plus 2.9Kg for the battery.
Conclusion:
The main advantage of this DIY conversion has been the significantly reduced weight, which for us older human types definitely makes handling the folded Brompton a lot lot easier. My previous Swytchified Brompton was about 6Kg heavier than this conversion, too heavy for me these days. The other main advantage is that the battery\controller remains attached to the eBrompton when folded and rolled.
Related Articles
-
 Swytch announce new conversion kit with ‘pocket-sized’ battery
- Started by: Pedelecs
-
 New Swytch launches on Indiegogo, raises £100k in first hour
- Started by: Pedelecs
-
 Swytch to unveil 70% smaller, 50% lighter conversion kit
- Started by: Pedelecs