After al the help I received in choosing this kit, I figured I'd post a thread on the installation which may be of use to others but also for me to ask a few specific questions as well.
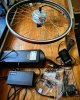
Kit received within 48 hours of ordering from Whooshbikes, all securely packed.
Offering up the battery to the frame showed that I can't use the bottle bosses on the downtube, they're too low and would mean I couldn't use the bottle cage on the seat tube. So, I need to add three rivnuts to the downtube.

It's a steel bike so I don't want to use aluminium rivnuts due to possible galvanic corrosion. Stainless seem like the best option. There's two rivnuts included with the whoosh bike kit but I'm not sure what material they are and I'd need three so amazon can deliver those. I'm going to need a right angle adapter for my drill because even my small pneumatic drill won't fit in the space for the top two holes that need to be drilled.
Also going to need a rivnut tool as I think using the nut and spanner trick may be ok for aluminium rivnuts but I doubt it would be reliable for steel going into steel. So, now I need to figure out what tool will fit into that space. Off to Amazon again. I really want something like this
which is beefy enough to do any type of rivnut but while the levers will be either side of the top tube in use, I'm not sure if the head will fit into the required gap. Anyone used one of these before? The ones that look like pop rivet guns I'm not sure if they're strong enough to do a steel rivnut into a steel frame reliably. Would appreciate any advice from those that have done this before.
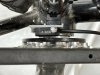
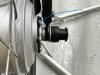
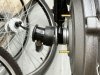
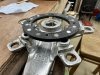
I've fitted the magnet disk to the chainwheel with epoxy. Not sure of the longevity of that as a solution so I'll probably try and design up and 3d print a version I can screw on to the chainring instead of glueing it.
so now it's off to peruse amazon and look at rivnut gun options.
Kit received within 48 hours of ordering from Whooshbikes, all securely packed.
Offering up the battery to the frame showed that I can't use the bottle bosses on the downtube, they're too low and would mean I couldn't use the bottle cage on the seat tube. So, I need to add three rivnuts to the downtube.
It's a steel bike so I don't want to use aluminium rivnuts due to possible galvanic corrosion. Stainless seem like the best option. There's two rivnuts included with the whoosh bike kit but I'm not sure what material they are and I'd need three so amazon can deliver those. I'm going to need a right angle adapter for my drill because even my small pneumatic drill won't fit in the space for the top two holes that need to be drilled.
Also going to need a rivnut tool as I think using the nut and spanner trick may be ok for aluminium rivnuts but I doubt it would be reliable for steel going into steel. So, now I need to figure out what tool will fit into that space. Off to Amazon again. I really want something like this
which is beefy enough to do any type of rivnut but while the levers will be either side of the top tube in use, I'm not sure if the head will fit into the required gap. Anyone used one of these before? The ones that look like pop rivet guns I'm not sure if they're strong enough to do a steel rivnut into a steel frame reliably. Would appreciate any advice from those that have done this before.
I've fitted the magnet disk to the chainwheel with epoxy. Not sure of the longevity of that as a solution so I'll probably try and design up and 3d print a version I can screw on to the chainring instead of glueing it.
so now it's off to peruse amazon and look at rivnut gun options.