

Mystery power cuts
- Thread starter tomtag
- Start date
No, 1v won't balance out.
What is likely is one cell group is well out whack /balance whether this is anything to do with the off, one doesn't know.
The battery will have to be opened and inspected tested.
One of a few issues has occurred.
1. A cell group is simply out of balance and just a coincidence following the off.
2. The force of the off may have snapped off a balance wire, hence one group could be out of balance.
3. Unlikely but a cell or two have become detached on a parallel group.
4. A cell group is failing.
If you are up to/for it we can guide you to opening the battery up and carrying out a basic voltage checks on the 10 cells groups as well as generally checking over the battery for any of the other issues mentioned in options 1 -3.
If any of 1 or 2 then this can be self remedied, if 3 or 4 it will need a bit more expertise and a spot welder etc.
To explain more, once the battery hits lvc or one cell group hits lvc the bms will cut power. At 40.6v it likely means one or two cells groups are out of balance so one/they are likely only charging to 3.5 or 3.6v each whilst the others are reaching 4.2v, the bms only balance voltages that are close so with in 0.01v.
So in use the cells will equally drop in voltage, whilst the weak/low group say is 3.6v and when it hits lvc say at 3.2v the others will be at 3.8v.
A battery is only as good as the weakest cell group.
So in use the cells will equally drop in voltage, whilst the weak/low group say is 3.6v and when it hits lvc say at 3.2v the others will be at 3.8v.
A battery is only as good as the weakest cell group.
Last edited:
This info is great, thanks very much. I am well up for trying to find out more about what has happened. It will take me a couple of days to get hold of a meter and find a bit of time but would really appreciate the support.To explain more once the battery hits lvc or one cell group hits lvc the bms will cut power. At 40.6v it likely means one or two cells groups are out of balance so one/they are likely only charging to 3.5 or 3.6v each whilst the others are reaching 4.2v, the bms only balance voltages that are close so with in 0.01v.
So in use the cells will equally drop in voltage, whilst the weak/low group say is 3.6v and when it hits lvc say at 3.2v the others will be at 3.8v.
A battery is only as good as the weakest cell group.
We can guide you once the inner pack is exposed, plus it gives future insight to checking batteries.
For what it may be worth, I'm going to throw in my 6-penny's worth:
Just saying
- My rig is a TSDZ2 250w with a VLCD6 display (no voltage readout, just fairly useless charge indicator bars) and a 36v 10Ah bottle battery
- After about 900 miles of use, I had the odd power shut down
- Faffed around a bit trying to determine if it was a controller or battery issue
- After some time, I thought I'd found the problem which was the on/off switch in the base of the bottle battery but I was able to live with this as if the battery didn't power up, by simply removing the battery from the battery cage, it would power up and mostly stay that way - new switch ordered and so far so good
- And then my range dropped and I ended up cycling home a couple of times without any assistance- arh!.
- More checks and I realised that at times the battery was not fully charging with the voltage only getting to around 37.5v ish
- Time for drastic action and a battery strip-down and to cut a long story short I stripped out the BMS (a circular jobby located in the top of the battery) and inspected it only to find 5 dry joints
- 2 off them were for the on/off switch plug-in socket(the switch closes and puts a short across these two pins which in turn enables the BMS discharge function).
- another two were for the battery thermistor/temperature side of things
- and the 5th dry joint was the BMS -B connect point (negative battery potential) used to power the BMS - I re-wetted these joints and all the others too and shorted together the two pins for the on/off switch (I'm still suspicious of that switch).
- The battery took a full charge and on checking each cell group, the voltages were within 0.01v of each other.
- One test ride so far and more later this week. (update 25Jan - the 35 miler this morning was without issue - woop woop!)
Just saying
Last edited:
Hi Bikes4Two, thanks for this. I will also look at the condition of the joints when I take the battery apart. I hope you did find the problem and you continue with no issuesFor what it may be worth, I'm going to throw in my 6-penny's worth:
The point I'm driving at is that my failure symptoms were not much different to those experience by the OP and in my case it was down to dry joints on the BMS.
- My rig is a TSDZ2 250w with a VLCD6 display (no voltage readout, just fairly useless charge indicator bars) and a 36v 10Ah bottle battery
- After about 900 miles of use, I had the odd power shut down
- Faffed around a bit trying to determine if it was a controller or battery issue
- After some time, I thought I'd found the problem which was the on/off switch in the base of the bottle battery but I was able to live with this as if the battery didn't power up, by simply removing the battery from the battery cage, it would power up and mostly stay that way - new switch ordered and so far so good
- And then my range dropped and I ended up cycling home a couple of times without any assistance- arh!.
- More checks and I realised that at times the battery was not fully charging with the voltage only getting to around 37.5v ish
- Time for drastic action and a battery strip-down and to cut a long story short I stripped out the BMS (a circular jobby located in the top of the battery) and inspected it only to find 5 dry joints
- 2 off them were for the on/off switch plug-in socket(the switch closes and puts a short across these two pins which in turn enables the BMS discharge function).
- another two were for the battery thermistor/temperature side of things
- and the 5th dry joint was the BMS -B connect point (negative battery potential) used to power the BMS- I re-wetted these joints and all the others too and shorted together the two pins for the on/off switch (I'm still suspicious of that switch).
- The battery took a full charge and on checking each cell group, the voltages were within 0.01v of each other.
- One test ride so far and more later this week. (update 25Jan - the 35 miler this morning was without issue - woop woop!)
Just saying
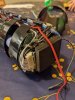
I have now got hold of a meter & taken the battery internals out of the case. I initially took the top off the battery & there was a crack/spark after I had removed the lid. I do not think I had disturbed anything at this point, so maybe indicative of a damaged/poor/dislodged connection? I would think it should be quite difficult to have this happen with a battery in good condition? I was hoping for a bit of help now on the best method to test. I assume I need to test the voltage of all 10 sets of 4 cells? I have identified the 11 wires to test, but what I am not sure of is best setting for meter (Direct Current, at suitable voltage setting?) Nor how best to get onto those connections, or if I need to disconnect anything first?
Attachments
-
 561.2 KB Views: 11
The spark was a wire shorting between + & -, I doubt any damage has occurred but it is worth carefully checking to why it occurred.
For checking the 10 cell groups one has to separate/pull out that White JST connector with one Black & 10 or so small White wires, It will e a tight fit but will pull out.
Once done tell us how many wires there are.
For checking the 10 cell groups one has to separate/pull out that White JST connector with one Black & 10 or so small White wires, It will e a tight fit but will pull out.
Once done tell us how many wires there are.
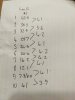
So I tested each group against black, but was seeing the cumulative voltage of the group's I think. Results as per the photo. Does it show 2 group's with issues?
Attachments
-
 969.5 KB Views: 6
Use the meter set to DC 20v.
Find two needles or a pair of arduino pc pins, starting with the Black wire b-/0v and the one next door cell group #1 place a needle/pin in each female pin hole, probe the outer side of the needles for voltage and write it down as a #1.
Next move the first needle/pin from Black to the second White wire, apply the probes in the same way & write down the reading for #2.
Continue doing the same process all the way along the connector until you have ten voltage readings, then list them for us to see.
Use the meter set to DC 20v.
Find two needles or a pair of arduino pc pins, starting with the Black wire b-/0v and the one next door cell group #1 place a needle/pin in each female pin hole, probe the outer side of the needles for voltage and write it down as a #1.
Next move the first needle/pin from Black to the second White wire, apply the probes in the same way & write down the reading for #2.
Continue doing the same process all the way along the connector until you have ten voltage readings, then list them for us to see.
Attachments
-
 1,000.5 KB Views: 10
You beat me to it. The way I describe gives the individual group reading, the accumulative method still come to the same conclusion.
So as I thought one cell group is way out #3, #10 has wandered a bit.
Trace/follow if poss #3 & #10 sense wire to the battery group to it's end for good connection, it will simply be soldered on.
If at all possible with those two and esp with #3 see if you can get a continuity reading from the cell soldered wire end to port #3 on the connector to rule out a bad wire or intermittent wire break.
That shows up a bit different now showing #2 & 9 # at odds.
#9 is the main culprit in drawing the pack down, effectively the pack is only operating at 35v despite the 41v accumulated charge as the lowest denominator controls the voltage.
Under load #9 will quickly reach LVC at 3 - 3.2v causing the cutting out.
#9 is the main culprit in drawing the pack down, effectively the pack is only operating at 35v despite the 41v accumulated charge as the lowest denominator controls the voltage.
Under load #9 will quickly reach LVC at 3 - 3.2v causing the cutting out.
Last edited:
One can charge the two low groups up though you will need and old unused 5v 300/500ma cell phone charger or one can try modding a 5v usb cable.
I prefer the former as the charge rate is very low and stable.
One has to cut off the jack plug and then shrink a bit of Red on the 5v wire usually denoted by a White stripe or confirm polarity with a meter.
On the end of each bared wire I solder an arduino strip pin or solder a pin to each end.
For group #2 place the charger V+ pin in #2 White wire pin out and the V- in #1 White wire pin out, plug in the charger and switch on. One has to stay with the charge all the time and monitor the voltage with a meter to 4.1v - 4.15v.
For #9 V+ in the last position #9 & V- in #8 again turn charger on and monitor voltage.
Once done and all are at 4.1/4.2v connect the BMS up a again and leave the battery as is and see if the charger will balance a bit better.
Then disconnect the BMS connector and let the battery sit for 36/48 hrs and then check the cell voltages again for voltage bleed down/self discharge, If the cells discharge then it is faulty cells.
If all ok connect the BMS and leave again for 36/48hrs, if the BMS is at fault then it will bleed the cells down, if this is the case then a bleed resistor is at fault and a new BMS is required unless one can do micro electronic surgery.
Last edited:
If all checks out after 36/48hrs and the battery isn't 100% balanced put it back together and discharge it some and then try a full charge to balance out better. An even balance may take a couple or three charge /discharge attempts if all is well.
Why one has discharged more so one won't know until the scenarios have been carried out.
Why one has discharged more so one won't know until the scenarios have been carried out.
Last edited:
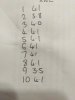
I was trying to track the balance wires back to the cells and saw this......
Attachments
-
 1.3 MB Views: 20
Related Articles
-
 Swytch announce new conversion kit with ‘pocket-sized’ battery
- Started by: Pedelecs
-
 New Swytch launches on Indiegogo, raises £100k in first hour
- Started by: Pedelecs
-
 Swytch to unveil 70% smaller, 50% lighter conversion kit
- Started by: Pedelecs