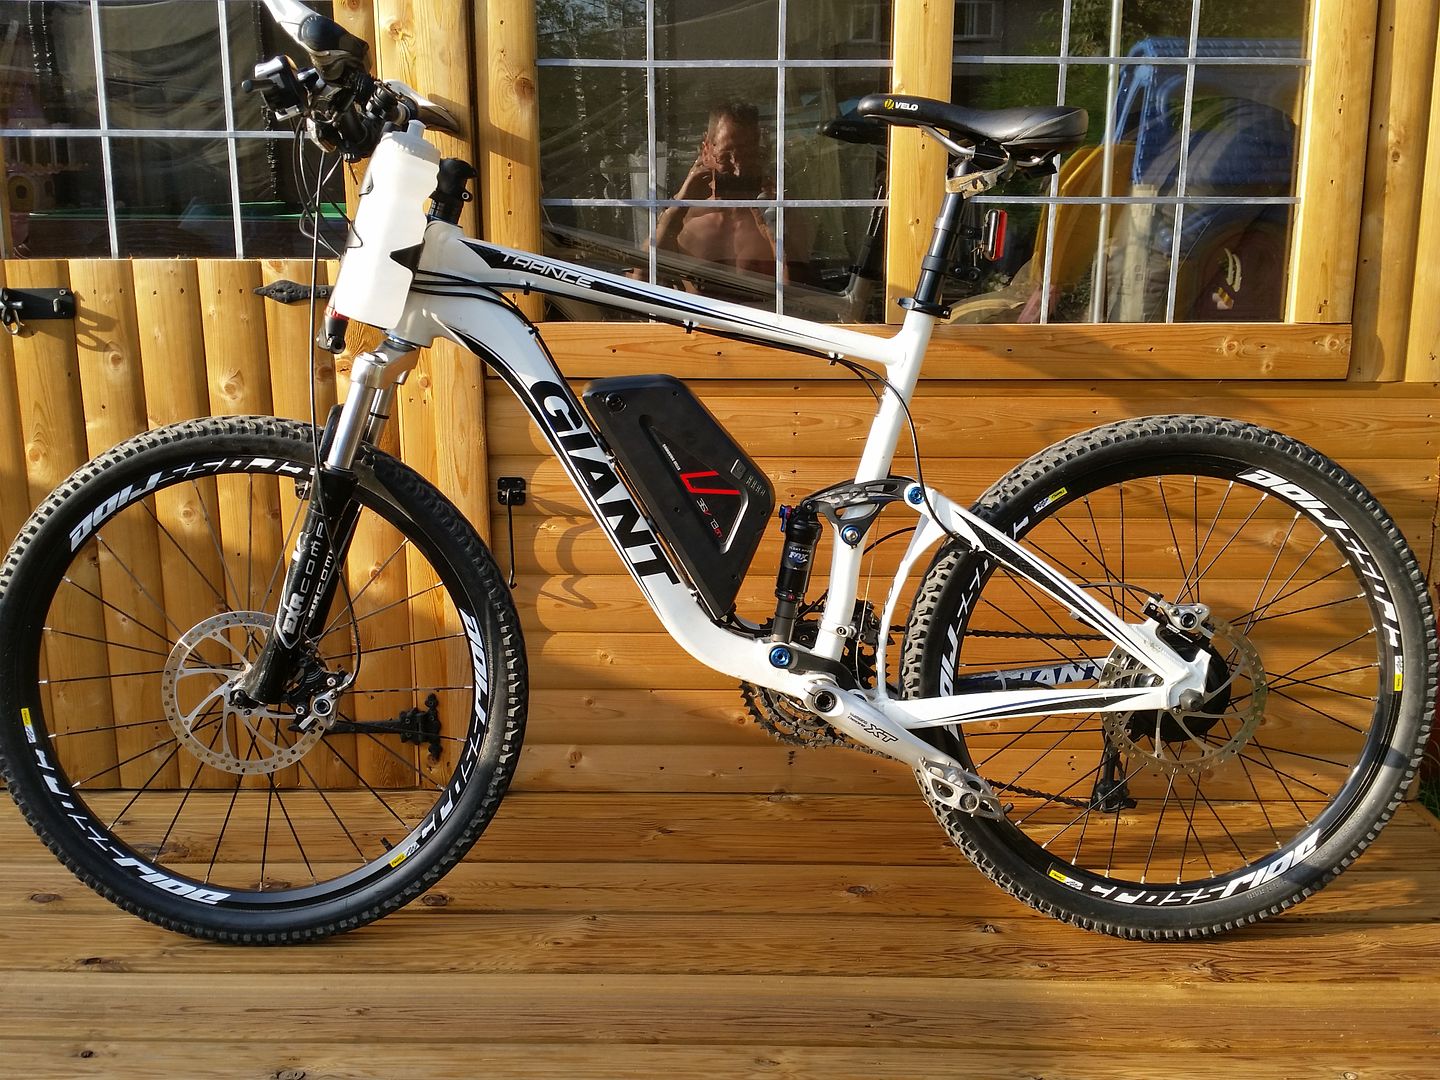
Just finished the frame swop on my bike and to say it's transformed the bike is an understatement. My main reason for the swop was because my old Specialized Hardrock frame was a 'small' size and it was. I have lived with it for years but I felt the time was right to get it sorted. I had always felt that when I did the swop, I may as well get a suspension frame but with the Oxydrive kit going on last year the choice of frame became harder - I had to know that the battery would fit. This is why I took great interest in Baldylox' build on his Giant Trance - a very nice full sus bike that due to it's suspension layout/shock placement accommodated the Oxydrive frame battery. I then did some research on full sus frame design and noted that the Trance had won many awards and several Best Buy reviews. Good enough for me! I ended up finding a 2012 Large frame on the Bay which also had an upgraded shock (Fox Float RP23) and it was even the right colour. It had some digs and chips in various places but nothing that would affect the workings so I bagged it for £175. On arrival, the first thing I did was strip down my Hardrock and weigh both the frames. The difference would never had prevented me using the Trance, but curiosity got the better of me. The Trance was just 16oz heavier which I was confused at. I even weighed it three times to be sure, but it was right. How Giant have done this I have no idea – the Hardrock is not known to be a heavy hardtail frame by any means, and the Trance has far beefier frame tubing, a bigger headtube area and all the suspension linkages (and shock) to boot. Neither is the Trance carbon. Amazing.
So the process of swopping everything over started to commence and I identified there were a few minor issues. My forks were non-tapered, the rear hydraulic hose wasn't long enough, all the gear cables would need to be replaced, the rear caliper mounts were post type (my old ones were IS), my PAS wheel wouldn't fit and the Trance had cable guides on top of the downtube which would mean some head scratching in terms of fitting the battery securely. Oh and I could not fit my PAS sensor as the BB bearings are pressed into the frame and I really didn't want to remove them.
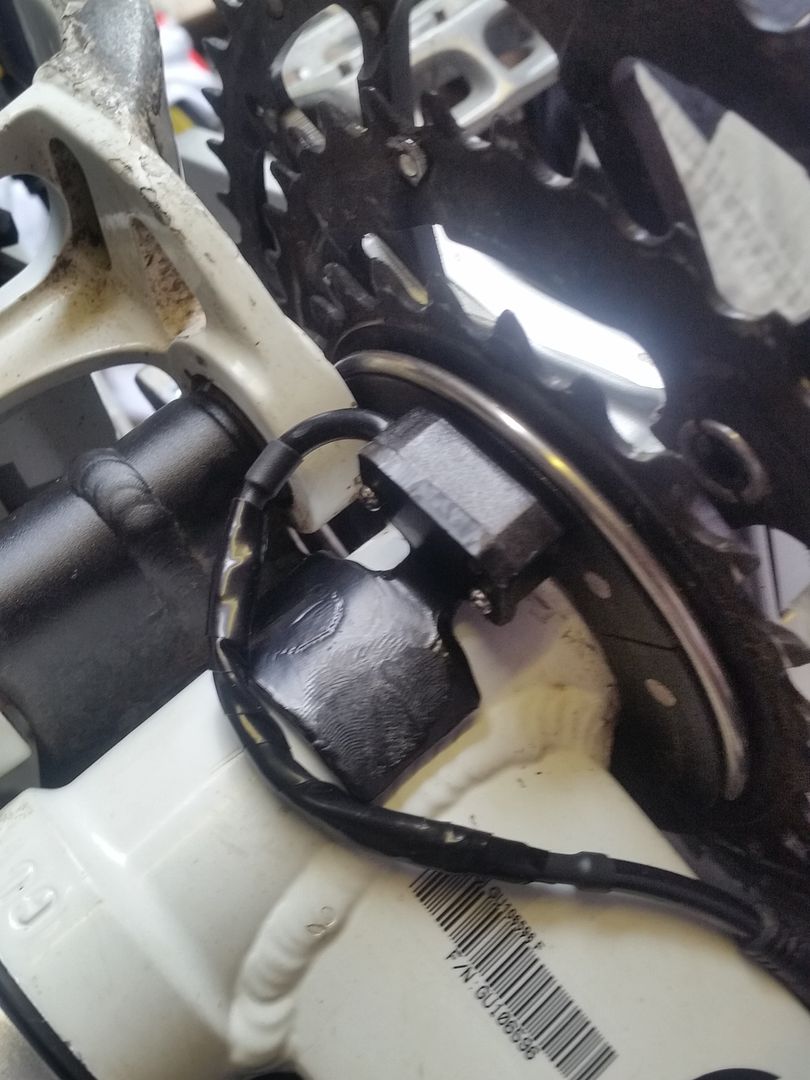
Getting the forks in was thankfully quite simple – I bought a straight to 1.5” taper adaptor then used the regular 1.5” tapered headset kit that came with the frame. A new Shimano gear cable set was bought, as was a new hose kit for the brake and a 203mm post to post caliper adaptor. All fairly simple so far. I then moved onto the PAS wheel – I ground out the centre hole even bigger (I had already ground it out to fit my old frame with Hollowtech crank) so it would go over the pressfit BB but then had another problem in that the clearance for the suspension linkages was tight, real tight. I really didn't want to fit all the PAS stuff on the non-drive side (I prefer the clean looks using the drive side) so after looking at ways around the problem I ended up grinding off plastic in the only area possible (near where the snap ring sits) to make the disc as narrow as it could be. I took off just enough to still allow the ring to be used but after fitting it all back up I was close, but not close enough. I needed about an extra 1.5mm. Lots of head scratching took place at which point I realised that spacing out the drive side by the same amount would unlikely cause any issues with chain line/gear indexing so looking around the trusty shed I found the plastic lid for my zip tie tube...hmm...I cut out the centre with a hole saw to the required outer diameter to fit directly behind the crank, saw it was bang on 1.5mm wide (lucky) then used another hole saw to cut out the middle to fit over the hollowtech crank tube. My Heath Robinson spacer went on first, then the original Shimano spacer which is used to butt up properly against the BB bearing. All fitted back up, voila! Enough clearance! It's still tight, but theres enough to clear the linkage even allowing for a bit of sideways movement in the swingarm. As previously with my Hardrock, I did not find it necessary to bond/attach the PAS disc to the crank – the magnets hold it firm enough, and central too. So with the disc now sorted, I moved on to the PAS sensor. There was no way the original metal bracket was going to fit – even if I had pulled the BB bearings out, the PAS disc was now too far back towards the centre of the bike to allow the stock bracket to line up. Lots more head scratching went on and reading of this site. I found someone (d8veh I think) who had made up a metal bracket which attached directly to the BB tube and carried the PAS sensor. Lots of looking around my shed for some suitable material (I didn't have any metal sheet) led my beady eyes to the bin of all places, where I saw an old rear shelf speaker box for a car...hmm it's made of plastic (so formable) and already had right-angles (which I needed). An hour with a saw, file and Dremmel (my favourite tool ever) saw me with a suitable bracket. It then took me another hour to mould the BB section into a curve to fit the BB nicely, drill a few holes for the sensor fixing/LED and adjust the angle to get up close and personal with the PAS disc. I used double sided numberplate tape to affix it to the BB, checked it operated correctly and job done.
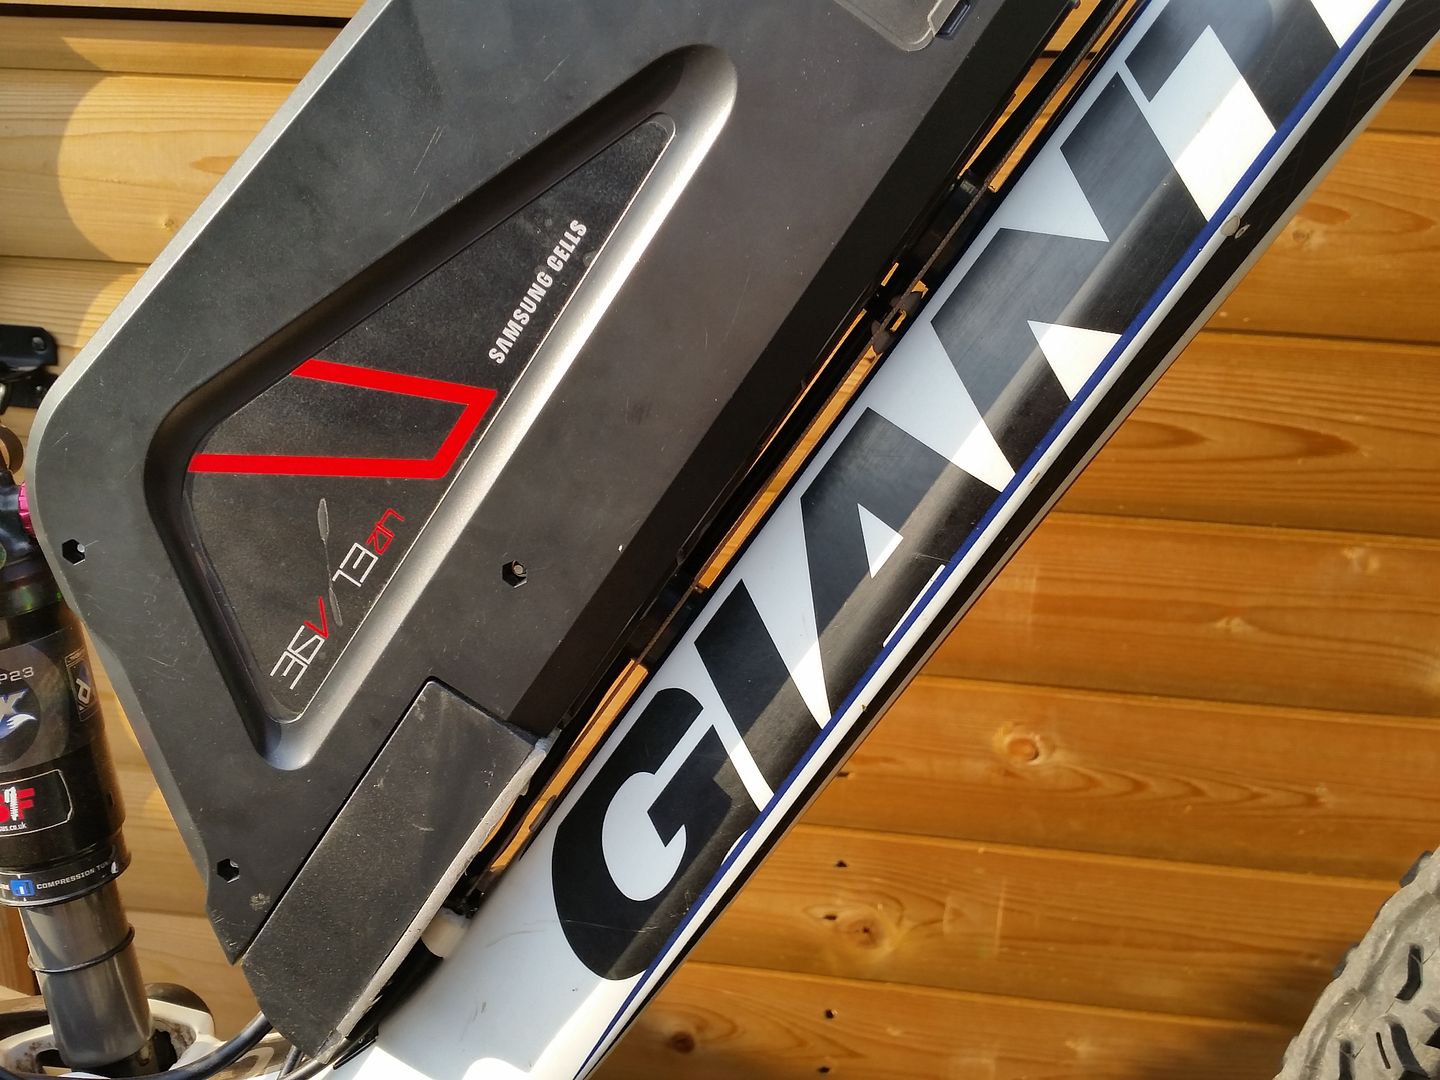
Then it was onto the battery mounting plate. This looked to be a right pain, as only one of the bottle bracket riv nuts lined up (they were too low down the tube to to use both) and the cable guides meant the plate had to sit away from the frame. Once again my beady eyes akin to a bird of prey scanned for anything interesting in my decrepit shed. I saw some 1” diameter nylon bar which I had used previously to make up some spacers for another job and thought ah ha! After measuring up I needed about 9mm thickness so I cut two off the bar and drilled 5mm holes through the centres. It then turned into a pain of a job though, as I also needed a recess on the bottom of the spacers to fit over the lip of the riv nuts and I also wanted to sculpt the bottom to fit the curvature of the frame to minimise battery wobble once it was all bolted up. Lots of Dremmel time ensued, offering up, re-dremmeling etc but got there in the end. I could have gone slightly thinner on the spacers but I am happy – theres about 1.5mm clearance with the bottom cable guide. Everything bolted up tight and virtually no side to side movement of the battery. I had to fit a riv nut further up the frame and I looked at trying to fit one without a proper tool which can be done but I was paranoid about making a hash of it and ruining the frame so I bought a tool for £15 off the bay and a pack of 5 riv nuts just in case. Luckily it all fitted fine first time round.
First outing yesterday and as I said at the start I am staggered by how plush the bike is. This is my first full sus bike and I can't believe how well it smooths the ride out. Even small stones/twigs are ironed out, despite the fact that when I look down it doesn't look like the shock is doing anything! The extra size in geometry is really helping me too, but the only downside is that I can now feel the shortcomings in the Marzocchi EXR forks which I had previously thought were pretty good. Oh well, onto a fork replacement soon as well then!
The OD kit continues to deliver, my only gripe being spoke tension which has been all over the place since new and although I have left it, I now have a wheel that does not run true so I need to get it to a shop to sort it out for good. It's one job I won't tackle myself but not sure where to take it – I can't say I trust Halfrauds but LBS's seem to be thin on the ground these days which is a great shame.
So the process of swopping everything over started to commence and I identified there were a few minor issues. My forks were non-tapered, the rear hydraulic hose wasn't long enough, all the gear cables would need to be replaced, the rear caliper mounts were post type (my old ones were IS), my PAS wheel wouldn't fit and the Trance had cable guides on top of the downtube which would mean some head scratching in terms of fitting the battery securely. Oh and I could not fit my PAS sensor as the BB bearings are pressed into the frame and I really didn't want to remove them.
Getting the forks in was thankfully quite simple – I bought a straight to 1.5” taper adaptor then used the regular 1.5” tapered headset kit that came with the frame. A new Shimano gear cable set was bought, as was a new hose kit for the brake and a 203mm post to post caliper adaptor. All fairly simple so far. I then moved onto the PAS wheel – I ground out the centre hole even bigger (I had already ground it out to fit my old frame with Hollowtech crank) so it would go over the pressfit BB but then had another problem in that the clearance for the suspension linkages was tight, real tight. I really didn't want to fit all the PAS stuff on the non-drive side (I prefer the clean looks using the drive side) so after looking at ways around the problem I ended up grinding off plastic in the only area possible (near where the snap ring sits) to make the disc as narrow as it could be. I took off just enough to still allow the ring to be used but after fitting it all back up I was close, but not close enough. I needed about an extra 1.5mm. Lots of head scratching took place at which point I realised that spacing out the drive side by the same amount would unlikely cause any issues with chain line/gear indexing so looking around the trusty shed I found the plastic lid for my zip tie tube...hmm...I cut out the centre with a hole saw to the required outer diameter to fit directly behind the crank, saw it was bang on 1.5mm wide (lucky) then used another hole saw to cut out the middle to fit over the hollowtech crank tube. My Heath Robinson spacer went on first, then the original Shimano spacer which is used to butt up properly against the BB bearing. All fitted back up, voila! Enough clearance! It's still tight, but theres enough to clear the linkage even allowing for a bit of sideways movement in the swingarm. As previously with my Hardrock, I did not find it necessary to bond/attach the PAS disc to the crank – the magnets hold it firm enough, and central too. So with the disc now sorted, I moved on to the PAS sensor. There was no way the original metal bracket was going to fit – even if I had pulled the BB bearings out, the PAS disc was now too far back towards the centre of the bike to allow the stock bracket to line up. Lots more head scratching went on and reading of this site. I found someone (d8veh I think) who had made up a metal bracket which attached directly to the BB tube and carried the PAS sensor. Lots of looking around my shed for some suitable material (I didn't have any metal sheet) led my beady eyes to the bin of all places, where I saw an old rear shelf speaker box for a car...hmm it's made of plastic (so formable) and already had right-angles (which I needed). An hour with a saw, file and Dremmel (my favourite tool ever) saw me with a suitable bracket. It then took me another hour to mould the BB section into a curve to fit the BB nicely, drill a few holes for the sensor fixing/LED and adjust the angle to get up close and personal with the PAS disc. I used double sided numberplate tape to affix it to the BB, checked it operated correctly and job done.
Then it was onto the battery mounting plate. This looked to be a right pain, as only one of the bottle bracket riv nuts lined up (they were too low down the tube to to use both) and the cable guides meant the plate had to sit away from the frame. Once again my beady eyes akin to a bird of prey scanned for anything interesting in my decrepit shed. I saw some 1” diameter nylon bar which I had used previously to make up some spacers for another job and thought ah ha! After measuring up I needed about 9mm thickness so I cut two off the bar and drilled 5mm holes through the centres. It then turned into a pain of a job though, as I also needed a recess on the bottom of the spacers to fit over the lip of the riv nuts and I also wanted to sculpt the bottom to fit the curvature of the frame to minimise battery wobble once it was all bolted up. Lots of Dremmel time ensued, offering up, re-dremmeling etc but got there in the end. I could have gone slightly thinner on the spacers but I am happy – theres about 1.5mm clearance with the bottom cable guide. Everything bolted up tight and virtually no side to side movement of the battery. I had to fit a riv nut further up the frame and I looked at trying to fit one without a proper tool which can be done but I was paranoid about making a hash of it and ruining the frame so I bought a tool for £15 off the bay and a pack of 5 riv nuts just in case. Luckily it all fitted fine first time round.
First outing yesterday and as I said at the start I am staggered by how plush the bike is. This is my first full sus bike and I can't believe how well it smooths the ride out. Even small stones/twigs are ironed out, despite the fact that when I look down it doesn't look like the shock is doing anything! The extra size in geometry is really helping me too, but the only downside is that I can now feel the shortcomings in the Marzocchi EXR forks which I had previously thought were pretty good. Oh well, onto a fork replacement soon as well then!
The OD kit continues to deliver, my only gripe being spoke tension which has been all over the place since new and although I have left it, I now have a wheel that does not run true so I need to get it to a shop to sort it out for good. It's one job I won't tackle myself but not sure where to take it – I can't say I trust Halfrauds but LBS's seem to be thin on the ground these days which is a great shame.