

Pendleton eSomerby Controller Upgrade
Thanks to @Seajay in this post here for initially raising the topic and others such as @Nealh for the suggested kit list and for tips on setting up parameter ‘P1’ (more on that later) by @DuncanDK in his posting here.
.
Why Change The Controller?
The Pendleton is the first ebike in our household and this 2017 rear hub motor model was bought for my wife a few weeks back. Right from the start, she couldn’t get the hang of the powered side of things, experiencing difficulty in keeping a steady pace alongside other riders and just seemed to accelerate to a set speed and then cut power.
I gave it a spin and after reading about such things in this forum, realised that the method of control is speed control rather than torque control which accounted for the phenomenon of the bike accelerating to a set speed before cutting power (about 6.5mph in power assist level one, 11.5mph in level two and 15.5mph in level three).
An alternative controller that offered simulated torque control was suggested in Seajay’s thread and I was happy to follow this advice.
Having now fitted the new controller I can tell you that the ebiking experience has been transformed in that the pedal assistance is smooth at all speeds with the degree of assistance (as in percentage of available power) available in 5 incremental steps. So if this upgrade is of interest to you – read on.
The Kit List
Ordered from Top Bike Kit here on a Monday and delivered by DHL the following Friday. The total cost including a very small Customs charge (see TBK’s FAQ on this topic) was just under £80, £23 of which was for DHL as opposed to something like £12 for China Post which would have taken a few weeks to arrive.
The Kit
Fitting the Controller
This only requires basic tools such as Philips screwdrivers, Allen keys and other minor items like cable ties and a very moderate technical ability.
Disassembly
The P1 setting was determined after following DuncanDK’s tips linked to above.
C Parameter Settings
So go around the bike and ensure all cables are neatly secured and if not using the thumb throttle, cap the end of the cable to prevent water ingress.
Happy ebiking.
Amndt: 26/7/20 - P2 now = 1 to correct speed reading issue and C7=1 for cruise control activation
Thanks to @Seajay in this post here for initially raising the topic and others such as @Nealh for the suggested kit list and for tips on setting up parameter ‘P1’ (more on that later) by @DuncanDK in his posting here.
.
Why Change The Controller?
The Pendleton is the first ebike in our household and this 2017 rear hub motor model was bought for my wife a few weeks back. Right from the start, she couldn’t get the hang of the powered side of things, experiencing difficulty in keeping a steady pace alongside other riders and just seemed to accelerate to a set speed and then cut power.
I gave it a spin and after reading about such things in this forum, realised that the method of control is speed control rather than torque control which accounted for the phenomenon of the bike accelerating to a set speed before cutting power (about 6.5mph in power assist level one, 11.5mph in level two and 15.5mph in level three).
An alternative controller that offered simulated torque control was suggested in Seajay’s thread and I was happy to follow this advice.
Having now fitted the new controller I can tell you that the ebiking experience has been transformed in that the pedal assistance is smooth at all speeds with the degree of assistance (as in percentage of available power) available in 5 incremental steps. So if this upgrade is of interest to you – read on.
The Kit List
Ordered from Top Bike Kit here on a Monday and delivered by DHL the following Friday. The total cost including a very small Customs charge (see TBK’s FAQ on this topic) was just under £80, £23 of which was for DHL as opposed to something like £12 for China Post which would have taken a few weeks to arrive.
The Kit
- T-06S 24V/36V250W Torque Simulation Sine Wave with Julei Waterproof Connector (T06S controller Waterproof Plug)
- Cable – 1-4 Cable
- Display - KT LCD5
- 9Pins - Without cable
- Brake – Without brake
- Throttle - Wuxing 108X Thumb Throttle
- PAS - Without PAS
Fitting the Controller
This only requires basic tools such as Philips screwdrivers, Allen keys and other minor items like cable ties and a very moderate technical ability.
Disassembly
- Slide out the battery from the battery holder
- Release and cable wrap and ties and unplug the 3 leads going into the bottom of the battery holder (power lead to the motor, the PAS sensor lead and the long lead going to the LED ‘790’ handlebar control).
- Attach a piece of string to the ‘790’ lead and withdraw it down the seat tube cableway (the other two leads may well come down too, but that’s fine). The string is to make it easy for when the new controller lead is pulled back up the cableway.
- Detach the ‘790’ lead from the clips on the underside of the down tube – this can be done by prising open the clips with a pointed tool – don’t worry about damaging them as they can’t be re-used as the replacement lead is fatter than the ‘790’ lead and the clips won’t fit.
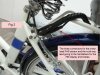
- Unplug the ‘790’ lead from the front brake sensor leads and the handlebar LED display and remove the latter.
- Next, the battery holder – first, release the 4 Allen bolts holding the pannier rack to the bike. Then turn the rack upside down to access the 4 screws holding the battery holder to the pannier rack.
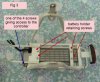
- The ‘790’ controller is located in the front part of the battery holder and is accessed by removing 4 small Philips screw on the underside. Once released, the ‘790’ controller can be pulled free.
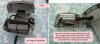
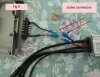
- At this point you will notice that the black and red leads on the new controller have ‘bullet connectors’ whereas the original ‘790’ controller has a plug and socket arrangement.
- There are a number of different ways in adapting this connection and will depend largely on what connectors you have to hand to make the transition. I had fresh bullet connectors in my tool box so stripped back and ‘tinned’ the wires and crimped them on. In the absence of all else you could get away with using simple ‘choc block’ screw connectors or the like.
- Do bear in mind that this connection is the one carrying ‘the amps’ to the motor, so it needs to be a good solid connection.
- You will also note that the new controller has a 2-pin red connector for ‘Light Output’ for which there is no matching connection on the Pendleton. As yet I have not discovered a use for this, so I have capped the end to prevent water ingress and tucked it out of the way.
- The new controller does fit comfortably and tightly in the battery holder. You will need to fiddle around a bit to find the right orientation of the controller in the holder compartment but it’s easy enough. Take care of course to not put unnecessary strain on the leads as they exit the holder compartment.
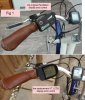
- Attach the new KT-LCD5 display to the handle bars and plug in to the 1-4 cable along with the two brake sensors and the thumb throttle controller.
- I have chosen to not fit the thumb throttle mainly because its location is too near the derailleur thumb shifters and secondly, my wife doesn’t want it. However, I loosely plugged it in for testing purposes.
- Run the 1-4 cable back along the down tube and back up the seat tube cableway, using fresh tie-wraps where needed.
- Re-attach the battery box to the pannier rack and the pannier rack to the bike.
- Plug in the 1-4 cable, PAS sensor and motor cables into the new controller leads. I did find the 9-pin motor connector required a bit of a push to get it fully homed.
- Re-insert the battery, switch on the LCD display, raise the rear wheel off the ground and give the throttle a tweak and the motor should turn. If not, there’s something wrong and you’ll need to re-visit the installation.
- Search Google for the manual for this display and read it through
- If you’re new to this sort of technical stuff, don’t worry. Yes there are a lot of settings to make, but below are the settings I’ve inputted and although they may get ‘tweaked’ at a later stage, (especially after any suggestions from other forum members), but if you follow them then be assured, you’ll be out riding very soon.
- Max riding speed – 25Km per hr, wheel diameter – 700c, Imperial Units
| P1 | 87 |
| P2 | 1 (was initially 0) |
| P3 | 1 |
| P4 | 0 |
| P5 | 12 |
C Parameter Settings
| C1 | 2 | C6 | 5 | C11 | 0 |
| C2 | 0 | C7 | 1 | C12 | 4 |
| C3 | 8 | C8 | 0 | C13 | 0 |
| C4 | 0 | C9 | 0 | C14 | 2 |
| C5 | 10 | C10 | n |
So go around the bike and ensure all cables are neatly secured and if not using the thumb throttle, cap the end of the cable to prevent water ingress.
Happy ebiking.
Amndt: 26/7/20 - P2 now = 1 to correct speed reading issue and C7=1 for cruise control activation
Last edited:


