Rear Wheel removal a big problem

Pete

Pedelecer
Oct 17, 2009
171
8
After days of rain I finally got to ride my new Synergie Mistral this morning. just 2.5 miles away from home the rear inner tube burst with a bang that you usually get if you have twisted the tube when installing. So 2.5 mile walk back, by which time it had started to rain, so, not too happy.

But, everybody gets a flat, so not really an issue. BUT when I came to get the old inner tube out and a new one in it APPEARS IMPOSSIBLE TO REMOVE the rear wheel or even just slacken it to nudge it out of the drop outs. The wire taking power to the motor is taut and wedged tight into the axle thread. It appears impossibe to slacken this axle nut without slicing through the wires.
Power cable entry.jpg
It would seem to be awful design. I suppose if you could get enough slack you could lead it out along the groove in the axle but there is no slack at all - tight all the way to the controller. I just cannot see how I am going to deal with this. Any help?

Pete
 

flecc

Member
Oct 25, 2006
53,488
30,803
There's only two wires inside there Pete, and I believe others have posted that further along the wire somewhere they have two bullet connectors which you can unplug to get some slack.

Then you can press the sleeving down into the groove to undo the nut.
.
 

Northern Irelander

Pedelecer
Jun 4, 2009
180
0
Cut the cable ties for starters. always worth having some spare ties in the bike toolkit

Some e-bikes have a cleat type clip for tracing the wire through.

As Flecc says some bullet connectors are handy, esp if you have to get a cassette removal tool on to the axle
 

Pete

Pedelecer
Oct 17, 2009
171
8
Thanks Flecc I did think of that point which was made earlier, but there is absolutely no slack available in the wiring at all and I didn't think that could be right anyway to have a wire exiting like that, protected or not.
It looks as if it has been installed with very little slack and then the clipping by cable ties has really got it pulled in like a violin string.

To be honest after only managing 20 minutes use I have bounced it to the suppliers as I didn't think I should have to be disconnecting wires etc just to remove a wheel, which you may well have to do regularly whether through punctures or perhaps to change tyre type. Unfortunately their mechanic is off sick and they can't offer any help in the meantime.

I suspect if it was you you would just sort it out in some sensible way, but not everybody has those sorts of skills and knowledge, and I don't think we should be expected to have just for the pleasure of riding a bike.

I would be interested to hear whether you feel this is a decent acceptable installation to have the cable in this way?

What I was thinking was that I could sever the wire along its length between the wheel and the control box and put in some kind of joining connector, which, if long enough in itself may give enough slack to lead the wire out properly. It would also mean that I wouldn't have this heartache every time. This would be at a very exposed point at crank level so do you think it is a good idea, and if so is there any type of connector you would recommend?
Thanks

Pete
 

flecc

Member
Oct 25, 2006
53,488
30,803
You don't need to Pete.

Just found Blew it's post, apparently the two bullet connectors are just inside the controller housing. Here's his post about it:

Mistral motor cable

Just cut the cable ties, undo the controller housing and unplug to get the cable slack.

It's actually a good thing having the cable tight in at the back wheel like that. Some have found that the protuding cable on other bikes has been damaged by catching the it on obstructions.
.
 
Last edited:

Pete

Pedelecer
Oct 17, 2009
171
8
Should you ever want to remove the back wheel, perhaps to change a tyre or tube, Then it's very easy on the Mistral with just two bullet connectors in the controller housing to disconnect. There is spare cable length available if you want to satisfy your need for peace of mind.
Yes, I didn't see the bullet connectors when I had a quick look in when I was taking the sealant off but maybe they are buried at the bottom under the tangle of wires, I'll have another look.
More to the point, is Blew it psychic? I wonder if he has the lottery numbers for the next draw?
 

Kal

Pedelecer
Mar 21, 2008
84
0
That's right.. to remove the back wheel of the Mistral you have to cut the cable ties, unplug the two bullet connectors inside the control box and remove the chrome crash brackets to allow room to turn the spanner. Some owners have cut the cable and fitted connectors on the outside to make it easy to take the wheel off in the future.

Mistral wiring.jpg

Mistral 022.jpg
 

Blew it

Esteemed Pedelecer
Jun 8, 2008
1,472
97
Swindon, Wiltshire
Hi Pete,

I've been out all day so have only just spotted this. If the tyre went down that quickly it sounds like a split. First of all you need a new tube. The Mistral uses long valve tubes, 48 mm. Unless you can source them locally THESE will do nicely.

It's a twinpack so you will another spare for future use. I'm currently on cook-house detail, but I will bring my own machine into the house this evening rather than work from memory. I will try and post a full reply a little later. In the meantime, please do not remove that wheel until I post a description of the procedure. There are certain things that need to be done to prevent further problems.

All for now
Bob
 

Pete

Pedelecer
Oct 17, 2009
171
8
Thanks Bob, but please don't go to too much trouble, you have been generous enough with your time and advice already. I have had a response back from Synergie to say if the Mechanic is not in tomorrow they will send a replacement (bike I think they mean) and pick this one up.
As a matter of interest when I got the tube out,(just cut it to get it off because I could see that it was useless) the damage was like a bullet exit hole - just looked like a mini volcano had erupted. Certainly wasn't a puncture and tyre carcase felt fine inside and no external evidence either. It must have been a weak spot in the tube. The only time I have had this happen before was when I put in a new tube and must have got a twist in it and that exploded as I pumped it up, made a fair old bang as well.
As I said, please don't waste your whole evening on this
Pete
 

Hugh

Esteemed Pedelecer
Sep 22, 2009
290
44
Hi Pete ; might be worth checking for protruding spoke ends in the rim - I've had sudden blowouts before because of this.

Cheers, Hugh
 

Pete

Pedelecer
Oct 17, 2009
171
8
There was nothing obvious Hugh, I ran my fingers round the rim and couldn't feel anything but I suppose it could happen only when under load? I will soon know if the next one blows!
Pete
 

Blew it

Esteemed Pedelecer
Jun 8, 2008
1,472
97
Swindon, Wiltshire
Yer tiz!

This can used for future reference. Copy and print it out if you wish before it disappears into the forum labrynth.

Up-end the machine and release the rear brake noodle from its stirrup, if there isn't enough slack in the cable you will need to release the inner from its clamping bolt.

Next, a little artwork.

Carefully draw a diagram of the positions of the various washers and spacers, this is important to maintain the wheel on frame centre line when re-fitting.

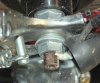
As Kal has already mentioned, it's easier if the two chrome protectors (footplates) are first removed. The carrier may drop down when this is done. Remove the controller housing cover and take out the controller with the cables. Locate the motor connections, a blue and a yellow cable and disconnect. Avoid pulling on the cables themselves, these bullet connectors are sometimes a little tight, I prefer to use two pairs of long-nosed pliers gripping the two brass parts, just inboard of the crimps, and teasing them apart. Don't twist, pull them straight out

After cutting the cable ties it may be neccessary to draw the cable through the square hole in the drop-out.

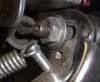
Undo the cable side wheel nut, it's 18 mm A/F. This will also release the propstand. This, together with the cable grommet, the wheel nut and any washers outboard of the drop-out should then be passed along the cable and out of the way. Undo the driveside wheel nut.

The chain!.

The original chain is continous. As the wheel slides rearward out of the drop-outs, it can passed around the axle. Personally, I prefer to have a snap on link and remove the chain completely, saves dinging the paintwork!.

If working on the wheel flat on the floor, do so with the cable side uppermost for obvious reasons.

When refitting the wheel there's a couple of things to watch out for. The hut on the motor axle (cable side) which is inboard of the drop-out must not be tightened with a spanner. Doing so will pre-load the wheel bearings in the motor, finger tight will do. Remember to pass the chain around the axle as it enters the drop-out. It's important, when threading the various parts back along the cable, to make sure the relationship of the lugged torque washer and the cable slot in the axle are correct. The slot should be facing forward to allow a natural exit for the cable along the chainstay. A spanner can be used on the axle flats to make this so. The torque washer lug should be facing rearward and engage with the drop-out slot behind the axle. Ensure the axle is fully forward in the slot on both sides and tighten both wheel nuts.

Thread the cable grommet into position. The cable is then threaded through the square hole in the drop out and secured to the first cable tie anchor. As Flecc has already pointed out, it should be loose enough to wriggle with your fingers but no more. Contrary to your belief, providing the wheel nut is firmly tightened, nothing will move, no matter how rough the terrain gets. There is however, a very real possibilty of any large loops in the cable left sticking out will get caught up, wrenching it from the motor.

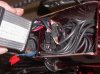
When the cable reaches the inside of the controller housing, reconnect to the bullet connectors, colour to colour. Place the controller in first then lay the cables alongside and re-fit the cover. My controller has strips of draught excluder stuck on it to stop it rattling about inside the housing, I hate rattles!.

Re-fit the footplates with the mudguard eyes and carrier support behind their respective bolt heads. Don't forget to re-fit the brake cable.

If anything here doesn't make sense, then please use your own discretion. If any of it is plainly wrong, then let me know and I'll edit the post.

Have fun
Bob
 

Pete

Pedelecer
Oct 17, 2009
171
8
Thank you very much for all that detail, I really do appreciate it. I will print it out as you suggest and have it alongside me in the morning when I tackle it.
Contrary to your belief, providing the wheel nut is firmly tightened, nothing will move, no matter how rough the terrain gets. There is however, a very real possibilty of any large loops in the cable left sticking out will get caught up, wrenching it from the motor.
I had another think about this and I can see that you and Flecc are making sense, as long as there is enough slack available by disconnecting the cables etc, it is much better to have it without anything which may get snagged and pull the whole lot out.
The original chain is continous. As the wheel slides rearward out of the drop-outs, it can passed around the axle. Personally, I prefer to have a snap on link and remove the chain completely, saves dinging the paintwork!.
That sounds really handy. Can it be done with a normal chain or is it a special type? Now that you have mentioned it there is something stirring deep in my memory - did all bikes have this fitted at one time?

When I had a look earlier there is another wire leading backwards with the motor supply wires, I think this must be for the lighting if the dynamo is fitted?

Pete
 

Blew it

Esteemed Pedelecer
Jun 8, 2008
1,472
97
Swindon, Wiltshire
Pete,

If you want to fit a removeable link to the chain, there are two types of joiner link. The type which use a spring clip to hold the side plates together are fine for 6 speed clusters and below but are usually seen on the 1/8" chains as described by Flecc. For seven speed clusters and above it's neccessary to use the snap together type.

You'll need a chain breaker to press two rivets out, and then replace that link with a snap-on link. The chain is normal 1/2" pitch x 3/32" wide. Both items should be available at your local bike shop.

Some multitools have a chainbreaker included. The one I prefer is the Crank Brothers M17, I always carry this on the bike with a couple of spare joiner links in with the puncture outfit. On longer rides I also carry a twenty link length of compatible chain just in case.

I purchased my Mistral at five months old from another forum member. When collecting the machine he presented me with the unfitted dynamo in a bag. Rummaging about in my memory banks, I remember removing an un-used wire from the front of the machine (front light to rear light) and also the wire which you speak off going to the rear light. I can't remember if it was a single wire with the frame providing the earth return, or a twincore cable.

If you intend to go ahead with repairing that puncture, please make sure you have a long schrader valve (48mm) tube to hand. Many electric bikes, including the mistral, use a deep V section double walled rim. It's possible to use a normal length valve, but personally I think it's an invitation to a valve tear-out.

Hope this helps

All the best

Bob
 

Pete

Pedelecer
Oct 17, 2009
171
8
That was first rate guidance Bob, and with it I managed to get the wheel off. Once I had loosened the wiring from the ties and disconnected the bullet connectors, I was able to get enough play to lay it along the axle groove.
I managed to get a long valve stem tube locally and so it is back together again and all seems ok. I need to ride it to be sure of course but it was dark by the time I finished so hoping for a bit of the dry stuff tomorrow.
On the downside it was impossible to avoid some fraying of the fabric outer sleeve on the cables both taking off and tightening the wheel nut. The wires themselves were OK but now have a bit less protection than before and I wonder how long it will stand up if I get a few punctures. The bottom line is that rear punctures are going to be a pain in the neck and personally would find it difficult to do by the roadside I think. I would really like to get whatever tyres/tubes are likely to give the most protection against punctures, however much they cost! I will have a look round the forum as I am sure this must have been covered. if not I will start a new topic on 'puncture proofing' to see what people think rather than have it buried down in this thread
Once again thanks for the help.
 

Blew it

Esteemed Pedelecer
Jun 8, 2008
1,472
97
Swindon, Wiltshire
I thought there was something odd about the photo you posted of your cable entry, It's different to mine. On my Mistral, the cable is encased in a spring winding and actually enters the motor through the central hole. The slot is machined right into the hole and allows a greater radius for the bend in the cable. In your photo, the cable is entering along a machined grove which does not appear to go all the way through to the hole in the axle. If that is the case, then I don't understand why they have done it that way. Granted, it will add a little strength to the axle, but what's the point if the hole is still there but unused, strange. I'll have to admit, I don't like the look of it.

Edit: post crossed with Kal.
 
Last edited: