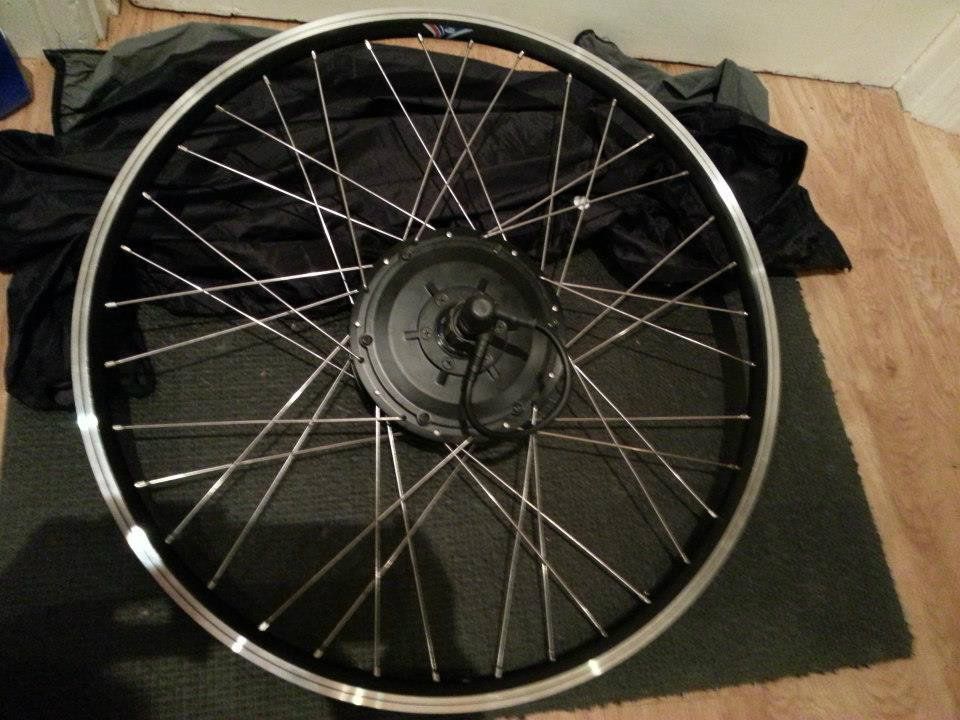
Wheel building

Jeremy

Esteemed Pedelecer
Oct 25, 2007
1,010
3
Salisbury
Luck of the draw, I suspect.

Some tapes seem to leave a sticky residue behind, some don't. The same seems true of duct tape, I have a roll of black stuff that leaves a nasty white sticky mess behind when pulled off, but a roll of silver stuff I have always comes away cleanly.
 

jerrysimon

Esteemed Pedelecer
Aug 27, 2009
3,292
112
Cambridge, UK
Otherwise known as stress relieving - like humans, spokes need the stress taken away or they might snap:cool:
Since I learnt how to build wheels some three years ago, I am fascinated by the many analogies it has with life. Of course I say learnt, but have noticed that this is an ongoing process with each new wheel I build.

Its a truly satisfying pursuit and I am so glad to have come to it later in life. I doubt as a youngster I would have had the patience.

Regards

Jerry
 
Last edited:

103Alex1

Esteemed Pedelecer
Sep 29, 2012
2,228
67
About to get started. Just done a weight check of the BMS 26" rim for future reference, as I don't remember seeing details online when ordering.

26" rim - 472g

36 x 13G spokes - 249g

roll of rim tape - 17g

Expected contribution to finished wheel weight - 738g
 

103Alex1

Esteemed Pedelecer
Sep 29, 2012
2,228
67
... and 5 hours later :)o) my first wheel is laced :D

I'd put up a picture but it's 2.04mb and Pedelecs won't let me.... will have to try to fiddle around editing the size down tomorrow.

Got lazy and tried the video but it actually sent me off on the wrong tack. So disassembled everything and started again following Sheldon Brown as I'd been told to do !

It worked (I think !) ... 2-cross pattern for this one. Turned out to be a right-hand rim and the leading hole was one removed from the one adjacent to the valve hole. You definitely can't afford to try to 'wing it' on starting this exercise !

d8veh, thanks a lot for giving me the right spoke lengths to order and the tips. Half way through trying to fit the crossing spokes (leading ones ?) I'd have been convinced I'd got the size wrong if I'd tried to work it out for myself :eek:

Learned my lesson the hard way over spoke nipples too - will make sure they are dropped through the rim properly before bringing the spoke in to join them, making sure they are well braced from behind so as not to retract before threads engage. Managed to get 3 stuck horizontally in the double rim over the course of lacing it, the last of which wedged with its head between the hole it was intended for and the one to the left, before working out what I was doing wrong. A great deal of patience and the aid of 2 spokes and a fishing paperclip to dislodge !!! It's definitely a learned skill.

Next steps with this - am I best to fit the brake disc and cassette now before moving on to try to true the wheel ?
 
D

Deleted member 4366

Guest
Great result.
I prefer to start in the morning when I have a clear head!
I guess you can get some sort of tools to thread the nipples through, but I use a spare spoke through the top of the nipple. Once fully down, I twizzle off the spoke and then use an electric screwdriver to do the rest. Again, you can get a special bit, but I just use a good-fitting flat screw-driver bit.

To publish your photos: Open up a photobucket account, which is free and they don't bombard you with spam etc. You can upload all your photos there, so you can access them from anywhere with internet. Once uploaded, select a photo and theres an image link tab on the right side that offers various links Click on the "img code"box and it says "copied". You then paste that into your forum post and you'll get the photo in full size and detail - free of any restrictions.
 

jerrysimon

Esteemed Pedelecer
Aug 27, 2009
3,292
112
Cambridge, UK
Well done. Building your first wheel gives you a great sense of achievement and the knowledge you can pretty much fix any part of your ebike setup.

Jerry
 

catsnapper

Pedelecer
I guess you can get some sort of tools to thread the nipples through, but I use a spare spoke through the top of the nipple.
A nicely pointed cocktail stick, a sharpened match and a Q-tip with the head cut off at a steep angle are frequently used 'tools' to seat nipples in the rim.
If you plan on doing lots of wheels there are proper tools available for about £10 upwards, but they're often slower to use than the above items....:rolleyes:

Alan
 

103Alex1

Esteemed Pedelecer
Sep 29, 2012
2,228
67
Courtesy of photobucket .... valve hole lowermost.


more attention to optimum assembly, correct and even tension and the frequently discussed and often misunderstood de-stressing - some suggested techniques are closer to de-struction than de-stressing:cool:
Any preferred techniques, Alan ?

I use a spare spoke through the top of the nipple. Once fully down, I twizzle off the spoke and then use an electric screwdriver to do the rest. Again, you can get a special bit, but I just use a good-fitting flat screw-driver bit.
Using spare spoke a good idea ! Managed the first 2 sets with just fingers for the initial lacing, but the 3rd and 4th sets a screwdriver was definitely needed. I just used a regular hand-held one in the absence of any electric screwdrivers in the toolbox :)o).
 

catsnapper

Pedelecer
Any preferred techniques, Alan ?

I use a couple of techniques - the first helps 'fit' the spoke to the hub, the second one is the well known squeezing pairs of spokes - a good pair of leather gardening glove helps doing this, because if you're doing it hard enough to be effective, it HURTS!

This short article sums it all up nicely. It's by a colleague in Seattle who has spent a lifetime developing and improving the technology of wheels.
Wheel Fanatyk: Wheel Building Tip No. 4 - How to Pre-stress Your Wheel
also:
http://wheelfanatyk.blogspot.co.uk/2011/12/wheel-building-tip-no-14-set-spoke-path.html

Alan
 
Last edited:

jerrysimon

Esteemed Pedelecer
Aug 27, 2009
3,292
112
Cambridge, UK
I use a couple of techniques - the first helps 'fit' the spoke to the hub, the second one is the well known squeezing pairs of spokes - a good pair of leather gardening glove helps doing this, because if you're doing it hard enough to be effective, it HURTS!
Yer been there done that and now grab the gardening gloves out the shed :p

Ps I also use the technique of resting the motor hub flange on the bench flat and then putting pressure (not excessive) on the rim progressively moving round the rim as I turn the wheel all the way round, then flip it over and do the same on the other side. You can hear the spokes ping/tingle as the stress comes out. I usually do this a few times during the tensioning up process.

Over the last year I have also invested in a spoke tension gauge which although not essential, usually just confirms that I have equal/correct spoke tension all the way round.


I use the cheaper of those shown the Park Tool model. Certainly not essential but having built quite a few wheels it was nice to confirm with the tool that my builds were pretty good even when I did not own one to check.

I guess I should also take this opportunity to say a public thanks to Alan (catsnapper) for his help over the last couple of years over and above providing me with spokes by giving me lots of advice (many many email exchanges) about building wheels and helping me develop skills in the art of wheel building :)

So many builders often keep everything thing secret as if it is a black art, whereas Alan has been the complete opposite sharing what he knows openly with us new DIY builders.


Jerry
 
Last edited:

catsnapper

Pedelecer
Yer been there done that and now grab the gardening gloves out the shed :p

Ps I also use the technique of resting the motor hub flange on the bench flat and then putting pressure (not excessive) on the rim progressively moving round the rim as I turn the wheel all the way round, then flip it over and do the same on the other side. You can hear the spokes ping/tingle as the stress comes out. I usually do this a few times during the tensioning up process.
Yes, that's quite a good technique to unwind spokes, but maybe less effective at removing stress, I often do it at the last stages of truing. Whatever technique, it's harder to do on small wheels as I'm sure you know!

On the subject of tension meters, I've owned all 3 types including both digital and analogue versions of the FSA. The DT Swiss is quite limited for anything other than DT Swiss spokes.
The digital version of the FSA is my personal favourite, but the Park meter is quite effective for checking consistency of tension and fast to use.

The 'pinging' technique is the cheapest way of checking consistency, if done at the same point on each spoke - assuming you're not tone deaf:cool:
Getting the right level of tension is not so easy and can be a contentious subject amongst wheelbuilders...especially for e-wheels:p

As Jerry comments, some wheelbuilders treat building as a secretive black art - usually means they're fairly clueless about the science of wheels:(
If a builder knows about the way a wheel works and the importance of each stage being done correctly, the more confidence he'll have in the consistency and reliabilty of the wheels.
Plenty of people make reliable wheels with minimal gear - just as some commercial suppliers produce poor quality, even downright dangerous wheels.


Alan
 
Last edited:

103Alex1

Esteemed Pedelecer
Sep 29, 2012
2,228
67
Great - will get my head round how to true the wheel and work on some stress relief too ;)

I'm slightly confused about the disc brake and whether this means the wheel has to be 'dished' ... haven't quite got round to understanding that yet. Is this something I can find out by mounting the brake disc and testing in the dropouts at this stage ?
 

catsnapper

Pedelecer
Great - will get my head round how to true the wheel and work on some stress relief too ;)

I'm slightly confused about the disc brake and whether this means the wheel has to be 'dished' ... haven't quite got round to understanding that yet. Is this something I can find out by mounting the brake disc and testing in the dropouts at this stage ?
Hi Alex,

Dishing is needed when the flanges are not equidistant from the centre of the hub. With all derailleur hubs the right flange sits closer to the centre of the hub than the left flange. It doesn't matter if it's disc or not, that makes little or no difference.
To get the rim centred between the dropouts means that the spokes on the drive(right) side need to be slightly shorter and under higher tension than the left side, as the rim needs to sit closer to the right flange.
If you look at the wheel from the back of the bike, the drive side spokes look 'flatter' than the left side - thats the dishing.

Some people will say it doesn't matter about dishing as you will be using disc rather than rim brakes. Unfortunately this isn't true as the rear wheel needs to track the front as close as possible, to ensure even steering and tyre wear. It will never be perfect, as very few affordable frames will be 100% true, but it's preferable to get it as close as possible.

A few frames designed for very heavy duty have an offset bult into the rear triangle to allow the wheel to be built off centre, with even spokes and tension on both sides(or very close!) to create a stronger wheel.
Some rims are drilled off centre to give a similar result, but this can only be done by a fairly small amount, or the uneven load on the rim will create a whole new set of problems:rolleyes:

For stress relief, don't study the science of wheels:cool:
For me right now, playing with wheels is more relaxing than listening to the mother in law arguing in Spanish with the televison........:(

Alan
 
Last edited:

103Alex1

Esteemed Pedelecer
Sep 29, 2012
2,228
67
OK ... I understand that - thanks. Presumably achieved by simply tightening the spokes slightly more on one side than the other. Cheapest dishing tool I can find on e-bay is a portable Park Tools one for about £28 :)() .. is that likely to be good enough / worthwhile to buy ...

Park Tool WAG5 - portable wheel dishing tool - www.biketart.com

or is there a cheaper way to get it right - at the moment, regular wheelbuilding isn't likely to be a therapy I'll have the opportunity to indulge in :)

For stress relief, don't study the science of wheels:cool:
For me right now, playing with wheels is more relaxing than listening to the mother in law arguing in Spanish with the televison........:(

Alan
Lol.
 

wurly

Esteemed Pedelecer
Aug 2, 2008
501
9
Yeovil, Somerset
One question i have with regard to 'dishing' the wheel. Is there any reason why you can't have the spokes entering the hub holes on the disc brake side and exiting the hub on the freewheel side therefore making the rim more centered without resorting to different length spokes? some bikes need a fair amount of centering which means some of the spokes don't engage a lot of thread if using the same length. I ran into this problem with the last two wheels i built which were rears of course....
 
Last edited:

catsnapper

Pedelecer
One question i have with regard to 'dishing' the wheel. Is there any reason why you can't have the spokes entering the hub holes on the disc brake side and exiting the hub on the freewheel side therefore making the rim more centered without resorting to different length spokes? some bikes need a fair amount of centering which means some of the spokes don't engage a lot of thread if using the same length. I ran into this problem with the last two wheels i built which were rears of course....
Hi Wurly,

Some builders do make wheels with heads in(inside the flange) on the drive side and heads out on the non-drive side to try and improve triangulation, so getting the tension a bit more even.
It's less than ideal as it introduces other problems, plus you still need different length spokes for optimal build quality.

A lot of these problems are worse with e-wheels, as many motors have the flanges even closer together than ordinary bike hubs. Adding on the extra load of the motor, it's not difficult to see why a less than ideal system gives more problems on e-bikes.

OTH, it does ensure my Morizumi spoke machine is kept busy:cool:

Alan
 
D

Deleted member 4366

Guest
You don't need any special dishing tool. You only need a spoke key. You can see by eye when the rim is approximately in the centre of the frame. Do it with the wheel in the frame and the bike upside down.