I have done this as a resource for novices like I am/ was who are attempting their first kit. Someone like me with no relevant tools, who has never even tightened brakes before. You can glean much of the following information on this forum but I wanted to bring it under one thread which would have helped me and saved lots of bother. Terms like bottom bracket, crank puller, chainstay meant nothing to me so I will try to be very basic here.
The TSDZ2 is a crank drive kit meaning it applies the power direct to the spindle which the pedal arms are attached to. This is more efficient than hub (wheel) kits and is better for hills and heavy riders. As its torque based the ride is also smooth and feels more natural akin to having bionic legs.
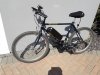
You are going to have to remove the pedal arms and the spindle (bottom bracket) to fit the new motor so there are several things to consider in finding a suitable donor bike. I fitted to a new Voodoo Agwe (same frame as Marasa) as research showed others had done it with no problems.
a) It must have a 68mm or 73mm bottom bracket. You can measure the width of the casing between the pedal arms which houses the bottom bracket and this is the metal bit at the bottom of the bike that connects the frame tubes together and looks a bit like a toilet roll tube. Alternatively look up the spec sheet of your bike and you should be able to find this size info. Its a pretty standard size so you have a good chance of this being correct specially on an older bike.
b) The motor is going to secure into this bottom bracket casing with the bulk hanging below hence this "loo roll" needs to be fairly thin to accommodate it. If your bike is carbon then chances are it will be too fat like a toilet roll quarter full. Some bikes have gear and brake wiring going under this bottom bracket casing with a plastic cable aligner placed here. Its possible you may need to dremel this flatter or remove it and redirect the cables through external cable sheath
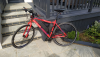
c) Bikes with fatter tyres such as modern mountain bikes tend to have a flared chainstay which will obstruct the motor from fitting. What this means is the horizontal tubing flares out very quickly from the bottom bracket as it goes to the back axle. Place your eye on the seat and look down to the pedals and observe how far the largest chain ring goes back. If the metal tubing going back towards the rear axle flares out much before this point the motor will probably not fit. See pic below for one that was a little tight.
d)The fewer gears in the rear cassette the better. The motor is so powerful you tend to forget to change gears and only use the higher half even on big hills
e) The front derailer and chain rings are going and being replaced by a new single chainring (toothed ring which the chain goes on) so dont worry at all about these
f) The motor and battery are heavy so dont worry about your bike being heavy or light in the first place. The motor will negate whatever weight
g) The general advice is older mountain bikes or modern hybrids will make worthy donors.
To remove the pedal arms you will need an 8mm allen key and a crank puller. I bought this below from halfords and followed this video
 www.halfords.com
The allen key was too flimsy for the task and I had to fashion a lever extension to it using sockets etc. One thing with the crank puller that I noted is you have to screw it well on and not just a few turns. The reason being that you are going to apply quite a bit of force and if only on a few turns it could strip the thread so needs to be secure. You then spin the handle and it closes and forces the pedal arms off.
www.halfords.com
The allen key was too flimsy for the task and I had to fashion a lever extension to it using sockets etc. One thing with the crank puller that I noted is you have to screw it well on and not just a few turns. The reason being that you are going to apply quite a bit of force and if only on a few turns it could strip the thread so needs to be secure. You then spin the handle and it closes and forces the pedal arms off.
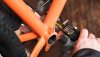
Once the pedal arms are off you need to remove the bottom bracket from its "loo roll" casing. This proved to be an absolute bugger. As this is the only one I have ever done maybe I was unlucky and had the bike that someone had air gunned it on but the effort to remove was extraordinary. I bought a tool from halfords (see below) for use with a 32mm spanner/adjustable spanner and in truth one that connects to a long lever torque wrench would have been much better. In the lockdown I had to make do with what I could find. I had to oil spray the bracket and leave for 10 mins. I then fitted the tool and using a G clamp secured the tool tight to the bracket so the teeth meshed and it didnt slip off whilst I applied force. I then with all my might, feet braced against the bike frame and many attempts managed to get it to loosen and off. Then I had to do it all again on the other side. Beware also that if your bracket isnt the most common British type then it may be reverse thread but chances are you have British thread and basically you loosen both sides in the same direction that the pedals turn to cycle so clockwise from the right side and anticlockwise from the left side.
 www.halfords.com
These tools cost me over £20 for a likely one off use and to be honest if it wasn't during the lockdown I would have gone to a local bike shop and given the lad a drink to remove these bits instead which with professional tools would probably take him just minutes.
I then watched these videos
https://www.youtube.com/watch?v=wThQH5Iy9uQ
I want a pair of those magic white gloves that can dismantle the pedal arms and bottom bracket with no force.
and read whoosh's guide here
Next you slide the motor into the now vacant bottom bracket casing. Mine wouldn't slide in like the YouTube videos show! It stuck half way in. I noticed the cable aligner screw from underneath was protruding slightly into the chamber so i undid it and filed the tip down and then replaced. Motor still wouldn't slide in. I then got some rough sandpaper and using heavy duty cloth duct tape (gorilla tape) stuck it to a very large drill bit. I then curled it round the bit so that it would fit into the bottom bracket casing and when the drill spun up it would flare the paper out and sand the inside.
After a few minutes I tried the motor again and this time it slid in with a bit of wiggling
My bike did have a gear cable and aligner under the bracket casing but the motor just managed to fit on with a fag paper to spare. You may not be so lucky.
I followed the instruction to secure the motor and this went without bother.
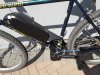
I then offered up the Hailong downtube battery bracket and noticed the bottle tube eyelets were nowhere near where I needed them. I found this next video and copied what he did and drilled into the metal plate
I am also going to add another couple of eyelets for the battery to mount to as it is so godamn heavy I think its best to. This video explains and these are the rivnuts you need
The lead from the motor to connect to the battery is long to accommodate rear rack mounting. I cut the cable shorter and decided to join the wires to the battery not outside but within the metal box part of the battery that we drilled using the following Wago connectors which I had spare. It now looks a real neat wiring job with the wire cable tied to the frame and going straight into the battery rack.
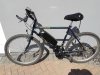
The rest of the install was straightforward as per instructions. Take care not to overtighten any zip ties as you can damage the thin wiring.
You can get into the hidden menu of the controller using the following vid to disable speed limiter if you so desire
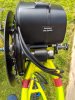
My kit is the 48v 750w with a Hailong 48V 17.5ah battery. Its quite hilly where I live and I didn't want battery anxiety whilst out. I have been out on it all afternoon so this is my early impressions.
The bike with motor and battery is heavy, nearly twice that of my carbon bike and level 1 of assist makes the bike feel like riding my carbon bike, maybe a little easier on hills. I tended to default to level 2 in the end. Level 3 was great for inclines against wind and I could plough on at speed. Level 4 I used for hills and it was a revelation. At first I was tearing up them in really high gear and panting like a dog at the top but later I dropped the gears and took them more leisurely and this is where it really excels. It now feels like you are just cycling a small incline. The last half a dozen miles home I ramped it up to level 4 and it was a pleasure being able to maintain a good constant speed despite the undulating ground. I can imagine for a commuter who just wants to get from A to B quickly this would be very handy
I was pleasantly surprised how quiet the motor was and it only became noticeable when climbing hard. The uptake is very smooth and it has met my expectations, so I cant see me changing the front ring to a bigger one or modding the firmware like others do. I prefer riding with the speed limiter raised by a couple of mph not because I am a speed demon but I found assist coming in and out a lot as I seem to hover around the 15mph mark. It wasn't that it was jerky or anything it just "felt" more pleasant being under slight assist all the time. I really didnt use the gears much at all and stayed in 2nd from top most of the time. Even pulling away in this gear was easy and on the steepest hill I didn't drop below gear 5 of 10. When I returned battery was half depleted. Bike in shed now so not sure how many miles, 35 at a guess
Hope all this helps at least one person take the plunge.
The TSDZ2 is a crank drive kit meaning it applies the power direct to the spindle which the pedal arms are attached to. This is more efficient than hub (wheel) kits and is better for hills and heavy riders. As its torque based the ride is also smooth and feels more natural akin to having bionic legs.
You are going to have to remove the pedal arms and the spindle (bottom bracket) to fit the new motor so there are several things to consider in finding a suitable donor bike. I fitted to a new Voodoo Agwe (same frame as Marasa) as research showed others had done it with no problems.
a) It must have a 68mm or 73mm bottom bracket. You can measure the width of the casing between the pedal arms which houses the bottom bracket and this is the metal bit at the bottom of the bike that connects the frame tubes together and looks a bit like a toilet roll tube. Alternatively look up the spec sheet of your bike and you should be able to find this size info. Its a pretty standard size so you have a good chance of this being correct specially on an older bike.
b) The motor is going to secure into this bottom bracket casing with the bulk hanging below hence this "loo roll" needs to be fairly thin to accommodate it. If your bike is carbon then chances are it will be too fat like a toilet roll quarter full. Some bikes have gear and brake wiring going under this bottom bracket casing with a plastic cable aligner placed here. Its possible you may need to dremel this flatter or remove it and redirect the cables through external cable sheath
c) Bikes with fatter tyres such as modern mountain bikes tend to have a flared chainstay which will obstruct the motor from fitting. What this means is the horizontal tubing flares out very quickly from the bottom bracket as it goes to the back axle. Place your eye on the seat and look down to the pedals and observe how far the largest chain ring goes back. If the metal tubing going back towards the rear axle flares out much before this point the motor will probably not fit. See pic below for one that was a little tight.
d)The fewer gears in the rear cassette the better. The motor is so powerful you tend to forget to change gears and only use the higher half even on big hills
e) The front derailer and chain rings are going and being replaced by a new single chainring (toothed ring which the chain goes on) so dont worry at all about these
f) The motor and battery are heavy so dont worry about your bike being heavy or light in the first place. The motor will negate whatever weight
g) The general advice is older mountain bikes or modern hybrids will make worthy donors.
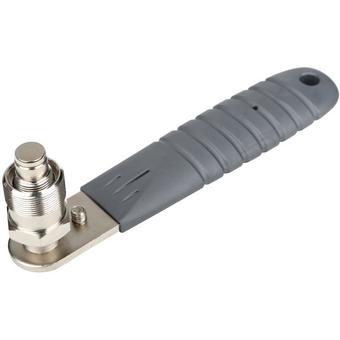
To remove the pedal arms you will need an 8mm allen key and a crank puller. I bought this below from halfords and followed this video
Halfords Professional Crank Extractor | Halfords UK
Shop the latest The Halfords Professional Crank Extractor is for square tapers and splined cranks. at Halfords UK
www.halfords.com
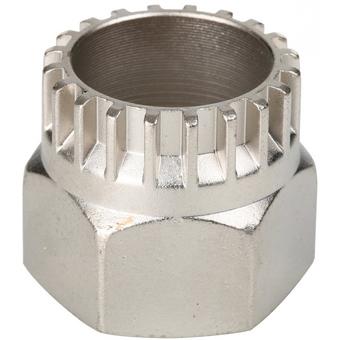
Once the pedal arms are off you need to remove the bottom bracket from its "loo roll" casing. This proved to be an absolute bugger. As this is the only one I have ever done maybe I was unlucky and had the bike that someone had air gunned it on but the effort to remove was extraordinary. I bought a tool from halfords (see below) for use with a 32mm spanner/adjustable spanner and in truth one that connects to a long lever torque wrench would have been much better. In the lockdown I had to make do with what I could find. I had to oil spray the bracket and leave for 10 mins. I then fitted the tool and using a G clamp secured the tool tight to the bracket so the teeth meshed and it didnt slip off whilst I applied force. I then with all my might, feet braced against the bike frame and many attempts managed to get it to loosen and off. Then I had to do it all again on the other side. Beware also that if your bracket isnt the most common British type then it may be reverse thread but chances are you have British thread and basically you loosen both sides in the same direction that the pedals turn to cycle so clockwise from the right side and anticlockwise from the left side.
Halfords Bottom Bracket Tool | Halfords UK
Shop the latest The Halfords Bottom Bracket Tool is precision CNC manufactured. at Halfords UK
www.halfords.com
These tools cost me over £20 for a likely one off use and to be honest if it wasn't during the lockdown I would have gone to a local bike shop and given the lad a drink to remove these bits instead which with professional tools would probably take him just minutes.
I then watched these videos
https://www.youtube.com/watch?v=wThQH5Iy9uQ
I want a pair of those magic white gloves that can dismantle the pedal arms and bottom bracket with no force.
and read whoosh's guide here
Next you slide the motor into the now vacant bottom bracket casing. Mine wouldn't slide in like the YouTube videos show! It stuck half way in. I noticed the cable aligner screw from underneath was protruding slightly into the chamber so i undid it and filed the tip down and then replaced. Motor still wouldn't slide in. I then got some rough sandpaper and using heavy duty cloth duct tape (gorilla tape) stuck it to a very large drill bit. I then curled it round the bit so that it would fit into the bottom bracket casing and when the drill spun up it would flare the paper out and sand the inside.
After a few minutes I tried the motor again and this time it slid in with a bit of wiggling
My bike did have a gear cable and aligner under the bracket casing but the motor just managed to fit on with a fag paper to spare. You may not be so lucky.
I followed the instruction to secure the motor and this went without bother.
I then offered up the Hailong downtube battery bracket and noticed the bottle tube eyelets were nowhere near where I needed them. I found this next video and copied what he did and drilled into the metal plate
I am also going to add another couple of eyelets for the battery to mount to as it is so godamn heavy I think its best to. This video explains and these are the rivnuts you need
M5 Grooved Serrated Steel Large Head Rivnuts - Rivet Nuts - Nutserts - Blind Nuts - Pack of 10: Amazon.co.uk: DIY & Tools
Shop M5 Grooved Serrated Steel Large Head Rivnuts - Rivet Nuts - Nutserts - Blind Nuts - Pack of 10. Free delivery on eligible orders of £20 or more.
www.amazon.co.uk
The lead from the motor to connect to the battery is long to accommodate rear rack mounting. I cut the cable shorter and decided to join the wires to the battery not outside but within the metal box part of the battery that we drilled using the following Wago connectors which I had spare. It now looks a real neat wiring job with the wire cable tied to the frame and going straight into the battery rack.
The rest of the install was straightforward as per instructions. Take care not to overtighten any zip ties as you can damage the thin wiring.
You can get into the hidden menu of the controller using the following vid to disable speed limiter if you so desire
My kit is the 48v 750w with a Hailong 48V 17.5ah battery. Its quite hilly where I live and I didn't want battery anxiety whilst out. I have been out on it all afternoon so this is my early impressions.
The bike with motor and battery is heavy, nearly twice that of my carbon bike and level 1 of assist makes the bike feel like riding my carbon bike, maybe a little easier on hills. I tended to default to level 2 in the end. Level 3 was great for inclines against wind and I could plough on at speed. Level 4 I used for hills and it was a revelation. At first I was tearing up them in really high gear and panting like a dog at the top but later I dropped the gears and took them more leisurely and this is where it really excels. It now feels like you are just cycling a small incline. The last half a dozen miles home I ramped it up to level 4 and it was a pleasure being able to maintain a good constant speed despite the undulating ground. I can imagine for a commuter who just wants to get from A to B quickly this would be very handy
I was pleasantly surprised how quiet the motor was and it only became noticeable when climbing hard. The uptake is very smooth and it has met my expectations, so I cant see me changing the front ring to a bigger one or modding the firmware like others do. I prefer riding with the speed limiter raised by a couple of mph not because I am a speed demon but I found assist coming in and out a lot as I seem to hover around the 15mph mark. It wasn't that it was jerky or anything it just "felt" more pleasant being under slight assist all the time. I really didnt use the gears much at all and stayed in 2nd from top most of the time. Even pulling away in this gear was easy and on the steepest hill I didn't drop below gear 5 of 10. When I returned battery was half depleted. Bike in shed now so not sure how many miles, 35 at a guess
Hope all this helps at least one person take the plunge.
Last edited by a moderator: