

Hello, I have been trying to install the kit today and enjoying it for the most part until that is I tried to install the PAS sensor. I don;t have Hollowtech 2 but do have Hollowtech 1 on a square taper BB. Problem is that when i fit the PAS and tighten the crank arm it gets so tightly jammed against the PAS that i can hardly turn the pedals. It seems like there isn't enough length on the BB arm to affix both the PAS and crank, can anyone help?
Yosepower hub kits.
- Thread starter Nealh
- Start date
I thought Hollowtech 1 was an octalink not square taper bottom bracket. Either way you will need a new longer bottom bracket to use the pas sensor you have or you need to buy a different sensor.
Thanks for your reply. It says hollowtech on the crank but it's from the late 90s so maybe it's not true hollowtech. It's definitely a square taper though. I wasn't aware that you could buy longer bottom brackets, I thought they just came as standard size according to the width not length.I thought Hollowtech 1 was an octalink not square taper bottom bracket. Either way you will need a new longer bottom bracket to use the pas sensor you have or you need to buy a different sensor.
Thanks for the tip, I'll give that a shot.You can grind 3 - 5 mm off the inside of the boss that goes onto the square taper to make a bit more room. It won't make any difference to the stability of the pedal arm.
That's very kind indeed but think I've just about got there. If I do hit another snag I'll be in contact. Have just fitted a wider bottom bracket and now thinking creatively to try and get the controller pack onto my gt frameKlang, if you need any practical assistance with your build, I'd be happy to help, I'm 5 mins drive from Westpoint Arena.
")
Right so I finally got the kit all set after some tinkering with the donor bike (perfectionist). I couldn't get the PAS to fit as work the wider bottom bracket my front derailleur no longer reached top gear at the front, which won't do at all!
Only had a short ride around locally but feels good and will fit the purpose (load carrier for shops etc.). Would have liked PAS but got my eye out now for a decent 2nd hand bike to fit the kit to. I might also be tempted by a mid drive in the future but have to be content for now.
Only question now is what do all the controller settings mean? Managed to get P4 setting at 0 in order to use throttle only (thanks nealh) but what about all the other stuff I. E c, p etc. Is there are manual somewhere?
Thanks Nealh, will do as soon as the battery is chargedJust list all your P & C settings for us look over, but generally they should be pre set.
Anyone know of a slimline PAS sensor that would work with the kit?
This is the thinnest pas disc you will find, the connectors you will have to cut off to solder and shrink the wires.

UK Electric Bike Steel PAS Pedal Assist Cadence Sensor 5/8/12 Magnet Ebike Parts | eBay
Electric Bike PAS Pedal Assist Sensor 5/8/12 Magnet Power Assist E-bike Ebike. Mount on electric bicycle pedal, easy to install. Suitable for most of electric bicycle s. 1 set of electric bicycle assistant sensor.
www.ebay.co.uk
Thanks Nealh that's very useful. I am not quite sure how to do the cutting and soldering but i do have a solder iron and so it's time for some practice whilst the PAS is in the post!This is the thinnest pas disc you will find, the connectors you will have to cut off to solder and shrink the wires.
UK Electric Bike Steel PAS Pedal Assist Cadence Sensor 5/8/12 Magnet Ebike Parts | eBay
Electric Bike PAS Pedal Assist Sensor 5/8/12 Magnet Power Assist E-bike Ebike. Mount on electric bicycle pedal, easy to install. Suitable for most of electric bicycle s. 1 set of electric bicycle assistant sensor.www.ebay.co.uk
You will need heatshrink tube.
Before soldering you have to identify the wire sequence correctly other wise it won't work. In the one I linked to the Blue is signal, Yellow gnd and red 5v.
Before soldering you have to slide a large size of heat shrink up the wire out of the way and then as you do each single wire slip a small size up out of the way then solder before covering the joint with shrink and then lightly touch it with hot side of the solder iron (not the tip). Once all three wires are joined slide the larger piece down to cover all and shrink again.
Thanks Neal really appreciate that detailed instruction and not something I would have realised on my own accord. I am actually experimenting with a more physical solution by seeing if i can either make the bottom bracket cup flush with the frame or failing that finding a way to make the derailleur pretrude more in the first place. I will report back if i make any headway with either strategy.You will need heatshrink tube.
Before soldering you have to identify the wire sequence correctly other wise it won't work. In the one I linked to the Blue is signal, Yellow gnd and red 5v.
Before soldering you have to slide a large size of heat shrink up the wire out of the way and then as you do each single wire slip a small size up out of the way then solder before covering the joint with shrink and then lightly touch it with hot side of the solder iron (not the tip). Once all three wires are joined slide the larger piece down to cover all and shrink again.
I don't know if this will work on your frame.slimline PAS
KT-D12L/KT-D12R Dual Hall Sensor Signals Easy Installation With 3pins Julet WP Plug [KT-D12L/R waterproof connector] - $6.42 : Zen Cart!, The Art of E-commerce
Zen Cart! KT-D12L/KT-D12R Dual Hall Sensor Signals Easy Installation With 3pins Julet WP Plug [KT-D12L/R waterproof connector] - ★★★★★ KT-D12L/KT-D12R Dual Hall Sensor Signals Easy Installation With 3pins Waterproof connector1.Offers higher accuracy and further detection distance 2.Easy...
www.topbikekit.com
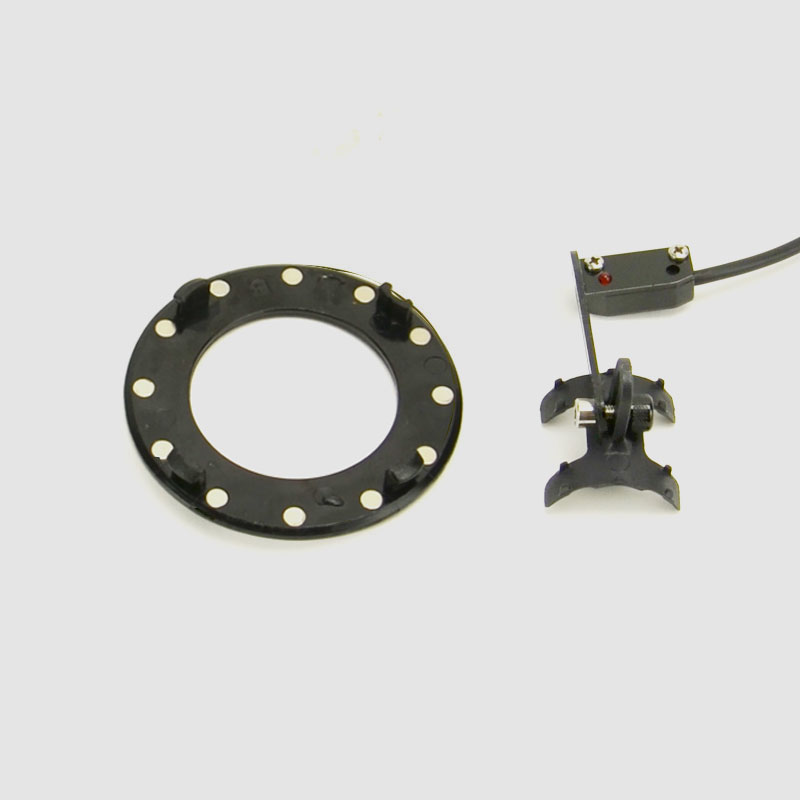
PAS I use as mentioned a few pages back + theres a link to a full manual a few pages back or check your email spam folder YOSE should have emailed you a full manual - the above PAS has a large dia disk about 100mm it's about 5mm thick with a metal ring the disk is also split into two parts to save having to remove parts and clipped together by the metal ring, this method is a good solid design tried and tested by many.
Thanks for this feedback, i had actually started to come to this conclusion myself. I measure the YOSE power PAS to be 6mm thick and so that is the sort of distance I need to find. I tried a wider BB, which worked for the sensor but threw off my Crankset so much i couldn't get into top gear. My latest thought is to put this wider BB back on and put my current 44T chainring on the inside of the gear where the 32t currently sits. I would then just run it as a single chainring at the front. There is a possibility I have missed something again but I can only give it a go and see. My only other avenue is to try and modify the BB cup on the left so it is flush with the frame and the sensor can sit there without getting in the way. Not sure on this one yet, need to look into it more.I don't know if this will work on your frame.
KT-D12L/KT-D12R Dual Hall Sensor Signals Easy Installation With 3pins Julet WP Plug [KT-D12L/R waterproof connector] - $6.42 : Zen Cart!, The Art of E-commerce
Zen Cart! KT-D12L/KT-D12R Dual Hall Sensor Signals Easy Installation With 3pins Julet WP Plug [KT-D12L/R waterproof connector] - ★★★★★ KT-D12L/KT-D12R Dual Hall Sensor Signals Easy Installation With 3pins Waterproof connector1.Offers higher accuracy and further detection distance 2.Easy...www.topbikekit.com
PAS I use as mentioned a few pages back + theres a link to a full manual a few pages back or check your email spam folder YOSE should have emailed you a full manual - the above PAS has a large dia disk about 100mm it's about 5mm thick with a metal ring the disk is also split into two parts to save having to remove parts and clipped together by the metal ring, this method is a good solid design tried and tested by many.
If it helps, you should be fine running just a single 44T chainwheel, unless you are riding steep trails.
I know it's a daft price, and install requires drilling & tapping of the BB frame area, but this one will work flawlessly with your standard BB
 www.ebike-solutions.com
[/QUOTE]
www.ebike-solutions.com
[/QUOTE]
Octalink cadence sensor set
The Octalink Cadence Sensor Set is available for: 1. for triple cranks with 22T small chain ring the included PAS disc can be clipped to the…
Thanks that does help. Using Bike calc and with my rear 11-32 cassette is puts the range at 9.6mph to 27.9 mph so with assist at the lower end that should just about work.If it helps, you should be fine running just a single 44T chainwheel, unless you are riding steep trails.
[/QUOTE]I know it's a daft price, and install requires drilling & tapping of the BB frame area, but this one will work flawlessly with your standard BB
Octalink cadence sensor set
The Octalink Cadence Sensor Set is available for: 1. for triple cranks with 22T small chain ring the included PAS disc can be clipped to the…
Thanks for that, it is a bit pricey for what you get but if I can't bodge it some way i will look to this option.
Related Articles
-
 Swytch announce new conversion kit with ‘pocket-sized’ battery
- Started by: Pedelecs
-
 New Swytch launches on Indiegogo, raises £100k in first hour
- Started by: Pedelecs
-
 Swytch to unveil 70% smaller, 50% lighter conversion kit
- Started by: Pedelecs