
Once it goes green its best to disconnect it.Many thanks for the info the battery charger had me puzzled..how long does it take normally for yours to reach full charge once it starts alternating? The charger is a bit of a brick isn't it!?
Do you know if it's safe to leave the battery on for longer once the LED is permanently green?
Self-build bike nearing completion..couple of questions
- Thread starter morphix
- Start date
First test ride!
Well I couldn't wait and decided to take the bike out early this morning for a quick test ride before I had fitted the pedal assist sensor... Ruddy hell it was cold. Wish I had taken my gloves my hands were froze!
Anyway back to the test ride... I tried pedaling the bike without any power in first gear just to see how it felt..wasn't too bad at all, no major effort to pedal.
Powered up the LCD and put it into auto then tried the throttle but released it too quickly. The motor lurched the bike forward and stopped with a jolt which took me by surprise. I took it onto a quiet bus route lane and let the throttle go to the max and the speed was showing 23km/h (about 14mph) but strangely it seemed a bit faster. No sooner had I got onto the bus route lane than the most annoying squeaking starting, really loud! I think it might of been the front right-side brake shoe rubbing but will have to investigate.
Before I headed back I decided to try it up a very steep hill near my flat. It made it up there on full throttle without pedaling. It got progressively slower as the hill got steeper, but was still faster than walking and about the same speed as the previous electric bike I tested on the same hill (also a 250W 36v bike).
On the hill test the 5Ah battery indicator dropped from full to one bar but then returned to full power once I reached the top. Going downhill the speed was showing as 24km/h with throttle fully open, and 27km/h with a bit of pedaling in 7th gear. Not sure how accurate the speed read out is as it seemed MUCH faster.
I spent a few minutes around an industrial estate but didn't stay out long on account of it being so damn cold. Not to mention the squeaking was starting to get embarrassing and attracting a few looks :-[] But squeaking aside, it felt exhilarating to be back on an electric bike again after 2 months. I've really missed it. All in all I'm very pleased with the performance and it feels very nippy. Will be interesting to see how the pedal assist works out, it has 7 different power levels of assistance so should be quite economical in terms of battery power management with my smaller battery.
Here are a couple of pics...


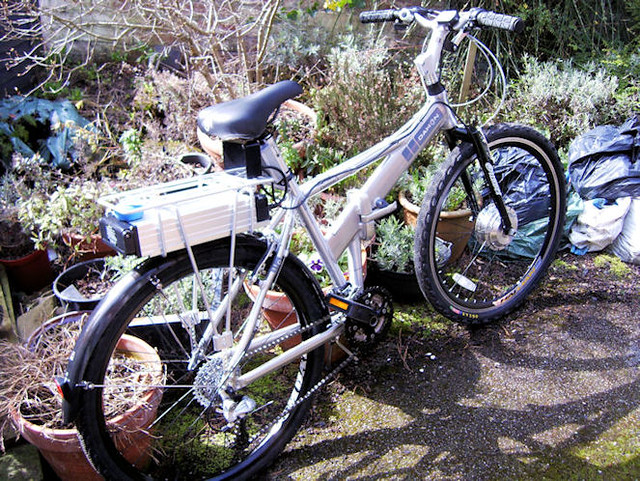
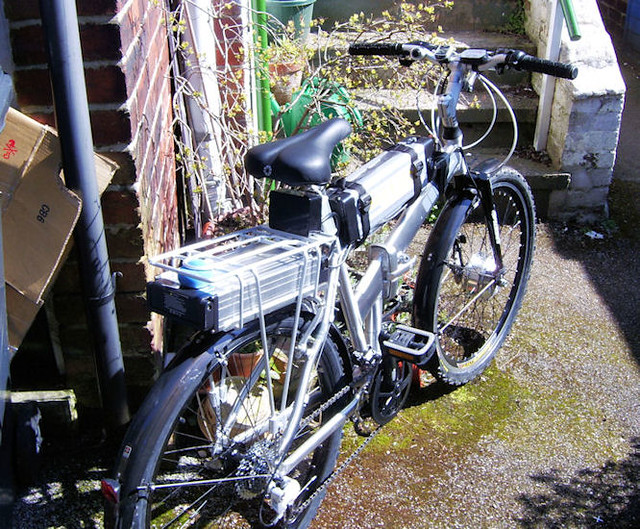
I ended up mounting the battery and controller on the handlebars for the test ride as the bag I'm using isn't suitable for behind the seat mounting which is where I planned to put it..there's too much weigh for this particular bag and it hangs too low so I'm going to either fit a seat post rack or look for a better bag with a quick release mount, or maybe just stick with the handlebar bag. As it turned out, having all the weight on the front (around 2kg from the bag) hardly effected steering and handling. It also has the added benefit of looking a lot neater and inconspicuous. If it wasn't for the whacking great motor on the front wheel, you wouldn't even know it's an electric bike!
Still a bit of work to do on the bike.. I'm going to get rid of the cheapo Chinese tyres and fit some Schwalbe puncture proof. Mudguards, seat post rack and chain guard all to be fitted.
Total weight of the bike with battery is 20.6kg so far.
Well I couldn't wait and decided to take the bike out early this morning for a quick test ride before I had fitted the pedal assist sensor... Ruddy hell it was cold. Wish I had taken my gloves my hands were froze!
Anyway back to the test ride... I tried pedaling the bike without any power in first gear just to see how it felt..wasn't too bad at all, no major effort to pedal.
Powered up the LCD and put it into auto then tried the throttle but released it too quickly. The motor lurched the bike forward and stopped with a jolt which took me by surprise. I took it onto a quiet bus route lane and let the throttle go to the max and the speed was showing 23km/h (about 14mph) but strangely it seemed a bit faster. No sooner had I got onto the bus route lane than the most annoying squeaking starting, really loud! I think it might of been the front right-side brake shoe rubbing but will have to investigate.
Before I headed back I decided to try it up a very steep hill near my flat. It made it up there on full throttle without pedaling. It got progressively slower as the hill got steeper, but was still faster than walking and about the same speed as the previous electric bike I tested on the same hill (also a 250W 36v bike).
On the hill test the 5Ah battery indicator dropped from full to one bar but then returned to full power once I reached the top. Going downhill the speed was showing as 24km/h with throttle fully open, and 27km/h with a bit of pedaling in 7th gear. Not sure how accurate the speed read out is as it seemed MUCH faster.
I spent a few minutes around an industrial estate but didn't stay out long on account of it being so damn cold. Not to mention the squeaking was starting to get embarrassing and attracting a few looks :-[] But squeaking aside, it felt exhilarating to be back on an electric bike again after 2 months. I've really missed it. All in all I'm very pleased with the performance and it feels very nippy. Will be interesting to see how the pedal assist works out, it has 7 different power levels of assistance so should be quite economical in terms of battery power management with my smaller battery.
Here are a couple of pics...
I ended up mounting the battery and controller on the handlebars for the test ride as the bag I'm using isn't suitable for behind the seat mounting which is where I planned to put it..there's too much weigh for this particular bag and it hangs too low so I'm going to either fit a seat post rack or look for a better bag with a quick release mount, or maybe just stick with the handlebar bag. As it turned out, having all the weight on the front (around 2kg from the bag) hardly effected steering and handling. It also has the added benefit of looking a lot neater and inconspicuous. If it wasn't for the whacking great motor on the front wheel, you wouldn't even know it's an electric bike!
Still a bit of work to do on the bike.. I'm going to get rid of the cheapo Chinese tyres and fit some Schwalbe puncture proof. Mudguards, seat post rack and chain guard all to be fitted.
Total weight of the bike with battery is 20.6kg so far.
Last edited:
Nice job 
I love seeing posters first pictures of their conversions. The first test ride is always fun.
This is the first conversion of a full size folding bike I have seen. I assume that the controller is in the front bag as well. A quick release bag (look at Klickfix options) would be a good idea and you could even use an umbilical plug for all the connections like shown below to make the whole affair plug and play.
Details here
Do you have cutout brake(s) ? (actually looking at the pics again it looks like you do have them)
If not you might also want to consider an isolater switch to kill the power.
Ride and enjoy it!
BTW did you fit the torque washers ?
Regards
Jerry
Last edited:
Morphix, you may need to calibrate your speedo for the wheel circumference, for 26" it's something like 2075mm. If thats OK make sure the brakes are not rubbing which could slow you down and one last tip, try to keep the speed of the bike when climbing hills above ~7mph as below this efficency drops rapidly and the motor / controller turn the availably energy into heat rather than forward motion....its typically in circumstances like this that controllers can fail.
Nice job
I love seeing posters first pictures of their conversions. The first test ride is always fun.
This is the first conversion of a full size folding bike I have seen. I assume that the controller is in the front bag as well. A quick release bag (look at Klickfix options) would be a good idea and you could even use an umbilical plug for all the connections like shown below to make the whole affair plug and play.
Details here
Do you have cutout brake(s) ? (actually looking at the pics again it looks like you do have them)
If not you might also want to consider an isolater switch to kill the power.
Ride and enjoy it!
BTW did you fit the torque washers ?
Regards
Jerry
Hi Jerry, you're right the controller is in the bag with the battery..it's only a little controller..the bag is the perfect size and only cost a fiver off eBay. I also managed to cram all the cabling in there but it's very messy and will need sorting out.
I agree with you on the umbilical plug, that would significantly reduce the amount of connectors and cable. A "plug and play" set-up is definitely the way to go for easier removal when parking.
Although the controller has support for cut-out brakes, they're not needed with this controller apparently as it cuts out very quickly when you either let go of the throttle or stop pedalling (less than a second it claims). I had no problems earlier on my test ride it does seem like an instant cut-out and normal braking works fine.
I haven't done the torque washers yet I had to order a set of files which probably will be here later today. Finding a round file the right size for the washer was impossible, they're all too small! I looked at your thread link yesterday and saw you mentioned there's 3 ways to go about this. I'm a bit nervous about filing the drop-outs never having done anything like this before and not being the engineering type. I would probably favour doing the washers as I think its only a mm or two and shouldn't affect the strength of them.. hmm. I haven't been able to find any suppliers of these washers online still which is a pity.
Be interesting to see how well the pedal assist works once I get that sensor in and also how well this 5Ah performs distance wise eh. It might be too wet the weekend to go far but when i get a dry day I will put it through it's paces and report back!
Ah, of course. I did set the 26" wheel size on the LCD menu but there was a second option for the tyre size I think which I had left on the first setting. I just checked again and I have 2.1" tyres so I adjusted the setting. I wonder how much difference that will make..Morphix, you may need to calibrate your speedo for the wheel circumference, for 26" it's something like 2075mm. If thats OK make sure the brakes are not rubbing which could slow you down and one last tip, try to keep the speed of the bike when climbing hills above ~7mph as below this efficency drops rapidly and the motor / controller turn the availably energy into heat rather than forward motion....its typically in circumstances like this that controllers can fail.
The brakes were indeed rubbing badly! I've had to adjust them, should of checked properly before going out any distance but they looked ok.
Thanks for the tip about the hill climbing speed I will remember that!
Jerry, do you cycle in the rain much and how does your bag cope is it water resistant? This is one thing which worried me a bit..I was looking for a waterproof bag and contacted a few companies.. one German manufacturer of bags told me that no bags are 100% waterproof due to all the stitching, so to take any claims with a pinch of salt.. They recommended I put the battery and controller inside a "dry bag" which can then go inside the mounted bag..
I found this manufacturer of dry bags in the UK they only cost a couple of quid, don't know of that is of any interest..I'm going to order one and see if it will fit my kit.
Lightweight Dry Bags from Lomo UK
I found this manufacturer of dry bags in the UK they only cost a couple of quid, don't know of that is of any interest..I'm going to order one and see if it will fit my kit.
Lightweight Dry Bags from Lomo UK
handlebar space
One thing I did have a problem with was fitting the LCD and throttle onto the handlebar. Being a folding bike it had a shorter handlebar and the twist gears eat up a lot of space so I couldn't fit the throttle on the right side where I wanted it.. My solution was to remove the bell and put it on the left side where the LCD panel is..

This meant leaving the bell off so I bought a cheap handlebar organizer which I had planned to fit to take the LCD off the handlebar to make room for the bell.. but as it turned out I didn't need the organizer and I have just put the bell on the right center which seems to work well..

Of course it would of been a lot easier just to use smaller handlebar grips, but I've grown rather attached to the ones I bought as they are very comfortable
and look better.
One thing I did have a problem with was fitting the LCD and throttle onto the handlebar. Being a folding bike it had a shorter handlebar and the twist gears eat up a lot of space so I couldn't fit the throttle on the right side where I wanted it.. My solution was to remove the bell and put it on the left side where the LCD panel is..
This meant leaving the bell off so I bought a cheap handlebar organizer which I had planned to fit to take the LCD off the handlebar to make room for the bell.. but as it turned out I didn't need the organizer and I have just put the bell on the right center which seems to work well..
Of course it would of been a lot easier just to use smaller handlebar grips, but I've grown rather attached to the ones I bought as they are very comfortable
and look better.
Last edited:
Nice DIY job morphix, I did a similar conversion last year with my Dahon 26” wheel folder.
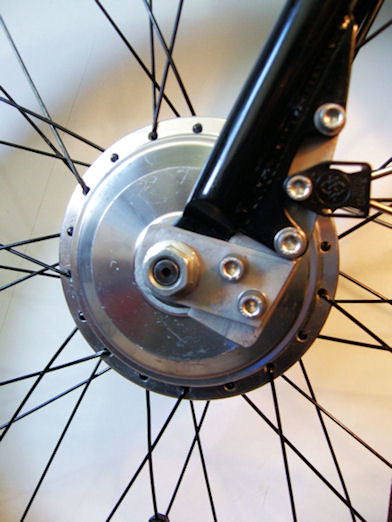
I was surprised to see the motor power cable enters from the left hand side on your system as most of the hub motors I have come across have the supply lead entering from the right.
Chris
I was surprised to see the motor power cable enters from the left hand side on your system as most of the hub motors I have come across have the supply lead entering from the right.
Chris
Hi Chris, thanks. Great bike. I actually planned to buy an Espresso myself as it seemed the ideal bike to convert.. but then I spotted this Chinese copy of the Espresso which was considerably cheaper so I took a gamble and got one. The frame is all that's good about it, so I'm upgrading nearly everything else.Nice DIY job morphix, I did a similar conversion last year with my Dahon 26” wheel folder.
I was surprised to see the motor power cable enters from the left hand side on your system as most of the hub motors I have come across have the supply lead entering from the right.
Chris
Funny you should mention the motor cable.. I too have noticed most are on the right so that is how I fitted mine...I was sat on the bike in my flat to test out the electrics and planned to go a couple of meters along the living-room on low throttle.. I nearly ended up going out the window as the bloody thing went in reverse! I soon realised I needed to flip over the wheel :-}
P.S. Have you got enough power there Chris??! Hehe do you cover long distances or have a high power motor? I see you changed your forks too.
Last edited:
My frame and the forks are made from steel I'm told..I don't know whether that is normal steel or some kind of steel alloy. The bike itself weighs 14.5kg which is quite light for a full size bike. The fit in the drop outs is very snug indeed, so perhaps that and the steel forks will be sufficient with the drop out washers. But if not, Jerry can say told you so! I rather like his Alien kit solution it doesn't look amateurish like some I've seen.Depends upon your frame material. My similar motor is a snug fit into the cutouts of a steel frame and I'm happy without washers. If the fit is less good, or the forks are ally, then I would consider washers. No need for torque arms at 250W unless your frame is made of cheese IME.
Last edited:
More than I would like toJerry, do you cycle in the rain much and how does your bag cope is it water resistant?
I pretty much commute every day unless its below 3 oC or snow is around. This year that has amounted to about 2 weeks already (but a lot of Dec last). On the plus cycled nearly every day since mid Jan
The Brompton bag comes with an elasticated fluorescent cover. I simply whip that out and put it over the bag/cables. Never had any problems with the electrics in the rain so far, touch wood.
Regards
Jerry
Yes filing the washers would be better, though that assumes there is enough material left on them once you have done it.I haven't done the torque washers yet I had to order a set of files which probably will be here later today. Finding a round file the right size for the washer was impossible, they're all too small! I looked at your thread link yesterday and saw you mentioned there's 3 ways to go about this. I'm a bit nervous about filing the drop-outs never having done anything like this before and not being the engineering type. I would probably favour doing the washers as I think its only a mm or two and shouldn't affect the strength of them.. hmm. I haven't been able to find any suppliers of these washers online still which is a pity.
Regards
Jerry
Help! Sensor problems
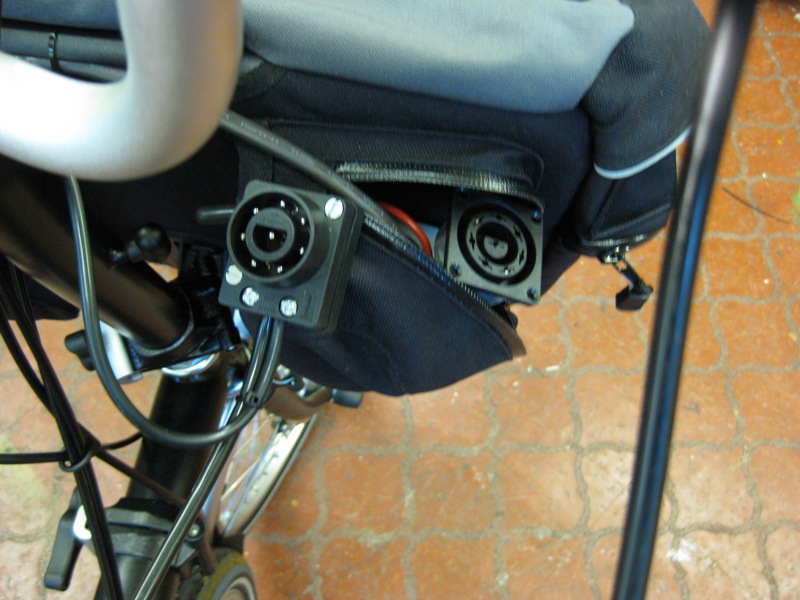
I have just taken the crank arm off with the help of my little crank puller but I'm completely stumped as to how to attach the sensor.

I think I understand where it needs to go, which if I'm right, is where I'm holding it in the picture below? But how do you get it to stay in that position? As soon as you put the magnetic disk on the sensor flies off towards it because there's nothing keeping it in place... sorry if this sounds dumb, but all I have are German instructions which are pretty useless!

Unless it goes BEHIND the black part I'm holding it against...but if so, how on earth would you remove that part..is there a special tool?
If anyone can shed any light on this I'd appreciate it.
I have just taken the crank arm off with the help of my little crank puller but I'm completely stumped as to how to attach the sensor.
I think I understand where it needs to go, which if I'm right, is where I'm holding it in the picture below? But how do you get it to stay in that position? As soon as you put the magnetic disk on the sensor flies off towards it because there's nothing keeping it in place... sorry if this sounds dumb, but all I have are German instructions which are pretty useless!
Unless it goes BEHIND the black part I'm holding it against...but if so, how on earth would you remove that part..is there a special tool?
If anyone can shed any light on this I'd appreciate it.
Last edited:
Hi wrong side undo the nut and put on the sensor replace the nut
yes it is a tool but I normally tap round with a screw driver or use pipe wrench
Frank
yes it is a tool but I normally tap round with a screw driver or use pipe wrench
Frank
Last edited:
Aha many thanks Frank. I will try your method and see how I go.Hi wrong side undo the nut and put on the sensor replace the nut
yes it is a tool but I normally tap round with a screw driver or use pipe wrench
Frank
That is what makes this forum so great..always someone knowledgeable on hand to answer any problem!
OK morphix, I bought my Dahon Espresso as a manufactures return. It was a new bike but had problem with the folding being stiff, so it was £100 from Rutland Cycles. I had the Bafang 8fun hub from a previous build. Yes I have changed the forks to Gusset Cr-Mo Straight Blade 26", as I was not happy with the metal around the dropouts of the Dahon’s. I bought the second battery cheap on ebay, both batteries can be run in parallel to extend the range. I live in very hill surroundings and have to use the motor on full power most of the way up the hills. It’s a 250W hub and only a small 12A controller but I found that with a single battery the voltage does sag under load, but not so with both batteries.
OK on your reverse hub rotation! That could have been a nasty accident. Anyhow it looks like a good well built project, all the best with pedal sensor, and the torque washers. I made a torque arm for mine, but it’s may be a bit OTT.
OK on your reverse hub rotation! That could have been a nasty accident. Anyhow it looks like a good well built project, all the best with pedal sensor, and the torque washers. I made a torque arm for mine, but it’s may be a bit OTT.
The special tool is called a C spanner, here's an adjustable one for example.Unless it goes BEHIND the black part I'm holding it against...but if so, how on earth would you remove that part..is there a special tool?
Like Frank, most people knock them round with a screwdriver or drift.
.
Thanks Flecc, something to add to my growing toolbox.The special tool is called a C spanner, here's an adjustable one for example.
Like Frank, most people knock them round with a screwdriver or drift.
.
Sensor Success!
I managed to get that crank fixture off with the old hammer and screwdriver method, came off very easily. I put the sensor behind it and put it back on and tightened up the same way I took it off.. put the magnetic disk in place as close as possible about 1mm gap then re-assembled the crank arm.

View from front, mounted the sensor on right side to avoid messing with the chainset.

View from below showing the sensor and magnetic disk in very close proximately. Note the L and R (left and right) on the magnetic disk, it has to face the correct way.
Powered up the system with the bike upside down, put it into pedal assist mode on lowest setting and gave the pedal a good turn and viola, the motor kicked in. I can't do a proper test yet as the cable from sensor is too short to reach the bag at front of bike, it's obviously intended for a rear set up. I'm not sure at this stage whether I will shift everything to the back, but either way my wiring needs tidying so I'm on the look out for some neater connectors and cable..
Happy to have got this far though without any real problems.. thanks for all the help I've received today from everyone! Before I started this it seemed quite a daunting project but it's not too difficult at all really and hasn't cost me much in the way of tools and bits.
Oh not sure if I mentioned..when I got my battery it came FedEx and I got hit with tax and import duty but it was only £5.87 plus a £10 "handling fee" to FedEx. The 36v 5A batteries cost just under £80 each as a special order.
I managed to get that crank fixture off with the old hammer and screwdriver method, came off very easily. I put the sensor behind it and put it back on and tightened up the same way I took it off.. put the magnetic disk in place as close as possible about 1mm gap then re-assembled the crank arm.
View from front, mounted the sensor on right side to avoid messing with the chainset.
View from below showing the sensor and magnetic disk in very close proximately. Note the L and R (left and right) on the magnetic disk, it has to face the correct way.
Powered up the system with the bike upside down, put it into pedal assist mode on lowest setting and gave the pedal a good turn and viola, the motor kicked in. I can't do a proper test yet as the cable from sensor is too short to reach the bag at front of bike, it's obviously intended for a rear set up. I'm not sure at this stage whether I will shift everything to the back, but either way my wiring needs tidying so I'm on the look out for some neater connectors and cable..
Happy to have got this far though without any real problems.. thanks for all the help I've received today from everyone! Before I started this it seemed quite a daunting project but it's not too difficult at all really and hasn't cost me much in the way of tools and bits.
Oh not sure if I mentioned..when I got my battery it came FedEx and I got hit with tax and import duty but it was only £5.87 plus a £10 "handling fee" to FedEx. The 36v 5A batteries cost just under £80 each as a special order.
Last edited:
Related Articles
-
 MTF Enterprises announces acquisition of EMU Electric Bikes
- Started by: Pedelecs
-
 Wisper 806T folding bike wins Which? ‘Best Buy’
- Started by: Pedelecs
-
 Sustrans calls for protected cycle lanes
- Started by: Pedelecs
-
 Amazon launch their first UK e-cargo micromobility hub
- Started by: Pedelecs
